Table of Contents
Advertisement
Quick Links
with continuous air flow
in acc. with DIN EN 14594:2018
Clemco
International GmbH
Revision: 2.1
OWNER'S MANUAL
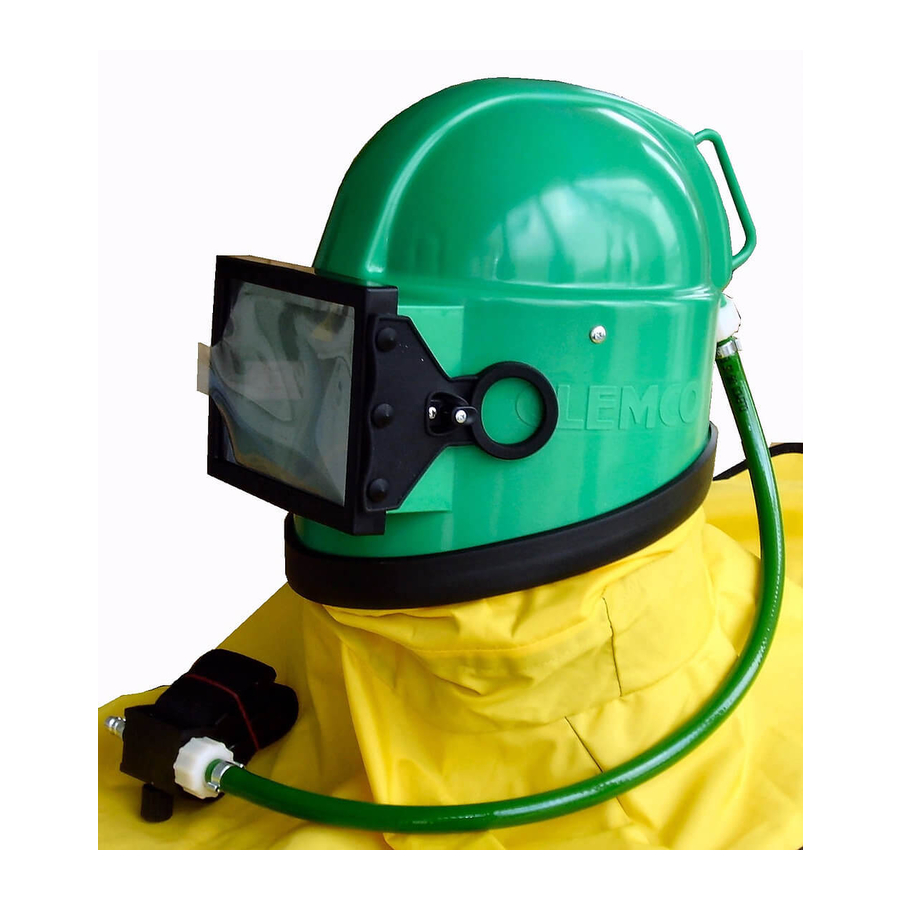
BLAST HELMET
APOLLO 100 CE
Supplied air respirator
Cat. III
Equipment class 4 B
Carl-Zeiss-Straße 21
83052 Bruckmühl
Germany
+49 (0) 8062 – 90080
Tel.:
E-mail: info@clemco.de
Web: www.clemco-international.com
Advertisement
Table of Contents

Related Manuals for Clemco APOLLO 100 CE

Summary of Contents for Clemco APOLLO 100 CE
- Page 1 OWNER’S MANUAL BLAST HELMET APOLLO 100 CE Supplied air respirator with continuous air flow Cat. III Equipment class 4 B in acc. with DIN EN 14594:2018 Clemco +49 (0) 8062 – 90080 International GmbH Carl-Zeiss-Straße 21 Tel.: 83052 Bruckmühl E-mail: info@clemco.de Germany Web: www.clemco-international.com...
-
Page 2: Table Of Contents
TABLE OF CONTENTS SCOPE OF MANUAL APPLICATION AND LIMITATIONS General description Restrictions and information in acc. with DIN EN 14594:2018 Toxic dust poisoning Ear protectors Expiry date of the PPE or certain of its components DESCRIPTION OF THE EQUIPMENT PREPARATION AIR SUPPLY Air quality Air volume, pressure and line length... - Page 3 Nylon cape Leather cape Inner collar Sweatband/helmet suspension Blast helmet Inner lens STORAGE 10.1 Daily storage 10.2 Long-term storage REPLACEMENT PARTS 11.1 Air control valve 11.2 Helmet 11.3 Additional parts...
-
Page 4: Scope Of Manual
2 Application and Limitations 2.1 General description The Apollo 100 CE blast helmet was developed especially for use in blasting operations and is approved in accordance with DIN EN 14594:2018 (and MSHA-NIOSH). 2.2 Restrictions and information in acc. with DIN EN 14594:2018 a) The helmet enables the wearer to be supplied with breathable air, which must comply with EN 12021. - Page 5 Clemco. m) It is imperative that operators follow the instructions for donning the equipment as provided by Clemco. These are contained in Sections 4 (Preparation) and 6 (Operation) of this owner's manual.
- Page 6 Line 4: right – Symbol: “See information provided by manufacturer” open book with “i” Line 5: Name of manufacturer Clemco International GmbH Line 6: Address of manufacturer Clemco International GmbH, Carl-Zeiss Str. 21, 83052 Bruckmühl Line 7: Country of manufacture Made in Germany Line 8: CE symbol and number of the notified monitoring body CE symbol and number of the...
-
Page 7: Toxic Dust Poisoning
2.3 Toxic dust poisoning The following applies for model 1 and model 2 protective clothing in accordance with DIN EN ISO 14877:2003 (D): Research has identified the potential risks of lead poisoning to unprotected operators and other personnel who may be exposed to lead-containing abrasive dust in the vicinity of abrasive blasting operations. -
Page 8: Air Supply
Three perforated cover lenses (replacement, see 8.2) The blast helmet should never be used without the inner lens, outer lens and cover lenses in place. (3) Belt Attach the air control valve to the belt. Screw the breathing air line coupling to the air inlet of the helmet. (4) Breathing air line ... -
Page 9: Air Volume, Pressure And Line Length
monoxide or an unpleasant smell. It is also possible to use systems to remove or convert carbon monoxide in order to ensure good breathing air quality. The maximum permissible carbon monoxide concentration in the breathing air is 10 ppm (parts per million). ... -
Page 10: Operation
6 Operation Prior to operation, the helmet, breathing air line, air supply line, air intake and all connections must be thoroughly inspected and cleaned of all dust and debris. The helmet suspension should also be inspected and adjusted if necessary (see 7.2 - Adjustments). The following steps must be taken before operating the helmet: ... -
Page 11: Settings
Figure 1: Air control valve The Clemco air control valve allows the operator to increase or decrease the air flow by turning the knob at the side while wearing the helmet. When the air supply is properly connected, the valve allows the breathing air to be regulated between 160 l/min and 400 l/min. -
Page 12: Maintenance / Replacing Parts
Open the velcro fastener on the cape. (1) Remove the cape. Slide the end of the cape as far as the opening. Pull out one end and slide it completely out of the cape holder (see 8.4). (2) Dismantle the helmet Push the four white plastic tabs out of the wedge-shaped holders on suspension. -
Page 13: Replacing The Inner Lens
Replacing the inner lens (1) Open the lens frame. Open the rubber latch. Remove the cover lenses and the outer lens. (2) Remove the inner lens. Pull the lens gasket and inner lens off the flange. Remove the inner lens from the lens gasket. ... -
Page 14: Replacing The Helmet Suspension
Figure 3: Replacing inner and cover lenses 8.3 Replacing the helmet suspension Follow the procedure described in 7.2 (see also Figure 2). 8.4 Outer cape Figure 4: Detaching the cape Follow this procedure if the cape is soiled or needs to be replaced. (1) Open the velcro fastener on the See Figure 4. -
Page 15: Replacing The Inner Collar
Slide the end of the cape as far as the opening. (2) Detach the cape. Pull out one end and slide the cape out of the cape holder. Open the velcro fastener. (3) Attach the cape. Starting at the opening, push one end through the cape holder and then slide the cape in. -
Page 16: Leather Cape
9.3 Leather cape The cape can be brushed or cleaned with a damp sponge. (Do not wash, dry clean, iron or use chlorine bleach.) 9.4 Inner collar For reasons of hygiene, the inner collar should be washed daily to remove sweat and dust. Detach the collar from the cape (zipper) and wash in warm water and a mild detergent. -
Page 17: Replacement Parts
11 Replacement parts Figure 5: Replacement parts Apollo 100 CE 11.1 Air control valve Item Art. no. Description 100042 CONTROL VALVE 100074 BREATHING VALVE LESS BELT 04381I FILTER SET APOLLO (foam filter, screen filter, snap ring) -
Page 18: Helmet
11.2 Helmet Item Art. no. Description 100419 APOLLO-100 WITH CONTROL VALVE, CAPE comprising: 100418 A100 CE blast helmet without accessories 90130 9 mm x 0.65 m air line with screw fittings 90331D A100 CE nylon cape 100042 control valve 100420 APOLLO-100 CE COMPL. -
Page 19: Additional Parts
100421 AIR HOSE 5 M WITH SAFETY COUPLED (SI) 100406 AIR HOSE 10 M WITH SAFETY COUPLING (SI) 100404 AIR HOSE 20 M WITH SAFETY COUPLING (SI) 100405 AIR HOSE 40 M WITH SAFETY COUPLING (SI) 11.3 Additional parts 23825D CLEMCOOL 04411I CLIMATE CONTROL CC...
Need help?
Do you have a question about the APOLLO 100 CE and is the answer not in the manual?
Questions and answers