
Subscribe to Our Youtube Channel
Related Manuals for AOC GK500


Summary of Contents for AOC GK500
-
Page 1: Table Of Contents
AOC GK500 Mechanical Gaming Keyboard USER'S GUIDE Ver.:1.00 CAUTION: To use this product properly, please read the user's guide before installing. Contents 1. PACKAGE CONTENTS/SYSTEM REQUIREMENTS 2. SPECIFICATIONS 3. DEVICE LAYOUT AND FUNCTIONAL INTRODUCTION 4. AOC G-TOOLS INSTALLATION 5. AOC G-TOOLS INTRODUCTION... -
Page 2: Package Contents/System Requirements
All key programmable ◼ All key roll-over anti-ghosting ◼ Up to 1000Hz/ms report rate ◼ Customizable RGB lighting effect syncing with other AOC gaming devices ◼ 1.8M Braided cable ◼ Approximate Size & Weight Length: 433 mm/ 190.5 in ◼... -
Page 3: Device Layout And Functional Introduction
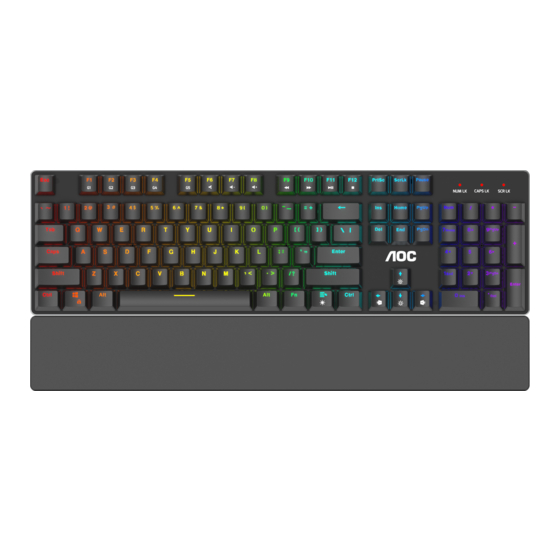
DEVICE LAYOUT AND FUNCTIONAL INTRODUCTION Device Layout Customized G Keys Multimedia Keys LED Indicator Wrist Rest Key Function (* compound key, press together with Fn key to operate) Ctrl+G Switching Key Mode Switch to All Keys Ctrl+N Switching Key Mode Switch to Standard Mute Turn off computer sound... -
Page 4: Aoc G-Tools Installation
Step 6: When the installation process is complete, please reboot your computer system. Step 7: The AOC G-Tools icon is displayed in the Windows® taskbar while it is running. Access the Configuration menu by right-clicking the AOC G-Tools icon. -
Page 5: Aoc G-Tools Introduction
AOC G-TOOLS INSTRUCTION Game Profile Management Under Game Profile Management, you may export a customized profile by clicking the Export button or import a profile from your computer by clicking the Import button The default profile names are Profile 1 to Profile 5. You may rename your profiles by typing in the text field below Profile Name. - Page 6 Macro Manager ➔ When you choose this option from the menu, the Macro Manager window will pop-up. Please refer to the Macro Manager section for more information Multimedia ➔ Open player: Start media player. Pre Track: Toggle to the previous media track. Next Track: Toggle to the next media track.
- Page 7 Text Editor ➔ Nine text commands are available: Cut, Copy, Paste, Undo, Select All, Find, New, Safe, and Open. Left Click ➔ Perform a left-click. Right Click ➔ Perform a right-click and quick function menu. Middle Click ➔ Activate the universal scrolling function. Browser Backward ➔...
- Page 8 1. Create a Macro (1) Click the button and name the macro you are about to record. Confirm the name by pressing the Enter key on your keyboard. (2) Set the delay time between events: -Recording: The delay between events are registered as they are recorded. -Fixed: Use a predefined time (shown in millisecond) for the delay.
- Page 9 5. Insert Macro Item Click the button to insert another macro into an existing macro. Choose to record this new macro before or after the existing one; then click the Start button to start the recording. When done, click the Stop button to complete the session and then click the Save button to keep the recording.
- Page 10 Sensitivity ◼ Polling Rate Choose from four polling rate: 125Hz/8ms, 250Hz/4ms, 500Hz/2ms, 1000Hz/1ms(default). ◼ Repeat Delay Drag the slider bar knob left or right to set the Repeat Delay; four options are available from Long to Short. ◼ Repeat Rate Drag the slider bar knob left or right to adjust the Repeat Rate, set the speed to any point of the slider.
- Page 11 Light FX ◼ Light FX Choose from the Light FX drop-down menu for your favorite light setting. Options are: Static, Breathing, React, Flashing, Ripple, Radar, Fireworks, Blink, Wave, Custom setup, Concentric Circle, W Wave. Related setting options like Direction and Stop Time will be displayed when applicable to the selected Light FX.
- Page 12 The lighting effect of the device can be synchronized with other AOC gaming devices that support the AOC Light FX Sync. To sync the devices, select the icons of the devices of your choice and click the Apply button. The synchronized devices are hightlighted in red.
- Page 13 Online Update When there are new updates available, a notice balloon will show on the upper right corner along with the tool icon. Click on the notice balloon, the Online Update pop-up window will show the update options. Select the updates to download and install. Click the Update button to complete the update process.
-
Page 14: Safety Guide And Maintenance
. 6. If the troubleshooting process does not resolve the issue, unplug the device and visit www.aoc.com for support. Do not attempt to repair the device yourself. Safety Federal Communication Commission Interference Statement This device complies with Part 15 of the FCC Rules.
Need help?
Do you have a question about the GK500 and is the answer not in the manual?
Questions and answers