Table of Contents
Advertisement
Quick Links
Advertisement
Table of Contents

Subscribe to Our Youtube Channel
Related Manuals for Limbs & Things 60000


Summary of Contents for Limbs & Things 60000
- Page 1 U S E R G U I D E ABDOMINAL EXAMINATION TRAINER This product is available in light and dark skin tones 60000 60054 FOR MORE SKILLS TRAINING PRODUCTS VISIT limbsandthings.com Sussex Street, St Philips, Bristol, BS2 0RA, UK | sales@limbsandthings.com | +44 (0) 117 311 0500...
-
Page 2: Table Of Contents
IN D E X PACKAGE SUPPLIED S A F E T Y & C LE AN I N G IN STR U C TION S TEST CERTIFICATIONS SET UP • ADDING/REMOVING ABDOMINAL SKIN • PLACING ORGANS & PATHOLOGIES • INSTALLING/CHANGING BATTERIES •... -
Page 3: Package Supplied
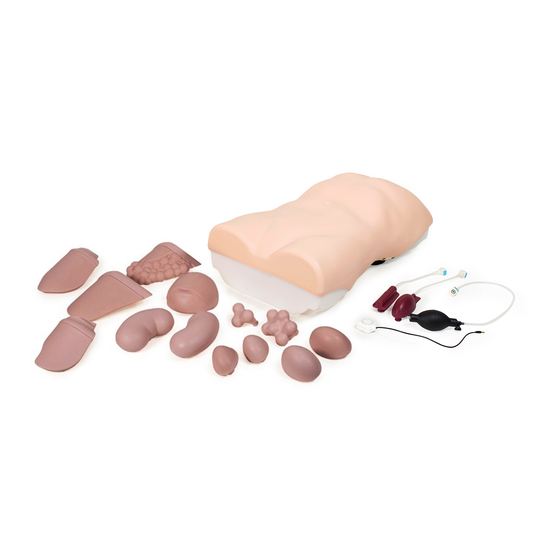
PACK AG E SUP P L I ED Abdominal Examination Base Abdominal Abdominal Examination Unit Skin Rectus Bag Organ Locator 60005 60006 60057 60007 60008 Abdominal Abdominal Examination Abdominal Examination Abdominal Examination Wall Livers (Set of 3) Spleens (Set of 2) Kidneys (x2) 60009 60010... -
Page 4: Saf Et Y & Cle A Ni Ng In Str U Ct I O N S
SAF ET Y & RE AD T HE SA F E TY IN S T RU C T ION S C AR EF UL LY BE F ORE CLE A NI NG U SI N G YO U R A B DO MI N AL E XAM INATIO N TR AIN ER IN STR U CT I O N S DO’s DON’Ts... - Page 5 SAF E TY & RE AD T H E S A F E TY IN S TR UC T ION S C AR EF UL LY BE F ORE C LE A NI NG U SI N G YO U R A B DO MIN AL EXAMI NATION TR AIN ER I N S TR UCT I O NS STORAGE &...
-
Page 8: Set Up
S E T U P A DD IN G / R E MOV IN G A B DOMIN AL SK I N Tilt the model on to its side to reveal the velcro straps Please ensure to pull the velcro straps and NOT the skin PLA CIN G O R G AN S &... - Page 9 S E T U P P LA C I NG O RG A N S & PATH OLOGI ES L iv e r & S pl e e n Select a LIVER from the Set of 3 Knob located on the top RIGHT of the model Select a SPLEEN from the Set of 2...
- Page 10 S E T U P P LAC I N G O RG A N S & PATHO LO GIE S K i d n e y & B l a dd e r Remove the KIDNEY LOCATOR (1 on each side of the model) Select the BLADDER and fit the 2 pegs on its back to the holes indicated below...
- Page 11 S E T U P P LA C I NG O RG A N S & PATH OLOGI ES Pa tho l o gi e s & Ao r t a s Various PATHOLOGIES/MASSES can be placed in different areas of the Organ Locator Hard &...
-
Page 12: Installing/Changing Batteries
S E T U P I N S TA LLI N G/ C H A N G I N G B AT T ER IE S When the batteries are low, the red light will light up [MEDIA ERROR] - If this message displays, it means ‘change the batteries’... -
Page 13: Using Mains Power
S E T U P U S I NG MA I NS P OW E R The model is also provided with a mains power lead Use only the XP Power ACM06 mains adaptor The unit can be used in tropical countries and up to 5000m altitude with the provided with the product, the use of a different XP Power ACM06 mains adaptor... - Page 14 S E T U P S P E AK E R & MP 3 P L AY E R Rotate the VOLUME control to turn volume up and down Press POWER button (hold for 2 seconds) and the display will light up Press MODE button and ensure it is set to Normal...
-
Page 15: Inserting The Abdominal Wall
S E T U P I NS E R T I NG T HE A B DOM IN AL WAL L Once the model has been set up with the relevant organs, the ABDOMINAL WALL needs to be inserted Ensure abdomen foam fits underneath liver/spleen AT TACH I NG T H E R E C T U S B AG Once the Abdominal Wall is in place,... -
Page 16: Ascites Set Up
S E T U P A SC I T E S S E T UP For ASCITES SET UP ensure that the Organ Locator is displayed as a starting point Ensure all organs are removed prior to insertion of distention foam Place the DISTENSION FOAM on top of the Organ Locator Use distension foam - not to be confused with... -
Page 17: Gaseous Distension
S E T U P G A S E O U S DI S T E N S ION For GASEOUS DISTENTION SET UP ensure that the Organ Locator is displayed as a starting point Ensure all organs are removed prior to insertion of distention foam For GASEOUS DISTENTION SET UP ensure that the Organ Locator is displayed... - Page 18 S E T U P G AS E O U S DI S TE N S IO N Attach the blue connector from the PUMP Once connected inflate the Gaseous Distension Bag with the pump. 6-8 PUMPS (in and out as 1 pump) Disconnect the pump from the model after inflating or the Gaseous Distension Bag will deflate itself...
-
Page 19: Using The Breathing Mechanism
S E T U P G A S E O U S DI S T E N S ION EMPTYING THE GASEOUS DISTENSION BAG USI NG T H E B R EAT H I N G ME C HA N IS M When the lever is rotated to a downward When the lever is pointed upwards, position, the model simulates the patient... -
Page 20: E X Amp Le S O F S Et U P F Or S C En Ar Ios
E XAM P L E S OF SE T U P FO R SCE N AR I O S ACUTE URINARY RETENTION - BLADDER SLIGHTLY ENLARGED LIVER OVARIAN CYST - SMOOTH SOFT MASS ENLARGED KIDNEY CARCINOMA ON MASS IN LEFT ILIAC FOSSA CARCINOMA WITH LIVER METASTASIS LYMPHOMA AORTIC ANEURYSM...
Need help?
Do you have a question about the 60000 and is the answer not in the manual?
Questions and answers