Advertisement
Quick Links
Wayfarer 150: D rivers Handbook
Welcome to our Addon London update. One key feature of this update is our fully-simulated
Wayfarer 150 ETM. In this handbook you can find instructions on how to Sign On, Sign Off,
and more.
This manual outlines every feature of our Wayfarer 150 rendition. It also goes into complete
depth on how to use the machine as intended. This manual is lengthy, so if you don't want to
read it all, please see
t he Studio Polygon Y ouTube
to correctly use the machine.
With that said, if you are an advanced user or you know what you are doing and want to get
started as quickly as possible, the D river Number i s 5 431134 a nd the P IN i s 2 361 .
Throughout the manual, you may see "enter any digits 1-3", these are things Addon London
doesn't simulate, however, if you have a real life running board, you can find all the info on
there and use those numbers instead.
If you just want a quick brief, see the next page.
p age
for short videos showing you how
Advertisement

Summary of Contents for WAYFARER 150 ETM
- Page 1 Wayfarer 150: D rivers Handbook Welcome to our Addon London update. One key feature of this update is our fully-simulated Wayfarer 150 ETM. In this handbook you can find instructions on how to Sign On, Sign Off, and more.
- Page 2 Wayfarer 150: Quick Start Log On Summary: Turn on the Battery and wait 10 seconds for the ETM to boot. Press Enter to begin sign on, the D river Number i s 5 431134 a nd the P IN i s 2 361 .
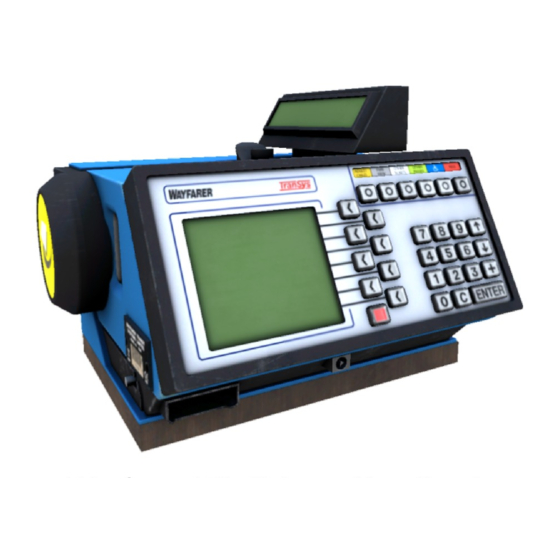
- Page 3 Turning on the Wayfarer: To turn on the Wayfarer 150, all you need to do is turn on the Battery Master Switch, or E on your keyboard 1 time, and then the Wayfarer will boot, this usually takes around 10 seconds to initialise.
- Page 4 Once you’ve pressed E NTER , the ETM will proceed onto the login screen. From here, you need to input your Driver Number, PIN, and Garage ID. First off, input your Driver Number with the number pad. This is 5 431134 , as annotated as 1 in the image, and then press “...
- Page 5 Once you’ve proceeded, enter your Garage ID. This can be any number you desire, from 1 digit to 3. Then press “ E NTER ” . Next, the ETM will proceed onto the Sign On Summary, which is where you input your route parameters.
- Page 6 Now the ETM will move onto O perator Number and then D uty . For O perator Number , you can enter any 1-3 digits and then press “ E NTER ” , and the same for D uty , any 1-3 digits you desire, then press enter.
- Page 7 Once you have completed this screen, the machine will now boot into the home screen, ready to issue tickets and accept Oyster cards. On your MDT, the ETM icon will also disappear as it has sent the required data to the MDT and both systems are ready to go*. The screen will display this message: for 5 seconds, and then boot into the Home Screen as shown here:...
- Page 8 As you can see, the Home Screen is now visible. For Addon London, and any other map that has a ticket name as “”, the machine will display an error saying “Cash Fare not available” (annotated 1 ) with a different audible beep. This is true-to-life and will disappear after 2 seconds, alternatively you can press ...
-
Page 9: Card Details
Additionally, you can now enter the C ard Functions Menu ( C ard ) by pressing the O uter Bottom Right b utton, as annotated. You can also press C to exit out of this menu and subsequent submenus. - Page 10 Stop Oyster Card: This submenu is for Inspectors, they can type in their several digit PIN and null and void the last Oyster Card scanned into the ETM. You can try and guess the PIN, but you being a driver, not an inspector, this part isn’t simulated. Cancel Card Operation: The last ticket scanned can be cancelled and refunded if you click it.
- Page 11 From here, the ETM will sign on again with the new details given. You’d do this at the end of a route each time. Driver Sign Off: Next is Driver Sign Off. If you press this button, a popup will appear confirming if you want to sign off or not.
-
Page 12: Driver Settings
Driver Settings: This menu is quite a unique feature. You can dim/brighten the display by changing the backlight and contrast settings. Just click the correlating buttons. Bright with High Contrast: Dim with Low Contrast: For those worried about memory usage when doing this, there’s no need. Whilst they are texture changes, they’re compressed DXT1 images and are very low in memory, and OMSI will dump them almost instantaneously out of memory. - Page 13 To exit these menus and submenus, you can press C to back out in all screens. Now you’ve learned how to operate the Wayfarer 150 ETM. H ave fun ! Credits: NanaSinfo o n Y ouTube f or reference material used: https://www.youtube.com/watch?v=CVaHp_ZgGl8&t...
Need help?
Do you have a question about the 150 ETM and is the answer not in the manual?
Questions and answers