Table of Contents
Advertisement
Quick Links
Advertisement
Table of Contents

Related Manuals for HARDKERNEL ODROID-C1

Summary of Contents for HARDKERNEL ODROID-C1
- Page 1 USER MANUAL ODROID-C1 rev. 20150929...
-
Page 2: Table Of Contents
Index ODROID-C1 Beginner’s Guide Chapter 1 • Welcome ..................1 Differences between a typical PC and a Single Board Computer (SBC) ..2 Components Included on an SBC ..............2 Block Diagram ....................3 Board Image ....................3 Attaching Peripherals ..................3 Power Supply ....................5 Monitor......................6 Keyboard and Mouse ..................6... - Page 3 Index ODROID-C1 Beginner’s Guide Chapter 3 • Operating Systems ..............34 Ubuntu/Debian....................34 Linux Basics ....................35 Kernel ......................36 GUI .........................36 720p vs 1080p ....................36 Progressive vs Interlaced Video ..............37 Video Downconversion ...................37 Video Upconversion ..................38 HDMI Overscan ....................38 Disabling Monitor Overscan ................39 Display Setting Button on Remote Control .............39...
- Page 4 Index ODROID-C1 Beginner’s Guide Tinkering Kit ....................58 ODUINO ONE ....................61 ODROID-SHOW2 ...................63 16x2 LCD I/O Shield ..................65 Weather Board ....................66 3.2inch TFT+Touchscreen Shield ..............68 USB-DC Plug Cable 2.5x0.8mm ..............71 USB-SPDIF ....................71 USB-CAM 720P ....................74 UPS2 ......................76 USB GPS Module ...................76 Conclusion ......................79...
- Page 5 © 2015 Hard Kernel, Ltd. • 704 Anyang K-Center, Gwanyang, Dongan, Anyang, Gyeonggi, South Korea, 431-815 Hardkernel manufactures the ODROID family of quad-core development boards and the world’s first ARM big.LITTLE single board computer. Read our monthly magazine at http://magazine.odroid.com.
-
Page 6: Chapter 1 • Welcome
ODROID-C1 are Ubuntu, Android, Fedora, ARCHLinux, Debian, and OpenELEC, with thousands of free open-source software packages available. The ODROID-C1 is an ARM device, which is the most wide- ly used architecture for mobile devices and embedded 32-bit comput- ing. The ARM processor’s small size, reduced complexity and low power consumption makes it very suitable for miniaturized devices such as wearables and embedded controllers. -
Page 7: Differences Between A Typical Pc And A Single Board Computer (Sbc)
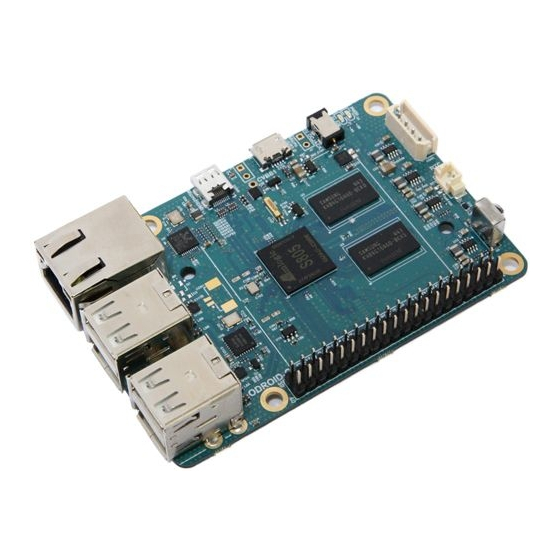
C1 also includes a 40-pin GPIO port, an external RTC battery connector, a USB-UART serial console port, an eMMC module connector, and a dedicated slot for a microSD card. For more details, refer to the ODROID-C1 introductory video at http:// youtu.be/DvJSCzIGr1E. ODROID C1 USER MANUAL... -
Page 8: Block Diagram
Chapter 1 Block Diagram The following diagram illustrates conceptually how the compo- nents of the C1 fit together: C1 Block Diagram and Annoted Board Image Attaching Peripherals The C1 supports the services of numerous peripherals. The image below depicts the following peripherals: Power Supply Unit (PSU) cable, USB / UART debug cable, RTC battery cable, Infra Red (IR) receiver, USB WiFi dongle, HDMI cable, USB / Wireless keyboard / mouse dongle, USB Touch cable, Ethernet cable, and the audio headphone cable attached to... - Page 9 Chapter 1 ODROID-C1 peripherals The image below shows the use of an ODROID-VU HDMI touch- screen monitor supporting stereo audio, and 10-point touch control. ODROID-VU HDMI Monitor This image depicts the use of the Tinkering kit designed for C1 useful to experiment with circuit design and related software monitor- ing and control, which is detailed in Chapter 4.
-
Page 10: Power Supply
PSU into the power outlet. The pins are of Asian standard, and you may need an adapter to use in your region - such as the Americas. The PSU pictured above is available from Hardkernel. USB DC plug cable Attach the USB end of this cable to the USB port of a charging device that can generate 2A @5V, and attach the plug to the C1. -
Page 11: Monitor
There are some reported issues with cables that lack HDMI grounding wires inside the cable, so it is best to order this cable directly from Hardkernel or one of its certi- fied distributors. Keyboard and Mouse Nearly all USB HID-compliant keyboard and mouse will work when connected to one of the four USB ports. -
Page 12: Ethernet And Wifi
Chapter 1 the following command in a Terminal window: $ sudo hcitool scan Push the Connect button on the bluetooth device and it will ap- pear in the console: Scanning ... XX:XX:XX:XX:XX:XX Rapoo E6700 $ sudo bluez-simple-agent hci0 XX:XX:XX:XX:XX:XX Push the Connect button again, and enter the shown pin on the keyboard, followed by the Enter key. -
Page 13: Led Status
Chapter 1 C1 closeup with eMMC module attached LED status The ODROID-C1 includes several LED lights that indicate the status of the device: • Is on when power is available blue • Is on (solid light) when the bootloader is running blue •... - Page 14 There are some microSD cards which cause an additional boot delay time of around 30 seconds. According to our testing, most Sandisk microSD cards don’t cause a long boot delay. The ODROID-C1+ mod- el is compatible with a wider array of microSD cards than the original...
- Page 15 You can use the standard microUSB connector with Linux gad- get drivers on your host PC, which means that the resources in the ODROID-C1 can be shared with other PCs. You can also add a mi- croUSB to HOST connector if you need an additional USB host port.
-
Page 16: Heatsink
Some owners prefer that the temperatures do not reach such high temperatures and install a heatsink, which is available from the Hardkernel store. Heat transfer from components to the surrounding air is related to the surface area available to transfer heat to the sur- rounding air. - Page 17 Chapter 1 to dissipate heat (approximately 1cm x 1cm). The heatsink is much larger and is therefore able to dissipate more heat into the surrounding air than the processor itself. Heatsink Installation Check that you have both parts of the heatsink. You should have a silver heatsink and a rectangular grey, gummy piece (the ther- mal pad).
- Page 18 Chapter 1 Heatsink thermal pad applied Removing heatsink adhesive protection Heatsink applied to ODROID-C1 The heatsink’s purpose is to transfer heat from the processor and memory modules. Therefore it is normal for the heatsink to feel warm when the C1 is operating. A warm heatsink is actually a sign that the installation was done correctly and heat is being transferred from the modules to the heatsink.
-
Page 19: Temperature Measurement
It is assumed that your unit has been through the initial setup procedure and is running the Ubuntu image from Hardkernel. • Open two terminal windows, where one window will be used to run the application used to test the processor. - Page 20 You may boot from either microSD card or eMMC module. Can I buy OS pre-loaded SD card or eMMC? Yes, they are available from Hardkernel as well as other distributors. Can I add extra RAM memory? No. The RAM is not removable or swappable.
- Page 21 Use a 10/100/1000 LAN Ethernet connection, or purchase the WiFi module kit for a wireless connection. What display can I use? There is an HDMI Type-D output port on the ODROID-C1, and an HDMI Type-A on the C1+. Below is a list of resolutions that are cur- rently supported:...
- Page 22 Is there an I2S port to connect a HiFi DAC? No, but an ODROID Hi-Fi Shield may be used with the ODROID-C1+. What is an eMMC module? The eMMC module is a NAND flash-based storage IC which is mount- ed on a custom PCB for easier upgrade/replacement, and is much fast- er than SD card.
- Page 23 Chapter 1 Which power adapter should I use? The ODROID-C1 consumes less than 0.5A in most cases, but it can climb to 2A if many passive USB peripherals are attached directly to the main board. It is recommended to use the Hardkernel 5V/2A PSU or USB-to-DC Plug cable with a 5V/2A charger.
-
Page 24: Chapter 2 • Getting Started
Getting Started iven the introduction to the C1 Single Board Computer (SBC) development board and the fact that you have all of the necessary peripherals, you must be excited to get started with your C1 now. To be able to use the com- puter on the Internet, we first need an idea of how the C1 will fit into a home computing network. -
Page 25: Preparing The Work Area
Chapter 2 Typical home computing network After preparing the boot media, it is theoretically possible to use a C1 in a network disconnected from the Internet. However, many use cases require an always-ON functioning secure connection to the Internet. In either case, it is presumed you have a fully functioning in- tranet (i.e., the internal network within the home). -
Page 26: Flashing An Image
If you refer to the annotated board image, you can see that the C1 supports two boot media types - microSD card or an eMMC mod- ule. They can be obtained from Hardkernel directly, either with Linux or Android, pre-installed. If you purchased one such device and if it has a factory-installed image, you can skip the flashing steps in this section and proceed to the next section. - Page 27 Chapter 2 Development boards such as the C1, by definition, will at some point either require an OS upgrade or a simple reflash to revert to a known good base state. The following section describes flashing the media. USB microSD card adapter No matter which boot media you select for your C1, you will need an additional device to perform the flashing process, which is called a USB SD card reader / writer.
- Page 28 However, you can still use any brand or speed of memory card as storage. Sandisk Class 10 or UHS-1 cards are working well with ODROID-C1, and below is a list of the memory cards that have been tested: Fully compatible microSD cards •...
-
Page 29: Windows 7
• PNY Turbo Performance Class 10 Class 2/4/6 microSD cards have not been tested with the ODROID-C1, therefore it is likely that the ODROID-C1 will not boot properly with them. We strongly recommend to use Class 10/UHS-I microSD cards, and a SanDisk microSD for fully compatibility. - Page 30 After the uncompress process, it will result in the image file that can be flashed. In this example, it will be ubuntu-14.04.1lts-lubun- tu-odroid-c1-20150204.img. Another essential utility is one that will be used to flash the un- compressed image file, such as the Win32DiskImager utility. Hard- kernel has an updated version of it that adds a useful step to the flash process, which clears the boot media prior to writing the image.
- Page 31 Chapter 2 Uncompress the compressed image file using the 7-zip appli- cation, which generates the directory win32diskimager2-binary that includes the Win32DiskImager2.exe application. Move the entire di- rectory to C:\Program Files (x86): C:\Program Files (x86)\win32diskimager2-binary\ You will need to be logged in to Windows OS as an administrator to move this directory.
-
Page 32: Linux
The screenshot below shows the web- page that lists the Android images. List of Android images for the ODROID-C1 Once the compressed file has been downloaded, uncompress it and flash it, using the steps listed earlier in this section. - Page 33 Chapter 2 This will result in an uncompressed image file called ubuntu- 14.04.3lts-lubuntu-odroid-c1-20151020.img. Attach the USB SD card reader / writer with the boot media into an appropriate USB port. After a few moments, check for an entry that corresponds to the SD card or...
-
Page 34: Osx
Chapter 2 Flashing an Image on an OSX Computer The procedure for creating an image file using OSX is similar to Linux, with some small differences. First, download and install the xzutils package from http://tukaani.org/xz/, making sure to select the OSX binaries, and use it to uncompress the image: $ xz -d selfinstall-odroidc-eng-s805_4.4.2_dev_master-195-v1.2.img.xz Other differences are that the block size (bs) parameter for the... - Page 35 (see Chapter 1 for details). Some HDMI cables have compatibility issues, so make sure to use an official Hardkernel HDMI cable. Some monitors have non-stan- dard EDID functions. In this case, you need to select the non-EDID mode in the ODROID configuration utility.
-
Page 36: Configuring Linux
Chapter 2 Acquisition, setup and troubleshooting Configuring Linux After booting the ODROID to a Linux desktop, run the included ODROID Utility, which is linked on the desktop, and expand the file system to have full use of the microSD card or eMMC module. Then, run the ODROID-Utility again to update the system and reboot. -
Page 37: Configuring Android
Chapter 2 After the system has been updated, select the desired HDMI resolution by running the ODROID Utility again: • 1920x1200 (WUXGA) • 1920x1080 (1080p) • 1280x720 (720p) • 720x480 (480p) • 720x576 (576p) • 1280x800 (800p for ODROID-VU) • 1280x1024 (SXGA) •... -
Page 38: Powering Down
$ sudo shutdown -h now Wait until the blue LED goes out, which indicates that all system ac- tivity has completed. It is now safe to unplug the ODROID-C1 power supply, remove the boot media, and detach the peripherals. ODROID C1 USER MANUAL... -
Page 39: Chapter 3 • Operating Systems
Booting Up Ubuntu can be ordered as a pre-installation on the eMMC or mi- croSD card that comes with the ODROID-C1. Please refer to Chapter 2 for instructions on downloading and flashing Ubuntu onto your C1’s boot media. Once the C1 has been powered on, it will boot to a desk- top similar to the one shown in the following image. -
Page 40: Linux Basics
Chapter 3 Linux Basics Ubuntu and Debian, along with most Linux distributions, have a home folder structure where documents, files and media may be stored for each user of the system. For example, downloaded files from the Internet are automatically saved to the Downloads folder, and the other folders may be used to organize various public and private files such as pictures, video, and word processing documents. -
Page 41: Kernel
Applications menu and Software Center for downloading new applications, as shown in the above image. If the ODROID-C1 is being used as part of robotics project, a lightweight environment such as Blackbox may be more suitable, in order to free up the amount of memory available for the main controller application. -
Page 42: Progressive Vs Interlaced Video
Chapter 3 which are video resolutions commonly supported on LCD TV’s and on many LCD computer monitors. 720p is sometimes referred to as HD, and 1080p as Full HD. The following comparison table lists the native display resolutions along with some sources that use these resolu- tions. -
Page 43: Video Upconversion
Chapter 3 For example, if you use a display that only supports native 720p, and you set your C1 to a 1080p screen resolution, it will probably work, but is not the ideal configuration. The mismatch in resolutions indi- cates that your display is automatically performing a downconversion of the incoming signal. -
Page 44: Disabling Monitor Overscan
Chapter 3 viewer, this results in a cleaner picture, and the overscan simply isn’t noticed. For a computer display however, this can be an issue. For this reason, computer LCD monitors usually do not provide overscan, and if they do have this feature, it is disabled by default. Disabling Monitor Overscan Prior to attempting to fix overscan using the methods detailed below, first verify that the monitor resolution setting and the C1 screen... -
Page 45: Command Line Interface
Chapter 3 On some monitor models, one of the HDMI inputs is intended to work with a PC and will disable overscan for that input (often HDMI 2). You can also look at the monitor’s HDMI connectors for a label such as PC Input, or read the monitor users manual to find the correct input to use if applicable. -
Page 46: Web Browsing
Kodi (formerly XBMC) Kodi is an application which can turn an ODROID-C1 into an amazingly powerful home media center. In fact, using the C1 to run Kodi is the reason why many, if not most people purchased their C1 in the first place. -
Page 47: Office And Productivity Applications
Chapter 3 ation to “software” by selecting the System menu, the pressing Set- tings >Video >Acceleration >Decoding Method >Software. Kodi Upgrade If you are installing a newer version of Kodi, you do not need to uninstall the current version first. However you should create a Kodi backup just to be safe, which is covered later in this section. -
Page 48: Music And Midi
Chapter 3 Music and MIDI Not long after the first personal computers became available, cre- ative individuals began to find inventive ways to use them for music composition and performance. Before long, the need for I/O standard- ization became clear, and in 1983 the MIDI specification was developed. MIDI (Musical Instrument Digital Interface) gained rapid industry ac- ceptance, and within a few years, a MIDI Interface was found on vir- tually every sound card and on most PCs with sound chips on the... -
Page 49: Experimental Music With The C1
Android is an easy-to-use, yet powerful operating system, in- tended for smartphones, tablets and other portable devices It also runs very well on the ODROID-C1, not only as an inexpensive testing platform for building Android applications, but also as a set-top box... -
Page 50: Odroid Utility And Updater
Chapter 3 settings. To open the applications menu, click on the circle with the six dots, which displays an alphabetical list of all installed apps. The Recent menu shows the recently opened applications. Power Options allows you to reboot, shutdown the device and put it in airplane mode, which disables all wireless functions, including Bluetooth. -
Page 51: Kodi
30 seconds, depending on the speed of your Inter- net connection. Gaming Most Android games are compatible with the ODROID-C1, but some applications that use multitouch gestures won’t be playable with- out a touchscreen. The ODROID-VU, available from the Hardkernel Store, will allow all Android games to be played without the need for an auxiliary controller. -
Page 52: Using Bluetooth Devices With Android
The ODROID-VU is a 10-point multitouch display that is capable of both 720p and 1080p resolutions. To use the ODROID-VU with An- droid, connect the USB cable from the VU to the ODROID-C1’s USB port, then use a microHDMI to HDMI cable to connect the display. -
Page 53: Chapter 4 • Hardware Tinkering
Hardware Tinkering ow that you have been introduced to the C1 and have become aware of booting it up with a image, it is time to get acquainted with one its main purposes – to be able to interact with the ex- ternal world through the age-old activity of tinkering. - Page 54 Chapter 4 C1 either via a serial connection or SSH. Prior to setting up the kit, power off the C1. Attach one end of the USB / UART module to the C1. Attach the other (micro USB) end of the USB / UART module to the USB cable. Attach the free end of the cable to an available USB port of the host PC system, then power on the C1.
- Page 55 Chapter 4 Enter configuration information as shown below. Then select the Session option on the left pane. You will see a popup window as indicated in the following image. Serial line: COM8 Speed: 115200 Connection Type: Serial Saved serial configuration in PuTTY Give this configuration a name such as c1-1-usb-serial, then save it.
- Page 56 Chapter 4 Host name: 192.168.7.133 Port: 22 Connection type: SSH Saved SSH configuration in PuTTY Enter the C1’s IP address or hostname (if it can be resolved from the host PC system) and a numerical value of 22 for the Port num- ber.
- Page 57 Chapter 4 do not address the use of Linux hosted in a virtual environment, such as VirtualBox. Linux Host Setup Access the Linux desktop of the host system and launch a termi- nal session. Attach the USB cable from the USB / UART setup to the host system.
- Page 58 Chapter 4 host system and USB / UART cable attached to the C1. The applica- tion used to enable communication will be minicom: $ minicom -version minicom version 2.6.1 (compiled May 1 2012) Copyright (C) Miquel van Smoorenburg. Launch minicom, using the following command: $ sudo minicom -o -s Here are the four screens you would go through to configure and use minicom:...
-
Page 59: Bluetooth Module 2
(terminal) session. Bluetooth Module 2 Hardkernel offers a bluetooth adapter called the Bluetooth (4.0) Module 2 which is certified to work with the C1 under both Android and Linux. However, quite a few of the plug-and-play adapters that are compatible with Microsoft Windows 7+ can also be expected to work with the C1 using Linux, such as the Asus BT400 Bluetooth adapter. - Page 60 Chapter 4 0.871245@0] Bluetooth: L2CAP socket layer initialized 0.876447@0] Bluetooth: SCO socket layer initialized 1.429422@2] Bluetooth: HCI UART driver ver 2.2 1.433876@2] Bluetooth: HCI H4 protocol initialized 1.438828@2] Bluetooth: HCI BCSP protocol initialized 1.443919@2] Bluetooth: HCILL protocol initialized 1.448782@2] Bluetooth: HCIATH3K protocol initialized 1.453877@2] Bluetooth: HCI Three-wire UART (H5) protocol ini- tialized 3.236424@2] Bluetooth: btwake_control_init Driver Ver 1.1...
- Page 61 Chapter 4 Hard blocked: no To configure the adapter from the Lubuntu desktop, launch the Bluetooth Manager configuration utility, then select the Preferences menu item to configure the application, as shown in the screenshots. Update the friendly-name of the Bluetooth adapter using a name like say, c1-1-0.
- Page 62 Chapter 4 Complete local name: ‘c1-1-0’ TX power level: 0 Complete service classes: 0x112d 0x1112 0x111f 0x111e 0x110c 0x110e 0x1105 > HCI Event: Command Complete (0x0e) plen 4 Write Extended Inquiry Response (0x03|0x0052) ncmd 1 status 0x00 < HCI Command: Write Extended Inquiry Response (0x03|0x0052) plen fec 0x00 Complete local name: ‘c1-1-0’...
-
Page 63: Tinkering Kit
While the power-efficient C1 is a very capable system for soft- ware development, it is also highly suited for prototyping hardware development. Towards that end, Hardkernel has developed the C1 Tinkering kit with numerous items to get you started, as shown in the following image. - Page 64 Chapter 4 GPIO layout for the 40-pin header on the ODROID-C1 The T-breakout board breaks-out all the pins from the 40-pin header onto a solderless breadboard. The pins include, power, GPIO, I2C, and ADC pins. This simplifies prototyping of data acquisition and control projects.
- Page 65 Chapter 4 40-pin layout with GPIO mappings for the Wiring Pi library The above image illustrates simplified information on layout and the designation of the 40 pins. Use the data sheet and this information with caution when applying voltages to the pins, to ensure compliance and prevent possible device damage.
-
Page 66: Oduino One
Chapter 4 $ cd ~ $ git clone https://github.com/hardkernel/WiringPi $ cd WiringPi $ ./build Then, download the C-language sample source code exam- ple-led.c from the previously mentioned Wiki, to a working directory such as tkit-example, then build and run it using the following com- mands: $ cd ~ &&... - Page 67 The activity on the ONE package also gets transmitted to the ODROID-C1. Hardkernel has provided C sample source code to dis- play this information. You will need to install some pre-requisite soft- ware components first: $ sudo apt-get install qt4-default qt4-designer libqwt-dev...
-
Page 68: Odroid-Show2
Hardkernel offers an Arduino compatible 2.2” 240×320 TFT-LCD display, called ODROID-SHOW2, that can be used with the C1, a PC or other Hardkernel boards. The LCD display can be used to display simple messages and hardware status, and the user switches mount- ed at the bottom of the board allow simple user interaction and input. - Page 69 /dev/ttyUSB0 ODROID-SHOW example project output Obtain the SHOW sample source code and build a sample using the commands: $ cd ~ $ git clone https://github.com/hardkernel/ODROID-SHOW $ cd ODROID-SHOW/example/Linux $ gcc -o status status.c $ sudo ./status ODROID C1 USER MANUAL...
-
Page 70: 16X2 Lcd I/O Shield
• It must NOT be installed during normal usage mode. 16x2 LCD I/O Shield Hardkernel offers an I/O shield with a, 16 chars by 2 lines, white on blue, LCD display, tactile switches and I/O pins. Its use requires the WiringPi library, whose installation was discussed earlier. After in- stalling the shield on the C1, the sample source can be obtained from http://bit.ly/1fbtFlE... -
Page 71: Weather Board
16x2 LCD – I/O shield showing some CPU data Weather Board The Weather-board shown below is an add-on developed by Hardkernel, to be used with either the SHOW or 16x2 LCD device. Below are the steps needed to get it to work with the C1 and ODROID- SHOW. - Page 72 Chapter 4 Install the Device Tree Compiler (DTC) using the command: $ sudo apt-get install device-tree-compiler Then, enable the sensors on the device tree using the commands: $ sudo fdtput -c /media/boot/meson8b_odroidc.dtb /i2c@c1108500/ bmp085@77 $ sudo fdtput -c /media/boot/meson8b_odroidc.dtb /i2c@c1108500/ si702x@40 $ sudo fdtput -c /media/boot/meson8b_odroidc.dtb /i2c@c1108500/ si1132@60...
-
Page 73: 3.2Inch Tft+Touchscreen Shield
Considering the size and form-factor of the C1, which is ideal for portable applications, it is only natural to expect the support for a small touchscreen. Hardkernel offers one such 3.2” 320x240 pixel TFT LCD screen with a resistive touch display, as shown here:... - Page 74 Chapter 4 gpios=reset:116,dc:115 speed=32000000 cs=0 You can achieve the same, by updating the /etc/modules file to include the following configuration, which should be placed on two lines: spicc fbtft_device name=odroidc_tft32 rotate=270 gpios=reset:116,dc:115 speed=32000000 cs=0 To run X windows while using the display, update the X11 related configuration: $ cd /usr/share/X11/xorg.conf.d/ $ sudo touch 99-odroidc-tftlcd.conf...
- Page 75 Chapter 4 needs to be calibrated. To do so, run the following command (one line): $ sudo TSLIB_FBDEVICE=/dev/fb2 \ TSLIB_TSDEVICE=/dev/input/touchscreen ts_calibrate You will be presented with directions on the display. Touch each of the points to be calibrated. Then run the following command on a single line, then reboot the system: $ sudo TSLIB_FBDEVICE=/dev/fb2 \ TSLIB_TSDEVICE=/dev/input/touchscreen ts_test...
-
Page 76: Usb-Dc Plug Cable 2.5X0.8Mm
This accessory, shown in the image below, is typically used to provide power to the C1 using a special purpose power supply. These power supplies could include bench-top models or Hardkernel’s own SmartPower. Ensure that the power supply provides clean power, rat- ed at 5V, 2.0+ Amps. - Page 77 Chapter 4 USB-SPDIF kit USB-SPDIF device internals If you use the latest Lubuntu image, you should have XBMC 13 Gotham (or newer) version of the open-source media player pre-in- stalled. Note that the pass-through audio function does not work in older versions of XBMC.
- Page 78 Chapter 4 configure it by first launching the PulseAudio Volume Control config option from the desktop. Then, in the Configuration tab, select the Digital Stereo Output profile, and select the Output Devices tab and update the configuration for the CM108 device as shown in the images below.
-
Page 79: Usb-Cam 720P
Kodi audio output device configuration USB-CAM 720P Hardkernel offers a USB-CAM rated @720p up to 30 fps (figure 4.43), which is certified to work with the C1. However, quite a few of the plug-and-plug USB webcams compatible with Microsoft Windows 7+, can also be expected to work with C1. - Page 80 Chapter 4 bDescriptorType wTotalLength 1087 bNumInterfaces bConfigurationValue iConfiguration bmAttributes 0x80 (Bus Powered) MaxPower 250mA Interface Association: bLength bDescriptorType bFirstInterface bInterfaceCount bFunctionClass 14 Video bFunctionSubClass 3 Video Interface Collection bFunctionProtocol iFunction 4 VF0610 Live! Cam Socialize HD … USB-CAM 720p VF0610 USB-CAM 720p Attach the USB-CAM to an available USB port on the C, and wait for a few moments.
-
Page 81: Ups2
There are many situations when an Uninterrupted Power Supply (UPS) is essential to ensure that the C1 is functioning well, even with loss of main power. Hardkernel has developed a 3000mAh UPS kit as shown below. This LiPo battery kit, when used in conjunction with the C1 charges the battery pack. - Page 82 Chapter 4 into the official Hardkernel Lubuntu image. One should be able to at- tach the device to an available USB port on the C1 and start using it right away: $ lsusb … Bus 001 Device 005: ID 1546:01a6 U-Blox AG …...
- Page 83 Chapter 4 $ sudo apt-get install gpsd gpsd-clients foxtrotgps Then, configure gpsd using the following command and options, then reboot: $ sudo dpkg-reconfigure gpsd Start gpsd automatically? <Yes> Should gpsd handle attached USB GPS receivers automatically? <Yes> Device the GPS receiver is attached to: /dev/ttyACM0 <OK>...
-
Page 84: Conclusion
Linux driver available. The ones sold by Hardkernel at http://bit. have the advantage of having pre-configured drivers in- ly/1fbE9ld cluded with the official Hardkernel disk images. We hope you enjoy tinkering and building your own projects using some of the techniques described here. Additional Resources ODROID Forums: http://forum.odroid.com... -
Page 85: Addendum C1+ Features
ODROID-C1+ he ODROID-C1+, released in August 2015, offers several new features and improvements over the original ODROID-C1: • HDMI connector was changed to Type A from Type D The Type A connection allows a standard HDMI cable to be used with any com- pliant HDMI monitor without the need for a Type D adapter or cable.
Need help?
Do you have a question about the ODROID-C1 and is the answer not in the manual?
Questions and answers