Advertisement
Quick Links
SEL-734 Advanced Metering System
I. Introduction
This Quick-Start Guide explains how
to install, configure, test, and operate
the SEL-734 Advanced Metering System.
For detailed information on these topics,
please refer to the SEL-734 Advanced
Metering System Instruction Manual
located at www.selmeters.com.
II. SEL-734 Overview
This section outlines essential
installation information, including
front-panel layout, rear-panel layout, labels, and dimensions.
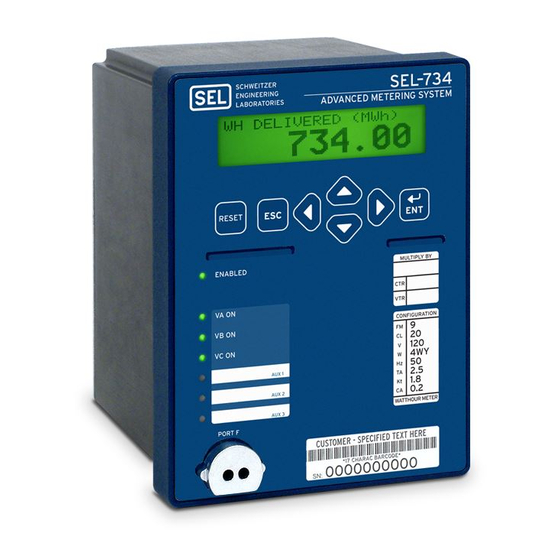
A. Front-Panel Layout
The front-panel interface consists of three programmable LEDs, an LCD, a seven-button keypad, and an
optical communications port.
Optical port, communications
and test mode LED
Enable LED
Programmable local-
control button
Potential LEDs
Programmable LEDs
Figure 1. Front-panel layout
Making Electric Power Safer, More Reliable, and More Economical
Courtesy of NationalSwitchgear.com
Quick-Start Guide
Programmable LCD
User-defined site information
Menu pushbuttons for alternate
display and settings
®
Advertisement

Related Manuals for Schweitzer Engineering Laboratories SEL-734

Summary of Contents for Schweitzer Engineering Laboratories SEL-734
- Page 1 This Quick-Start Guide explains how to install, configure, test, and operate the SEL-734 Advanced Metering System. For detailed information on these topics, please refer to the SEL-734 Advanced Metering System Instruction Manual located at www.selmeters.com. II. SEL-734 Overview This section outlines essential installation information, including front-panel layout, rear-panel layout, labels, and dimensions.
- Page 2 B. Rear-Panel Layout Removable connectors allow easy wiring for PT circuits, I/O, communications, and the auxiliary power supply. The CT circuits require ring terminals for safety. Communications board: EIA-485, telephone modem, EIA-232 I/O board: 4 outputs (EM or SS), Note: Functions as one port 4 inputs or 4 analog outputs, 4 SS outputs Ground terminal...
- Page 3 • Mounting screws: 12 in-lb C. Mounting Options SEL supplies each SEL-734 Meter with four #8 screws for mounting the meter in a rectangular panel cutout shown in Figure 3. For detailed information on mounting options, communications cables, and other accessories, please refer to the SEL-734 Metering Accessories flyer, found at www.selinc.com or...
- Page 4 E. Voltage and Current Connections The SEL-734 supports both Form 9 (4-wire wye) and Form 5 (3-wire delta) connections. Form 9, 4-wire wye connection Voltages SEL-734 Voltage Inputs SEL-734 Current Inputs Wire the phase-to-neutral voltages to terminals E01, E02, and E03. Connect the neutral wire to terminal E04.
- Page 5 PC using an ANSI optical probe, or a C234 or C287 serial cable. The SEL-734 supports various optical probes. Table 1 lists compatible probes and any special requirements. SEL-734 Compatible...
- Page 6 To access the communications parameters QuickSet Software, select Erator Communications>Parameters. Figure 4 shows the default serial port parameters for the SEL-734. Figure 4. Default communications parameters Figure 5. SEL-734 Serial Port 3 Figure 6. Cables for the SEL-734 D. Settings Editor...
- Page 7 2. Read Configuration Settings From the Meter Into Erator Before editing configuration settings, QuickSet must Erator read them from the SEL-734. Click File>Read as shown in Figure 8 to Quick Tip: read and load meter configuration settings. QuickSet will prompt which...
- Page 8 1200:5 CT ratio equates to a CTR setting of 240. Figure 13. CTR and PTR settings 2. Demand Metering The SEL-734 supports Thermal, Rolling, and Block demand types with intervals of 1, 5, 10, 15, 30, and 60 minutes. To configure demand metering, choose Group 1>...
- Page 9 3. KYZ Pulse Settings The KYZ Pulse Settings define the KYZ pulse Quick Tip: weight. Figure 15 depicts the KYZ settings that configure 1.8 kWh/pulse. Type 2, 3, or 4 in The KE1 Units the EKYZ Enable KYZ Pulse Settings box to add setting KILO additional KYZ pulses.
- Page 10 – Set the time with QuickSet Software. Erator – Connect an IRIG-B time-code input to the 2-pin terminal on the back of the SEL-734. See Figure 2. b. Daylight Savings Time (DST) Quick Tip: By default, the meter ships with the 2006 United States DST calendar. The meter begins DST on the first Sunday in April at 2:00 a.m.
- Page 11 .HHF or .CSV format. In addition, third-party meter reading software, such as MV-90 from Itron, can automatically read LDP data from the SEL-734. The data are also available through the SEL YMODEM, Modbus, and DNP protocols. See Section 9, page 13 for details on configuring the SEL-734 for MV-90 compatibility.
- Page 12 QuickSet meter reports. The FP_DECPL, FP_SCALE, and FP_ Erator DND configuration settings affect the SEL-734 front-panel LCD reports. Refer to Table 2 for details on how these configuration settings scale each communications interface. Number Number Max.
- Page 13 8. Communications and Protocol Settings The SEL-734 supports the communications protocols listed in Table 3. The Ethernet port supports three simultaneous Modbus TCP or Telnet (SEL ASCII) communications sessions, including one DNP3 LAN/WAN session. Port 4 supports three communications options, but only one is available at a time.
-
Page 14: Human-Machine Interface (Hmi)
3. Example 5, Reversed CT Connections: Many times CT polarity convention varies from site to site, which can lead to reversed CT connections. The top label of the SEL-734 indicates CT polarity convention with a dot that denotes current flow out of the instrumentation transformer and into the SEL-734 CT terminal. - Page 15 QuickSet HMI allows simple test mode interaction Erator and eliminates the need to navigate through the front panel to enable test mode. While in test mode, the SEL-734 stops collecting LDP and Demand data and places an asterisk next to records in the LDP report.
-
Page 16: Security And Passwords
VI. Security and Passwords A. Security The SEL-734 supports four access levels to prevent unauthorized entry. The table below describes the default passwords and the capabilities of each access level. The user must enter the ACC access level before entering the EAC or 2AC access levels.
Need help?
Do you have a question about the SEL-734 and is the answer not in the manual?
Questions and answers