Advertisement
Advertisement
Table of Contents

Related Manuals for Loupedeck LOUPEDECK CT


Summary of Contents for Loupedeck LOUPEDECK CT
- Page 1 USER GUIDE FOR LOUPEDECK CT & PREMIERE PRO SOFTWARE V.3.0...
-
Page 2: Table Of Contents
TABLE OF CONTENTS OVERVIEW OF LOUPEDECK CT ..........................2 DEFAULT PROFILE ..................................3 KEYBOARD MODIFIERS ............................... 4 LOUPEDECK CT & PREMIERE PRO ..........................5 GENERAL ELEMENTS ................................6 WORKSPACE ELEMENTS ..............................7 WORKSPACE 1: EDITING ..............................8 WORKSPACE 2: COLOR ..............................12 WORKSPACE 3: AUDIO .............................. -
Page 3: Overview Of Loupedeck Ct
Please read this manual as well as the User Guide on how to use the Loupedeck Setup to fully understand the depth and usage of the device and its software before fully getting into it to avoid potential confusion and misunderstanding. -
Page 4: Default Profile
Having what matters to you where it matters and memorizing it will speed up your workflow. Use Loupedeck Setup to make the profile – or several, if you wish – perfect for you and save them (e.g. on the built-in CT storage). -
Page 5: Keyboard Modifiers
KEYBOARD MODIFIERS As some editors love their keyboard modifiers, e.g. to copy a clip, we have them available on CT, too. Pressing the keyboard modifier button, makes keyboard modifiers accessible on the round buttons. The round buttons are turning white when keyboard modifiers are enabled. -
Page 6: Loupedeck Ct & Premiere Pro
LOUPEDECK CT & PREMIERE PRO To make using Loupedeck CT as intuitive as possible for Premiere Pro, all the actions are divided into two levels of control elements: 1) Workspace (elements): a. Dials b. Touch buttons c. Wheel (incl. touch screen) 2) General elements: a. -
Page 7: General Elements
GENERAL ELEMENTS Round buttons have a number from 1 to 8, and they change their color according to the assigned action type (e.g., green indicates workspace, purple indicates an action). Square buttons, are dedicated to the most used actions that are needed from time to time regardless of the activated workspace. -
Page 8: Workspace Elements
WORKSPACE ELEMENTS A workspace is a “toolbox”, a collection of related functions (rotation, press and wheel templates), laid out so that you can do certain actions. Dials are prioritized for the most used adjustments (e.g., Exposure in Basic Adjustments workspace). Dials also have a press function that is, in most cases, bind for resetting adjustment value (e.g., pressing contrast dial will reset contrast back to zero). -
Page 9: Workspace 1: Editing
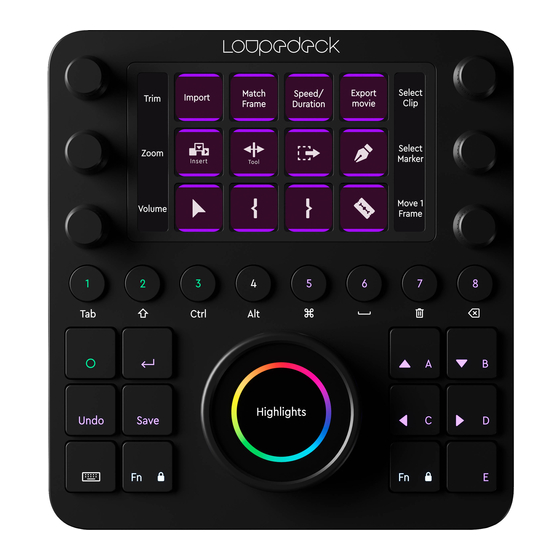
“Project” and accessing “Tools” as well as the Loupedeck Setup icon. In case you don’t recognise an Tip!: icon right away, a long press on the touch display will show the action name on the wheel. - Page 10 1.2. PROJECT PAGE - TOUCH PAGE With the actions on this page, you can: • Organize your project by adding New Bins and Sequences (Project Panel needs to be the selected Panel) • Import material • Go through imported clips in your Project Window using the “Select Clip”...
- Page 11 1.3. TOOLS PAGE - TOUCH PAGE Here you can access quickly all TOOLS so that you can either reduce your mouse usage or keep your hands on the device. Tip!: You can also access the touch pages that are linked under “Project” and "Tools" with a horizontal swipe on the touch display instead of clicking the page link button.
- Page 12 NAVIGATION There are several ways of navigating within your timeline and through clips. You just need to find what feels best depending on the situation and controls needed. è Navigation Wheel For precise control, we suggest using the pre-defined NAVIGATION WHEEL with the navigation functions 1 Frame and 5 Frames.
-
Page 13: Workspace 2: Color
WORKSPACE 2: COLOR The color workspace is dedicated to the color grading tools that Premiere offers. Using CT dials and the wheel is intuitive and gives you very precise control. You can access the wheels, sliders and curves of all six Adobe Premiere Pro Color Panels. - Page 14 WITH DIALS, ROTATE TO ADJUST • Temperature • Tint • Blacks • Whites • Saturation • Contrast WITH COLOR WHEEL: SWIPE on wheel to adjust Hue, ROTATE the wheel to adjust Brightness for: • Midtones • Shadows • Highlights Changing between Shadows , Midtones and Highlights works by pressing Fn + swiping up / down.
- Page 15 As an alternative to pressing page links, you can access all touch, wheel and dial pages again by swiping the displays. On a color wheel page, remember to press Fn + horizontal swipe – otherwise your Note! : swiping will result in a color adjustment. There is no dedicated dial page for Color Wheels, Vignette and Curves.
- Page 16 COLOR AND TINT WHEELS: As for Color Wheels (Color Wheels Panel) and Tint Wheels (Creative Corrections Panel), you can SWIPE with your finger on the wheel display and ROTATE the wheel to adjust Brightness. You can even make color adjustments on Full Frame Mode. However, if you prefer to see your adjustments visualised in corresponding number changes, just open Adobe Premiere Pro Panel with a click on the dedicated touch button on CT display, e.g., Open HSL Panel.
- Page 17 CURVES Accessing Curves inside Premiere is fast and easy, as rotating the wheel automatically sets a point on the curve when you have navigated the cursor close enough to the curve. Inside the Curves Page, open the Curves Wheel Page with one click, and the Curves Panel inside Premiere with another click.
-
Page 18: Workspace 3: Audio
WORKSPACE 3: AUDIO For any audio work, you probably want to enlarge the height of your audio tracks first. There is a separate dial for audio and video track height on the left side of the touch display. To adjust volume, select the clip(s) you wish to adjust with your mouse and rotate the Wheel with Volume action selected. - Page 19 If you want full control over your transition right from the start, we suggest you select the PEN TOOL and set keyframes to your audio clip. Alternatively, you can assign "Add keyframes" action to a touch button if you prefer. Make sure you have enabled the visibility of keyframes by right-clicking the audio clip and selecting “Show Clip Keyframes”.
-
Page 20: More Questions
Pro® (most recent version). I am unable to install Loupedeck Setup. Loupedeck setup is compatible with Windows® 10 or later and Mac® OS 10.12 or later. Loupedeck software also requires a 64-bit OS version. Loupedeck software is not specifically developed for Windows 7 or 8, but it might work normally, as the OS base is very similar.
Need help?
Do you have a question about the LOUPEDECK CT and is the answer not in the manual?
Questions and answers