Table of Contents
Advertisement
Quick Links
Advertisement
Table of Contents

Subscribe to Our Youtube Channel
Summary of Contents for Encore sitdown
- Page 1 User Guide...
-
Page 3: Table Of Contents
Table of Contents Warranty ......................3 Attaching your Square Tubing ............... 4 Your Light Fixture ..................5 Your Thread Stand ..................6 What is the Tension Release Lever? ............... 7 How Do I Adjust the Height of the Hopping Foot? ......... 7 Routine Cleaning and Oiling ................ -
Page 4: Warranty
• Your Encore 18x6 Sitdown has a full labor warranty for one year from the day you receive your machine. We guarantee the machine parts for five years. -
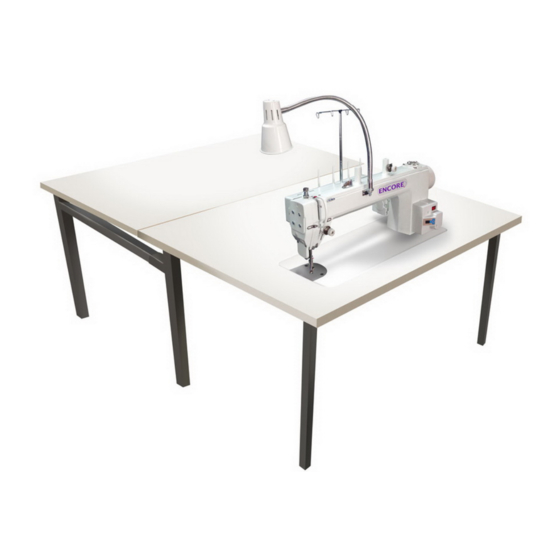
Page 5: Your Light Fixture
Your Light Fixture To add your light fixture to your machine, first loosen the nut and washer from the base of the light fixture. Slide the lamp base into the lamp holder on the side of the machine. Your light fixture came with a long cord. At this time you can trim the cord so that it will reach the outlet on top of the power box. -
Page 6: Your Thread Stand
2. Slide the Thread Stand over the two screws. 3. Level the Thread Stand with the top of the machine. 4. Tighten the two screws to hold the Thread Stand securely in place. 6 | Encore 18x6 Sitdown Model User Guide... - Page 7 Connecting the Foot Control The Foot Control is connected to the power supply box on the bottom side of the box. Plug the Foot Control plug into the jack provided on the base of the power supply. Turn the sewing speed controller dial to the right to increase the motor speed;...
- Page 8 This may take some test presses to get it down, and to get the feel for the foot pedal needle control. Alternatively, you can use the buttons on the control panel. Needle Up Position: Needle Down Position: 8 | Encore 18x6 Sitdown Model User Guide...
-
Page 9: What Is The Tension Release Lever
What is the Tension Release Lever? The Tension Release Lever raises the Hopping Foot and releases the tension on the thread. You can watch the tension disc plates open as you lift the lever. NEVER start sewing with the lever up, because there is no tension on the thread, and the bottom stitches will be huge loops. -
Page 10: Routine Cleaning And Oiling
(Note: The machine pictured here is before complete assembly from factory; your machine has more components attached. Oil point top of machine Oil Reservoir with dip stick Oil Reservoir with dip stick removed 10 | Encore 18x6 Sitdown Model User Guide... -
Page 11: Bobbin Winder And Bobbins
Bobbin Winder and Bobbins A Bobbin Winder is included with your machine. The thread on a properly wound bobbin should be snug and have even layers of thread. A sloppy or mushy wound bobbin will result in poor stitch quality. Bobbin Thread: Bobbin Thread Guide: Bobbin Winder:... - Page 12 Bobbing Fill Mechanism This picture is provided for your reference should you need to make an adjustment to your bobbin fill mechanism. Never adjust unless you are told to do so by our technicians. 12 | Encore 18x6 Sitdown Model User Guide...
- Page 13 Check the tension of the bobbin by holding the loaded bobbin case in one hand. With one hand under the bobbin case, hold the tail of thread and watch as the thread flows out of the bobbin case. A slight bounce should cause the bobbin case to slide down the thread.
-
Page 14: Machine Part Names
Thread Guide Take Up Lever (Note: some machines do not have this) Three Hole Thread Guide Thread Guide Tension Disc Thread Guide Check Spring Thread Eyelet Above the Needle Silver Angle Bracket Needle 14 | Encore 18x6 Sitdown Model User Guide... -
Page 15: Threading Overview
Threading Overview Please note: The takeup lever guard has been removed for a clear view for pictures only. Never run the machine without the guard in place. Extreme head injury may occur. How Do I Thread the Machine? 1. Place a cone of thread on the thread holder. Figure 1 2. - Page 16 11. Thread the needle left to right. Figure 6 Figure 5 TIP: Use a dental floss threader to thread the guide directly above the needle. The threader will Figure 5 also thread your needle. Figure 6 16 | Encore 18x6 Sitdown Model User Guide...
-
Page 17: How Do I Change The Needle
How Do I Change the Needle? A 134RSAN needle (size 18) will be installed on your Encore 18x6 Sitdown model from the factory. When it is time to replace the needle, you can easily install one. Be sure the power switch is off on the machine. -
Page 18: How Do I Make Adjustments To Make The Perfect Stitch
Tip: A general rule of thumb is that if the stitch looks bad on the top, it is the bottom tension. If the stitch looks bad on the bottom, is the upper tension. The upper and lower threads play tug of war with each other. 18 | Encore 18x6 Sitdown Model User Guide... -
Page 19: Tension, Tension, Tension
Tension, tension, tension… This probably causes more problems than anything else. You need correct tension on the top and bottom threads, but you also must have correct tension on the quilt held between the bars. You should be able to gently rock the belly bar where the backing fabric is attached. - Page 20 Difficult to Control the Movement of the Machine Check for lint or other debris on the track and bars. Sometimes the smallest pieces of thread create the biggest headaches. 20 | Encore 18x6 Sitdown Model User Guide...
- Page 21 3-9 Check Spring Replacement/Tension Knob From time to time you may need to replace the Check Spring. This series of photos will help. Broken Spring Figure 3-84 Figure 3-85 Tension assembly with broken Tension assembly with good spring. (old tension knob) spring (new tension knob) Figure 3-86 Figure 3-87...
- Page 22 Tension assembly out of machine Do noT LoSE PIn removed Figure 3-90 Figure 3-91 Loosen screw only Remove tension assembly from Do noT REMoVE barrel Figure 3-93 Figure 3-92 Remove spring Tension assembly and barrel 22 | Encore 18x6 Sitdown Model User Guide...
- Page 23 Figure 3-94 Figure 3-95 Spring removal Spring removed Figure 3-96 Figure 3-97 New spring, This tail is what was Insert the new spring broken Figure 3-99 Figure 3-98 New spring in place Twist while inserting the new spring Updated January 2019 | 23...
- Page 24 Figure 3-104 Figure 3-105 Place the assembly back into Once in, ensure that your check your machine spring is at 11:00 24 | Encore 18x6 Sitdown Model User Guide...
- Page 25 Figure 3-106 Figure 3-107 Press in and notice the tension Release and the disk will close; disk opens this is the proper place for your tension assembly Figure 3-108 Figure 3-109 Tighten screw on your machine Tension assembly back in place with new check spring at 11:00 Figure 3-110 For fine adjustment of check...
- Page 26 D is the set screw to adjust hook timing. (The photo on the right is the actual machine as shown in the drawing.) The drawing and the photo show correct timing. 26 | Encore 18x6 Sitdown Model User Guide...
- Page 27 Turn the hand wheel to locate the needle at its lowest position. Note: Correct needle position is when you can see a small portion of the eye of the needle. This picture shows correct location. Loosen needle bar connecting screw A. This will allow you to raise and lower needle bar for correct location.
- Page 28 1.800.401.8151 www.sewingmachinesplus.com.com Proud to be a LEADInG manufacturer of long arm quilters in the U.S.
Need help?
Do you have a question about the sitdown and is the answer not in the manual?
Questions and answers