
Subscribe to Our Youtube Channel
Related Manuals for TOOLCRAFT Digimicro

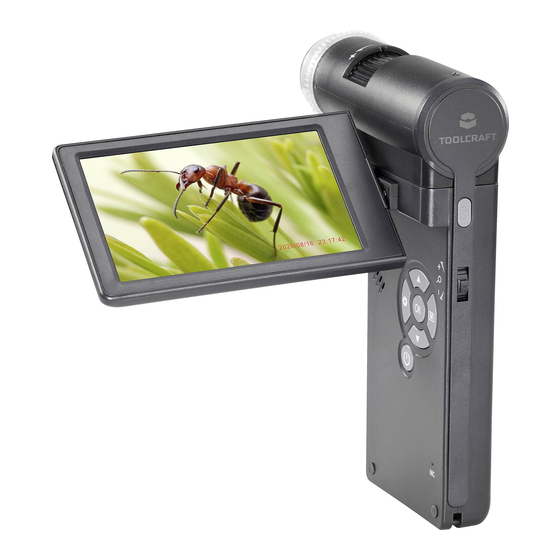
Summary of Contents for TOOLCRAFT Digimicro
- Page 1 Bedienungsanleitung Mikroskopkamera Digimicro Mobile Best.-Nr. 2176727 Seite 2 - 19 Operating Instructions Digimicro Mobile Microscope Camera Item No. 2176727 Page 20 - 37...
-
Page 2: Table Of Contents
Inhaltsverzeichnis Seite Einführung ................................4 Symbol-Erklärung ..............................4 Bestimmungsgemäße Verwendung ........................4 Lieferumfang ................................5 Aktuelle Bedienungsanleitungen ........................5 Sicherheitshinweise .............................5 a) Allgemeines ..............................5 b) Angeschlossene Geräte ..........................6 c) LED-Licht ...............................6 d) Batterien/Akkus .............................6 e) Netzteil ................................6 f) Mikroskop ..............................6 Bedienelemente und Komponenten ........................7 a) Digitalmikroskop ............................7 b) Display ................................7 Vorbereitung zur Verwendung ..........................8 a) Einsetzen des Akkus .............................8... - Page 3 e) Aufnehmen eines Videos ..........................13 f) Aktivieren des Timers für das Anfertigen von Fotos/Aufnehmen von Videos ..........13 g) Einfügen einer Markierung/eines Kommentars ...................14 h) Aktivieren der Werkzeuge für die Bildvermessung ..................14 i) Kalibrierung ..............................15 j) Überprüfen der Kalibrierung ........................16 12. Ausgabe an ein Fernsehgerät / einen Monitor ....................16 13.
-
Page 4: Einführung
1. Einführung Sehr geehrte Kundin, sehr geehrter Kunde, wir bedanken uns für den Kauf dieses Produkts. Dieses Produkt erfüllt die gesetzlichen nationalen und europäischen Anforderungen. Um diesen Zustand zu erhalten und einen sicheren Betrieb zu gewährleisten, müssen Sie als Anwender diese Bedienungsanleitung beachten! Diese Bedienungsanleitung gehört zu diesem Produkt. -
Page 5: Lieferumfang
4. Lieferumfang • Digitalmikroskop • HDMI-Kabel • Mini-Stativ • Netzteil • Akku • Bedienungsanleitung • CD-ROM mit PortableCapture • microSD-Karte (4 GB) Plus-Software • microSD-zu-SD-Adapter • USB-Kabel 5. Aktuelle Bedienungsanleitungen Laden Sie aktuelle Bedienungsanleitungen über den Link www.conrad.com/downloads herunter oder scannen Sie den abgebildeten QR-Code. Befolgen Sie die Anweisungen auf der Webseite. -
Page 6: B) Angeschlossene Geräte
b) Angeschlossene Geräte • Beachten Sie auch die Sicherheits- und Bedienhinweise der übrigen Geräte, die an dieses Produkt angeschlossen sind. c) LED-Licht • Achtung, LED-Licht: - Blicken Sie nicht direkt in das LED-Licht! - Blicken Sie weder direkt noch mit optischen Geräten in den Lichtstrahl! d) Batterien/Akkus •... -
Page 7: Bedienelemente Und Komponenten
7. Bedienelemente und Komponenten a) Digitalmikroskop Auslöser 9 Befestigungsstelle für Stativ (1/4 Zoll) Ein-/Ausschalten Zoom 10 microSD-Kartensteckplatz 18 ▲Hoch 3 Drehring des Polfilters 11 Fokusrad Modus (Foto/Video/Wiedergabe) 4 LED-Ladeanzeige 12 Helligkeitsregler 20 OK (Bestätigen) 5 HDMI-Ausgang 13 Akkufach 21 ▼Runter 6 TV-Ausgang 22 MIC (Mikrofon) 14 Display 7 5V/USB-Anschluss... -
Page 8: Vorbereitung Zur Verwendung
8. Vorbereitung zur Verwendung a) Einsetzen des Akkus 1. Schieben Sie wie in der Abbildung gezeigt das Akkufach auf und setzen Sie den Akku ein. 2. Schließen Sie dann die Akkufachabdeckung wieder. b) Aufladen des Akkus 1. Schließen Sie ein Ende des USB-Ladekabels an den 5V/USB-Anschluss am Mikroskop und das andere Ende an das im Lieferumfang enthaltenen Netzteil an. -
Page 9: Inbetriebnahme Und Verwendung
9. Inbetriebnahme und Verwendung a) Erste Schritte 1. Klappen Sie das Display auf oder drücken Sie die -Taste, um das Mikroskop zunächst einmal einzuschalten. 2. Bringen Sie dann das Objektiv über dem Objekt in Position und stellen Sie über den Helligkeitsregler die Helligkeit des LED-Ringlichts ein. 3. Verwenden Sie nun das Fokusrad, um das Bild scharf zu stellen. 4. Drehen Sie anschließend am Ring des Polfilters, um dem möglicherweise vorhandenen Blendeffekt entgegen- zuwirken. -
Page 10: E) Anzeigen Bzw. Wiedergeben Von Fotos/Videos
e) Anzeigen bzw. wiedergeben von Fotos/Videos 1. Drücken Sie zunächst wiederholt die -Taste, bis das -Symbol eingeblendet wird. 2. Verwenden Sie dann die Tasten „▲/▼“, um den Menüpunkt „Photo“ oder „Video“ auszuwählen. - Das -Symbol weist Sie darauf hin, dass aktuell der Foto-Modus aktiviert ist. - Das -Symbol weist Sie darauf hin, dass aktuell der Video-Modus aktiviert ist. Drücken Sie anschließend auf OK, um die ausgewählte Datei anzuzeigen bzw. -
Page 11: Portablecapture Plus-Software
11. PortableCapture Plus-Software Wichtig: • Ist das Gerät an einen Computer angeschlossen, bleibt eine Betätigung der Tasten wirkungslos. Verwenden Sie zur Steuerung des Mikroskops stattdessen die beiliegende Software „PortableCapture Plus“. • Bilder und Videos, die Sie anfertigen bzw. aufnehmen während das Gerät an einen Computer angeschlossen ist, werden auf der Festplatte des Computers gespeichert. a) Installieren der Software 1. -
Page 12: C) Übersicht
c) Übersicht B1 Menüpunkte: - File > Photos / Videos Folder: Hier finden Sie die angefertigten Bilder und aufgenommenen Videos, die auf Ihrem Computer gespeichert wurden. - Options > Resolution: Ändern der Auflösung der aufgenommenen Bilder. - Options > Date /Time: Ein-/Ausblenden des Datums-/Uhrzeitstempel auf einem Foto oder in einem Video. - Options > Language: Einstellen der Sprache für die Benutzeroberfläche. - Options > XY Guide: Ein-/Ausblenden der Hilfslinien. B2 Shortcuts: Kamera/Video/Timer/Vollbild/Importieren B3 Hilfslinien (X- und Y-Achse) B4 Vorschaufenster... -
Page 13: D) Anfertigen Eines Fotos
d) Anfertigen eines Fotos 1. Positionieren Sie das Mikroskop so, dass sich das Kameraobjektiv nahe am Objekt befindet und auf dieses zeigt. 2. Behalten Sie das Vorschaufenster (B4) im Auge und verwenden Sie das Fokusrad, um das Bild scharf zu stellen. 3. Klicken Sie dann auf das Shortcut-Symbol , um das Bild anzufertigen und zu speichern. 4. -
Page 14: G) Einfügen Einer Markierung/Eines Kommentars
g) Einfügen einer Markierung/eines Kommentars Führen Sie im Fenster für gespeicherte Bilder (B7) einen Doppelklick auf das gewünschte Bild aus, um die Benutzer- oberfläche für das Markieren/Kommentieren aufzurufen. - Symbol für das Einfügen von Markierungen - Symbol für das Einfügen von Kommentaren Über ein Dropdown-Menü neben dem jeweiligen Symbol erhalten Sie Zugriff auf zahlreiche Optionen. h) Aktivieren der Werkzeuge für die Bildvermessung Führen Sie im Fenster für gespeicherte Bilder (B7) einen Doppelklick auf das gewünschte Bild aus, um das Menü... -
Page 15: I) Kalibrierung
i) Kalibrierung Für die Kalibrierung benötigen Sie ein Lineal. 1. Wählen Sie: Options → Crossing → On. 2. Richten Sie dann das Mikroskop auf das Lineal aus. 3. Verwenden Sie nun das Fokusrad, um wie gewohnt das Bild scharf zu stellen. 4. Justieren Sie die Position des Lineals so, dass die Markierungen der Messskala parallel zu den XY-Hilfslinien ausgerichtet sind. -
Page 16: J) Überprüfen Der Kalibrierung
j) Überprüfen der Kalibrierung 1. Führen Sie nun im Fenster für gespeicherte Bilder (B7) einen Doppelklick auf das Bild mit dem Lineal aus, um die Benutzeroberfläche „Image Preview“ aufzurufen. 2. Klicken Sie dann auf das -Symbol. 3. Wählen Sie die Option „Any Angle Line“ aus dem Dropdown-Menü und positionieren Sie durch Klicken und Ziehen den Start- und Endpunkt in einem Abstand von 1 mm zueinander auf dem Lineal. -
Page 17: Pflege Und Reinigung
14. Pflege und Reinigung Verwenden Sie keine aggressiven Reinigungsmittel, Alkohol oder andere chemische Lösungsmittel, da diese zu Schäden am Gehäuse und zu Fehlfunktionen führen können. • Trennen Sie das Produkt vor jeder Reinigung von der Stromversorgung. • Verwenden Sie zum Reinigen des Produkts ein trockenes, faserfreies Tuch. 15. Entsorgung a) Produkt Elektronische Geräte sind Wertstoffe und gehören nicht in den Hausmüll. Entsorgen Sie das Produkt am Ende seiner Lebensdauer gemäß... -
Page 18: Technische Daten
16. Technische Daten a) Mikroskop Stromversorgung ..........Li-Ion, 3,7 V, 1050 mAh (Akku) 5 V/DC, 500 mA (USB 2.0) Ladezeit des Akkus ...........ca. 5 Stunden (über Netzteil) Akkulaufzeit ............ca. 4 Stunden Unterstützte Speicherkarten ......microSD, SDHC, SDXC (max. 32 GB) Dateisystem der microSD-Karte .......FAT32 Anzeigesprache ..........Englisch, Deutsch Bildsensor ............12 MP Bildauflösung der Kamera ........ -
Page 19: B) Software
b) Software Unterstützte Betriebssysteme ......Windows 7/8/10 (32/64 Bit), Mac OS 10.14 oder aktueller ® c) Netzteil Eingangsspannung ...........100 - 240 V/AC Eingangswechselstromfrequenz .......50/60 Hz Ausgangsspannung ..........5,0 V Ausgangsstrom ..........1,0 A Ausgangsleistung ..........5,0 W Durchschnittliche Effizienz im Betrieb ....≥73,62 % Effizienz bei geringer Last (10%) ......N/A Leistungsaufnahme bei Nulllast ......≤0,10 W Modellkennung ..........DSA-5PF02-05 FEU 050100 Handelsregisternummer: HRB 3896 Hersteller: Conrad Electronic SE, Klaus-Conrad-Str. - Page 20 Table of contents Page Introduction ................................22 Explanation of symbols ............................22 Intended use ..............................22 Delivery content ..............................23 Up-to-date operating instructions ........................23 Safety instructions .............................23 a) General information .............................23 b) Connected devices ............................24 c) LED light ..............................24 d) (Rechargeable) batteries ..........................24 e) Power adaptor .............................24 f) Microscope ..............................24 Operating elements ............................25 a) Digital Microscope ............................25...
- Page 21 e) Record videos ..............................31 f) Photo and video timer ..........................31 g) Image mark-up / comment ...........................32 h) Image measuring tools ..........................32 i) Calibration ..............................33 j) Check the calibration ...........................34 12. Output to T.V. / monitor ............................34 13. Tripod mount ..............................34 14.
-
Page 22: Introduction
1. Introduction Dear customer, Thank you for purchasing this product. This product complies with the statutory national and European requirements. To maintain this status and to ensure safe operation, you as the user must observe these operating instructions! These operating instructions are part of this product. They contain important notes on commissioning and handling. -
Page 23: Delivery Content
4. Delivery content • Digital Microscope • HDMI cable • Mini tripod • Power adaptor • Rechargeable battery • Operating instructions • CD-ROM PortableCapture • 4 GB microSD card Plus software • MicroSD to SD adaptor • USB cable 5. Up-to-date operating instructions Download the latest operating instructions at www.conrad.com/downloads or scan the QR code shown. -
Page 24: B) Connected Devices
b) Connected devices • Also observe the safety and operating instructions of any other devices which are connected to the product. c) LED light • Attention, LED light: - Do not look directly into the LED light! - Do not look into the beam directly or with optical instruments! d) (Rechargeable) batteries •... -
Page 25: Operating Elements
7. Operating elements a) Digital Microscope Capture button 9 Tripod mounting point (1/4 inch) Power ON/OFF Zoom 10 MicroSD card slot 18 ▲Up 3 Polarizer lens ring 11 Focus dial Mode (photo/video/playback) 4 Battery charging indicator 12 Brightness dial 20 OK Confirm 5 HDMI-out 13 Battery compartment 21 ▼Down... -
Page 26: Setting Up
8. Setting up a) Inserting the battery 1. Slide the battery compartment open and insert the battery as shown. 2. Close the compartment. b) Charge the battery 1. Connect one end of the charging cable to the 5V/USB port on the microscope, and the other end to the included power adaptor. -
Page 27: Operation
9. Operation a) Getting started 1. Flip the display panel open or press the power button to turn the microscope ON / OFF. 2. Position the lens over the object and adjust the LED brightness using the brighness dial. 3. Adjust the focus dial to bring the image into sharp focus. 4. -
Page 28: E) Photo / Video Playback
e) Photo / video playback 1. Press until the playback icon shows. 2. Press ▲/ ▼to select photo or video. - Photo is indicated by . Press OK to playback the selected video. - Video is indicated by 3. Press to view further options such as “Delete”, “Protect” (prevent accidental deletion), and “Slide Show”. - Press ▲/ ▼to select a menu item. -
Page 29: Portablecapture Plus Software
11. PortableCapture Plus software Important: • When tethered to a computer, the button functions will not be active. Use the “PortableCapture Plus” soft- ware to control the microscope. • Images and videos recorded while tethered to a computer are saved onto the computer hard drive. a) Installation 1. -
Page 30: C) Overview
c) Overview B1 Menu items: - File > Photos / Videos Folder: Where captured images are stored on your computer. - Options > Resolution: Change image capture resolution. - Options > Date /Time: Show/hide the recorded date and time in photo or video. - Options >... -
Page 31: D) Take Photo
d) Take photo 1. Position the microscope so that the camera lens is close to and pointing at the object. 2. While observing the image preview area (B4), bring the image into focus using the focus dial. 3. To capture the image select the camera shortcut icon 4. -
Page 32: G) Image Mark-Up / Comment
g) Image mark-up / comment Double-click an image in the saved images window (B7) to enter the image mark-up / comment interface. - Mark-up icon - Comment icon A dropdown menu beside each icon will show various options. h) Image measuring tools Double-click an image in the saved images window (B7) to enter the measurement interface, then select the measure icon. -
Page 33: I) Calibration
i) Calibration You will need a ruler for calibration. 1. Select: Options → Crossing → On. 2. Focus the microscope on the ruler. 3. Rotate the focus dial until the image becomes sharp. 4. Adjust the ruler position so the image is lined up square with the XY guide lines. 5. -
Page 34: J) Check The Calibration
j) Check the calibration 1. Double-click the image of the ruler in the saved images window (B7) to enter the “Image Preview” interface. 2. Select the measure icon. 3. Select “Any Angle Line” from the drop down menu, then click and drag the start and end points across 1 mm on the ruler. -
Page 35: Care And Cleaning
14. Care and cleaning Do not use any aggressive cleaning agents, rubbing alcohol or other chemical solutions as they can cause damage to the housing and malfunctioning. • Disconnect the product from the mains before each cleaning. • Clean the product with a dry, fibre-free cloth. 15. Disposal a) Product Electronic devices are recyclable waste and must not be disposed of in the household waste. -
Page 36: Technical Data
16. Technical data a) Microscope Power source ............ Li-Ion 3.7 V/1050 mAh (rechargeable battery) 5 V/DC, 500 mA (USB 2.0) Battery charge time ..........Approx. 5 hrs (via power adaptor) Battery life ............Approx. 4 hrs Memory .............MicroSD, SDHC, SDXC (max. 32 GB) MicroSD file system ..........FAT32 Interface language ..........English, German Image sensor ............12 MP... -
Page 37: B) Software
b) Software Supported operating systems ......Windows 7/8/10 (32/64 bit), Mac OS 10.14 or higher ® c) Power Adaptor Input voltage .............100-240 V/AC Input AC frequency ...........50/60 Hz Output voltage ..........5.0 V Output current ...........1.0 A Output power ............5.0 W Average active efficiency ........≥ 73.62 % Efficiency at low load (10%) ......N/A No load power consumption ......≤ 0.10 W Model identifier ..........DSA-5PF02-05 FEU 050100... - Page 40 Dies ist eine Publikation der Conrad Electronic SE, Klaus-Conrad- 1, D-92240 Hirschau (www.conrad.com). Alle Rechte einschließlich Übersetzung vorbehalten. Reproduktionen jeder Art, z. B. Fotokopie, Mikroverfilmung oder die Erfassung in elektronischen Datenverarbeitungsanlagen bedürfen der schriftlichen Genehmigung des Herausgebers. Nachdruck, auch auszugsweise, verboten. Die Publikation entspricht dem technischen Stand bei Drucklegung. Copyright 2020 by Conrad Electronic SE.
Need help?
Do you have a question about the Digimicro and is the answer not in the manual?
Questions and answers