
Subscribe to Our Youtube Channel
Related Manuals for Krüger & Matz KM0817


Summary of Contents for Krüger & Matz KM0817
- Page 1 Kitchen radio KM0817 BEDIENUNGSANLEITUNG OWNER’S MANUAL INSTRUKCJA OBSŁUGI MANUAL DE UTILIZARE...
- Page 3 Bedienungsanleitung SICHERHEITSANLEITUNGEN Das dreieckige Blitzsymbol mit Pfeilkopf weist den Benutzer auf das Vorhandensein von nicht isolierter „gefährlicher Spannung“ im Inneren des Gerätes hin, die ausreichen kann, um die Gefahr eines elektrischen Schlags darzustellen. Um die Gefahr eines elektrischen Schlags zu verringern, entfernen C A U T IO N Sie nicht die Abdeckung (oder Rückseite) das Geräts.
- Page 4 Bedienungsanleitung 9. Keine offenen Flammen, wie brennende Kerzen, dürfen auf das Gerät gestellt werden. 10. Trennen Sie dieses Gerät von der Stromversorgung, wenn es über einen längeren Zeitraum nicht verwendet wird. 11. Wenn Sie das Gerät von der Netzsteckdose trennen, ziehen Sie am Stecker und nicht am Kabel.
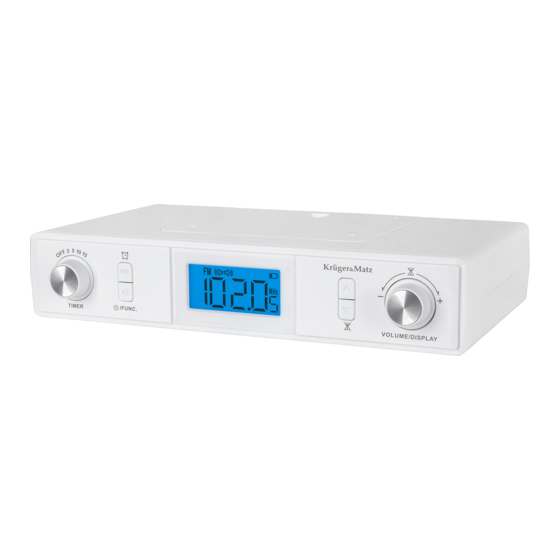
- Page 5 Bedienungsanleitung Rückseitiges Paneel Unterseite Display 14 15 16...
- Page 6 Bedienungsanleitung 1. Timerregler 9. Antenne 2. Taste PROG 10. Faltbarer Ständer 3. LCD Display 11. Batteriefach 4. Taste Aufwärts 12. Stereomodus 5. Multifunktionstaste 13. (FM) UKW Radio 14. Timersymbol 6. Taste 15. Alarmsymbol 7. Taste Abwärts 16. Uhrsymbol 8. Netzkabel EINLEGEN DER PUFFERBATTERIEN INSTALLATION Wird das Gerät vom Stromnetz getrennt oder fällt die Stromversorgung aus, bleiben die Einstellungen für Uhrzeit und Alarm erhalten, wenn die Pufferbatterien...
- Page 7 Bedienungsanleitung Folgen Sie den nachstehenden Anweisungen, um das Gerät unter dem Küchenschrank zu montieren: 1. Entfernen Sie die Montageplatte, indem Sie diese zurückschieben und aus dem Gerät herausziehen. 2. Legen Sie die Platte auf den Schrankboden und markieren die Bohrlöcher. Bohren Sie die Löcher und befestigen die Platte mit den mitgelieferten kürzeren Schrauben.
- Page 8 Bedienungsanleitung 3. Drücken Sie wiederholt die Tasten Aufwärts/Abwärts um die Minuten einzustellen. 4. Drücken Sie die Taste PROG zum bestätigen der Uhrzeit und zur Einstellung der Alarmquelle zu wechseln. 5. Drücken Sie die Tasten Aufwärts/Abwärts um die Alarmquelle einzustellen: Summer oder Radio. 6.
-
Page 9: Radio Modus
Bedienungsanleitung • Nach Ablauf der eingestellten Zeit blinkt das Timer-Symbol und es ertönt ein ansteigender Ton. Drücken Sie eine beliebige Taste, um den Alarm zu stoppen. • Die maximale Zeit für Timer 2 beträgt 3 Stunden. Hinweise: • Nach dem Einstellen des Timers wird der Countdown 5 Sekunden lang angezeigt. Danach kehrt das Gerät zur Uhrzeitanzeige zurück. -
Page 10: Bluetooth Modus
Es bedeutet, das Gerät befindet sich im Bluetooth Kopplungsmodus. 2. Schalten Sie Bluetooth am externen Gerät ein. 3. Suchen und verbinden Sie sich mit diesem Gerät (KM0817). Voreingestelltes Passwort „0000” oder „1234” wenn nötig eingeben. 4. „bt” hört auf zu blinken bei erfolgreicher Verbindung. - Page 11 Bedienungsanleitung TECHNISCHE DATEN Hauptparameter Radio: UKW UKW-Radiofrequenzbereich: 87,5-108 MHz LCD-Anzeige Eingebaute Antenne Lautsprecher Lautsprecher: 2x 2,25” Ausgangsleistung: 2x 0,4 W Impedanz: 8 Ohm THD: 0,8 % Frequenzgang: 40 Hz - 15 kHz S/N: 50 dB Anschlüsse Bluetooth: 2.1+EDR Bluetooth Reichweite: bis zu 10 m Bluetooth-Frequenzbänder: 2402 - 2480 MHz Maximale Bluetooth-Sendeleistung: <...
- Page 12 Im Falle irgendwelcher Zweifel oder Fragen siehe unsere Häufig gestellte Fragen-Seite. Hiermit erklär die Firma Lechpol Electronics Sp. z o.o. Sp.k. dass sich das Gerät Küchenradio KM0817 im Einklang mit den Bestimmungen der Richtlinie 2014/53/UE befindet. Komplette Konformitätserklärung zum herunterladen auf www.lechpol.eu.
-
Page 13: Safety Instructions
Owner’s manual SAFETY INSTRUCTIONS The lightning flash with arrowhead symbol, within an equilateral triangle is intended to alert the user the presence of uninsulated, dangerous voltage, within the product enclosure that may be of sufficient magnitude to constitute risk of electric shock to person. To reduce the risk of electric shock, do not remove the cover (or C A U T IO N back). -
Page 14: Product Description
Owner’s manual 11. When you disconnect the power cord of the device, grasp and pull the plug, not the cord/cable. 12. Use only authorized accessories. 13. This appliance may be used by children who are above 8 years old and by persons with reduced physical, sensory or mental capabilities, or lack of experience and knowledge, if they are supervised and guided by a person who is responsible for their safety in a cautious manner for all the safety precautions being understood... - Page 15 Owner’s manual Bottom LCD display 14 15 16 1. Timer knob 9. Antenna 2. PROG button 10. Foldable stand 3. LCD display 11. Battery compartment 4. Up button 12. Stereo mode 5. Multifunctional knob 13. FM radio 14. Timer icon button 15.
-
Page 16: Mounting The Device
Owner’s manual BACKUP BATTERIES INSTALLATION In case of the device being disconnected from power supply socket or a power failure, clock and alarm settings will be retained if the backup batteries have been installed (Bluetooth function, radio and backlight is not available). To install the batteries follow the below instructions: 1. -
Page 17: Power Supply
Owner’s manual POWER SUPPLY Connect the power cord to the power supply socket. The device is ready to be used. SETTINGS 1. Hour After the power cable is connected to the power supply, „0:00” starts to flash on the display for a minute. During this period, you can set the time directly. To do this: 1. - Page 18 Owner’s manual 2.2 Stop the alarm When the alarm goes off, the alarm icon flashes on the display and increasing sound is issued. You can stop the alarm by: • Pressing the button when radio is set as an alarm source. •...
-
Page 19: Radio Mode
Owner’s manual 4. Display backlight Display backlight is off from 11 p.m to 5 a.m. Press any button to turn on backlight. Backlight is on in full brightness for 5 seconds. Afterwards, the backlight turns off. In other hours, the backlight is on in half brightness. After pressing any button, the backlight is on in full brightness for 5 seconds, then it returns to half brightness. -
Page 20: Bluetooth Mode
Bluetooth pairing mode. 2. Turn on Bluetooth on the external device. 3. Find and connect with this device (KM0817). Enter default password „0000” or „1234” if necessary. 4. „bt” stops flashing when the connection is successful. -
Page 21: Learn More
In case of any doubts or questions reach out to our Frequently Asked Questions section. Lechpol Electronics Sp. z o.o. Sp.k. hereby declares that Kitchen radio KM0817 is consistent with directive 2014/53/UE. Full text of the EU Declaration of Conformity is available at following Internet address: www.lechpol.eu. - Page 22 Instrukcja obsługi KWESTIE BEZPIECZEŃSTWA Symbol błyskawicy zakończonej strzałką w obrębie trójkąta równobocznego ma na celu ostrzegać użytkownika o obecności nieizolowanego “niebezpiecznego napięcia” urządzenia, o wartości, która może stwarzać ryzyko porażenia prądem elektrycznym osób. Aby zmniejszyć ryzyko porażenia prądem elektrycznym nie C A U T IO N należy zdejmować...
- Page 23 Instrukcja obsługi 11. Odłączając urządzenie od źródła zasilania, należy chwycić i pociągnąć za wtyczkę, nigdy za kabel/sznur. 12. Nie należy używać nieoryginalnych akcesoriów. 13. Niniejszy sprzęt może być użytkowany przez dzieci w wieku co najmniej 8 lat i przez osoby o obniżonych możliwościach fizycznych, czuciowych lub umysłowych, a także te, które nie posiadają...
-
Page 24: Opis Produktu
Instrukcja obsługi OPIS PRODUKTU Panel przedni Panel tylny Spód... -
Page 25: Montaż Urządzenia
Instrukcja obsługi Wyświetlacz 14 15 16 1. Pokrętło timera 9. Antena 2. Przycisk PROG 10. Składana podstawka 3. Wyświetlacz LCD 11. Gniazdo baterii 4. Przycisk w górę 12. Tryb stereo 5. Pokrętło wielofunkcyjne 13. Radio FM 14. Ikona timera 6. Przycisk 15. - Page 26 Instrukcja obsługi 2. MONTAŻ PODWIESZANY Uwagi: • Przed przystąpieniem do montażu podwieszanego należy upewnić się, że wybrane miejsce wytrzyma obciążenie urządzenia, jest odpowiednie oraz bezpieczne. • Nie należy montować urządzenia nad powierzchniami/urządzeniami emitującymi ciepło (np. płyta grzewcza, kuchenka). • Aby zminimalizować ryzyko nieprawidłowego montażu, należy skonsultować się...
- Page 27 Instrukcja obsługi Jeśli w przeciągu minuty od podłączenia urządzenia do zasilania, godzina nie zostanie ustawiona, należy przejść do ustawień zegara, aby ustawić godzinę. Aby to zrobić należy: 1. Nacisnąć i przytrzymać przycisk PROG, aby najpierw przejść do ustawień formatu godziny. 2.
- Page 28 Instrukcja obsługi 5 min/ 10 min/ 15 min. Na wyświetlaczu pojawi się ikona timera. Timer rozpocznie odliczanie czasu. • Po upływie ustawionego czasu, ikona timera miga i rozlega się narastający sygnał dźwiękowy. Aby wyłączyć alarm należy przestawić pokrętło timera w pozycję „OFF”...
-
Page 29: Tryb Radia
Instrukcja obsługi TRYB RADIA Aby przejść do trybu radia należy nacisnąć przycisk (gdy urządzenie znajduje się ekranie zegara), aż na wyświetlaczu pojawi się częstotliwość. Aby wrócić do ekranu zegara, należy nacisnąć i przytrzymać przycisk 1. Regulacja głośności Aby dostosować głośność urządzenia należy pokręcić pokrętłem wielofunkcyjnym w prawo/w lewo. -
Page 30: Tryb Bluetooth
2. Uruchomić funkcję Bluetooth na urządzeniu zewnętrznym. 3. Na liście dostępnych urządzeń znaleźć i połączyć się z urządzeniem (KM0817). Wpisać domyślne hasło „0000” lub „1234”, jeśli to konieczne. 4. Gdy połączenie zostanie nawiązane, napis „bt” na wyświetlaczu przestanie migać. - Page 31 W przypadku pytań lub wątpliwości zachęcamy do zapoznania się z Najczęściej Zadawanymi Pytaniami w zakładce Pomoc. Lechpol Electronics Sp. z o.o Sp.k niniejszym oświadcza, że Radio kuchenne KM0817 jest zgodne z dyrektywą 2014/53/UE. Pełny tekst deklaracji zgodności UE jest dostępny pod następującym adresem internetowym: www.lechpol.eu...
-
Page 32: Instrucțiuni Privind Siguranța
Manual de utilizare Triunghiul continand simbolul fulgerului indica cazurile in care sanatatea dumneavoastra este in pericol (datorita electrocutarii, de exemplu). Acest simbol avertizeaza in privinta existentei unor tensiuni periculoase in interiorul aparatului, suficient de puternice pentru a provoca electrocutarea. AVERTISMENT: Pentru a reduce riscul unui soc electric nu C A U T IO N indepartati capacul (partea din spate). -
Page 33: Descrierea Produsului
Manual de utilizare 8. Păstrați distanța minimă (5 cm) în jurul produsului pentru o ventilație adecvată. 9. Nu puneti pe aparat surse de foc deschis, cum ar fi lumanari aprinse. 10. Deconectați aparatul de la sursa de alimentare dacă dispozitivul nu va fi utilizat mult timp. - Page 34 Manual de utilizare Panoul din spate Partea de jos Ecran 14 15 16...
- Page 35 Manual de utilizare 1. Buton temporizator 9. Antenă 2. Buton PROG 10. Suport pliabil 3. Ecran LCD 11. Compartiment baterie 4. Buton sus 12. Mod Stereo 5. Buton multifuncțional 13. Rafio FM 14. Pictogramă temporizator 6. Buton 15. Pictogramă alarmă 7.
- Page 36 Manual de utilizare Respectați instrucțiunile pentru a monta dispozitivul sub dulapul de bucătărie: 1. Scoateți placa de montaj glisând-o înapoi și scoateți-o din dispozitiv. 2. Puneți placa în partea de jos a dulapului și marcați locurile pentru găurit. Găuriți și montați placa cu șuruburile scurte incluse. * Pentru a reduce înălțimea de montare, utilizați distanțierele și șuruburile mai lungi incluse.
- Page 37 Manual de utilizare 5. Apăsați butoanele sus/jos pentru a seta sursa alarmei: buzzer sau radio. 6. Apăsați butonul PROG pentru a confirma și pentru a accesa setările de volum ale alarmei. 7. Apăsați butoanele sus/jos pentru a seta volumul. Confirmați apăsând butonul PROG.
- Page 38 Manual de utilizare 3.3 Previzualizare temporizator Când dispozitivul afișează ceasul, apăsați butonul multifuncțional pentru a accesa previzualizare temporizator. • Când este apăsat butonul pentru prima dată, va fi afișat timer 1 (dacă temporizatorul 1 nu este setat, va fi afișat OFF). •...
- Page 39 Înseamnă că dispozitivul este în modul de asociere Bluetooth. 2. Activați funcția Bluetooth de pe dispozitivul extern. 3. Căutați și conectați cu dispozitivul (KM0817). Introduceți parola implicită ”0000” sau ”1234” dacă este necesar. 4. ”bt” se oprește din pâlpâit când conexiunea s-a realizat cu succes.
- Page 40 Manual de utilizare Funcții Ceas Alarmă Temporizator Stingerea automată a ecranului Lumină de fundal a ecranului Memorare posturi FM: 20 Poate fi montat sub un dulap Suport pliabil Alimentare Alimentare: 220-240 V; 50 Hz Baterii: 2 baterii tip AA (nu sunt incluse) Consum de energie: 6 W Consum de energie în modul standby: <...
- Page 41 In cazul in care aveti nevoie de lamuriri suplimentare consultati rubrica Intrebari Frecvente si Raspunsuri. Compania Lechpol Electronics declară prin prezenta că Radio de bucătărie KM0817 este în conformitate cu Directiva 2014/53/UE. Textul integral al Declarației de Conformitate UE este disponibil la următoarea adresă: www.lechpol.eu.
- Page 44 www.krugermatz.com is a registered trademark...
Need help?
Do you have a question about the KM0817 and is the answer not in the manual?
Questions and answers