
Subscribe to Our Youtube Channel
Summary of Contents for Telco T-Marc 3306
- Page 1 T-Marc 3306 CE 2.0 1GE Business Services Installation Guide For the latest product documentation, log on to the Telco Systems website at http://support.telco.com. MN100280 Revision A...
- Page 2 The information in this document is subject to change without notice and describes only the product defined in the introduction of this document. This document is intended for the use of customers of Telco Systems only for the purposes of the agreement under which the document is submitted, and no part of it may be reproduced or transmitted in any form or means without the prior written permission of Telco Systems.
-
Page 3: Table Of Contents
T-Marc 3306 Installation Guide Table of Contents Preface ....................1 Intended Audience ..................1 Reference Documentation ................1 Downloading Product Documentation ............1 Conventions Used ................... 2 Contacting Technical Support .............. 3 Safety Information ................. 2 Safety & Electromagnetic Compatibility (EMC) ........4 Safety Compliance .................. - Page 4 T-Marc 3306 Installation Guide Unpacking the Device .................. 12 Mounting the Device ................13 Mounting the Device on a Desktop ............13 Rack Mounting the Device ................14 Wall Mounting the Device ................15 Grounding the Device ................. 17 Connecting to Power Source ............... 18 Connecting to AC Power Source ..............
- Page 5 T-Marc 3306 Installation Guide Operating Conditions ...................35 List of Figures Figure 1: T-Marc 3306 ..................6 Figure 2: Front panel ports ................8 Figure 3: Internal AC power supply ..............11 Figure 4: DC power supply ................11 Figure 5: Attaching the mounting brackets ..........14 Figure 6: Installing the device in a rack ............15...
-
Page 7: Preface
Preface This document describes the procedure for installation and initial configuration of the T-Marc 3306. If the information in future release notes differs from the information in this guide, follow the information presented in the release notes for that version. -
Page 8: Conventions Used
Once you complete registration, you will receive a user name and password by return email. Professional Services Group continues to provide the best possible service and support for your Telco Systems products. Conventions Used The following conventions are used to highlight important information. Shock Hazard Indicates instructions intended to prevent possible injury as a result of an electric shock. -
Page 9: Contacting Technical Support
T-Marc 3306 Installation Guide Contacting Technical Support Telco Systems provides technical assistance for customers and partners. Contact the Professional Services team at our international headquarters, or the technical support center for your region. International Europe, Middle East Headquarters and Africa (EMEA) -
Page 10: Safety Information
T-Marc 3306 Installation Guide Safety Information Before handling the T-Marc 3306, read the instructions and safety guidelines on the following pages to prevent damage to the product and to ensure your own personal safety. If you have any questions regarding the material presented here, please contact the Telco Systems Support Center. - Page 11 T-Marc 3306 Installation Guide Shock Hazard DC POWER SOURCE The DC power source should be protected with a branch circuit over-current protection rated at 15Amp, located in the building installation Danger Install this equipment only in a Restricted Access Location per UL 60950-1 clause 1.2.7.3.
-
Page 12: Safety & Electromagnetic Compatibility (Emc)
T-Marc 3306 Installation Guide Caution Remove the power cord from a power-supply unit before you install it or remove it from the device. Otherwise, as a result, the power supply or the device could be damaged. (The device can be running while a power supply is being installed or removed, but the power supply itself should not be connected to a power source.) -
Page 13: Environment Compliance
T-Marc 3306 Installation Guide Environment Compliance • Full RoHS WEEE FCC 47 CFR Part 15 Class A This equipment has been tested and found to comply with the limits for a Class A digital device, pursuant to Part 15 of the FCC Rules. These limits are designed to provide reasonable protection against harmful interference when the equipment is operated in a commercial environment. -
Page 14: Hardware Overview
It offers a comprehensive demarcation solution that supports carrier class HQoS, OAM, resiliency, and redundancy. The T-Marc 3306 is easy to deploy and configure and provides 8G capacity in a compact size: only 1RU in height, ½ shelf width. T-Marc 3306 supports advanced security management capabilities and network features to support data, voice, security, and wireless technologies. -
Page 15: Performance
T-Marc 3306 Installation Guide Performance • 8 Gbps switching capacity • 1392KB on-chip frame buffer • 11.904 Mpps (64-bit packets) • Up to 8K MAC address entries • Jumbo frames supported on Gigabit interfaces: frame sizes up to 10056 Bytes •... -
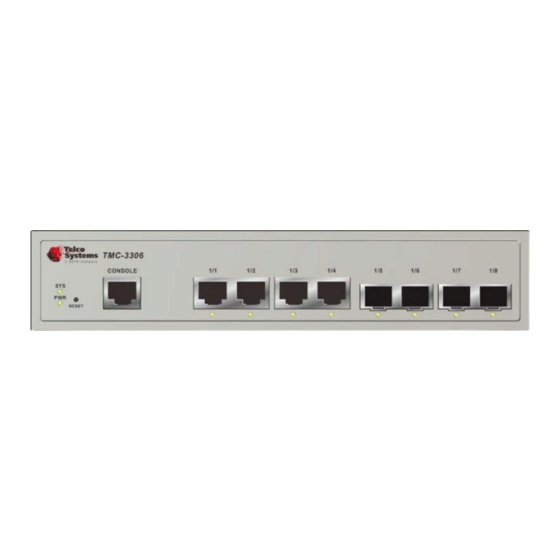
Page 16: Front Panel Interfaces
T-Marc 3306 Installation Guide Front Panel Interfaces The front panel of the T-Marc 3306 has the following interfaces: • RJ45 and SFP ports • Port Status LEDs • Power Supply LED • Recessed reset button This section describes the ports and LEDs present on the front panel of the device. - Page 17 T-Marc 3306 Installation Guide Port Description 4 x Unpopulated SFP ports 4 x (1/5-1/8) unpopulated SFP ports, for dual rate support of Fast Ethernet or Gigabit Ethernet SFP compliant, fiber-optic transceivers. These are dual rate SFP ports supporting 100Base- Fx/1000Base-X.
-
Page 18: Device Leds
T-Marc 3306 Installation Guide Device LEDs The following LED are located on the front panel and reflect the status of the port. Table 2: Port LEDs Description Status General • Off: Processing the boot loader Platform Status • Blinking Green: Initializing the application •... -
Page 19: Rear Panel Components
T-Marc 3306 Installation Guide Rear Panel Components Power Supply The AC model has an internal AC power supply of 100 - 240VAC on the rear panel. Figure 3: Internal AC power supply The DC model has a 24/48VDC power supply unit on the rear panel. -
Page 20: Package Contents
Unpacking the Device The package contents are factory tested and inspected prior to shipment. Telco Systems recommends that you retain the original shipping package until the device is installed and you have verified that it is operational. • Before you unpack the device, inspect the packaging for damage during shipment. -
Page 21: Mounting The Device
Danger Install this equipment only in a Restricted Access Location per UL 60950-1 clause 1.2.7.3. T-Marc 3306 can be mounted in a standard 19-inch equipment rack or on a desktop or shelf. • The site should meet the following requirements: ... -
Page 22: Rack Mounting The Device
T-Marc 3306 Installation Guide Rack Mounting the Device T-Marc 3306 is an ETSI standard device and you can rack mount it in a standard, 19-inch equipment rack, one devices per adapter, using the mounting kit included in the package. Caution... -
Page 23: Wall Mounting The Device
4. If installing multiple switches, mount them in the rack, one below the other, in any order. Wall Mounting the Device To wall mount the T-Marc 3306 Note Before you wall mount the device, verify that the device passes the startup self tests successfully. -
Page 24: Figure 7: Wall Mounting The Device
L mm 2. Install the screws on the wall 170 mm apart from each other. 3. Hang the T-Marc 3306 on the screws, making sure that the screws slide into the set of holes shown in the following figure. Figure 7: Wall Mount the device... -
Page 25: Grounding The Device
T-Marc 3306 Installation Guide Grounding the Device Before connecting power, ground the device to earth as described in the following procedure. T-Marc 3306 has a grounding post on the rear panel, indicated with the universal grounding symbol. Figure 8: Universal grounding symbol Danger •... -
Page 26: Connecting To Power Source
To connect the device to an AC power source 1. Plug in the power cord, provided with the device, into the power supply connector on the T-Marc 3306 rear panel. 2. Connect the other end of the power cord to the power source. - Page 27 T-Marc 3306 Installation Guide • The device is connected directly to the DC supply system and that there is no switching or disconnecting devices in the earthed circuit conductor between the DC source and the connection point of the grounding electrode conductor.
- Page 28 T-Marc 3306 Installation Guide Danger The DC power supply does not have a Power On/Off button and is automatically turned on when the cabling is completed and the power to the feed line is turned on. Before wiring the DC...
-
Page 29: Connecting To The Console Port
T-Marc 3306 Installation Guide Connecting to the Console Port The console port is an EIA232 VT-100 compatible port through which you can define the device's basic operational parameters. To connect to the console port 1. Connect the RJ45 connector of the console cable to the device's console port. -
Page 30: Establishing Network Connection
Establishing Network Connection Connecting Network Devices T-Marc 3306 is designed to interconnect multiple segments (or collision domains). You can connect the device to network cards in PCs and servers, as well as to hubs, devices, and routers. You can also connect to other devices using SFP. -
Page 31: Inserting An Sfp Transceiver Into An Sfp Socket
T-Marc 3306 Installation Guide Inserting an SFP Transceiver into an SFP Socket Laser Warning The device uses lasers to transmit signals over fiber optic cable. The lasers are compliant with the requirements of a Class 1 Laser Product and are inherently eye safe in normal operation. -
Page 32: Connecting An Sfp Transceiver
T-Marc 3306 Installation Guide Connecting an SFP Transceiver Laser Warning The device uses lasers to transmit signals over fiber optic cable. The lasers are compliant with the requirements of a Class 1 Laser Product and are inherently eye safe in normal operation. However, you should never look directly at a transmit port when it is powered on. -
Page 33: Extracting An Sfp Transceiver
T-Marc 3306 Installation Guide Extracting an SFP Transceiver Caution The SFP transceiver modules are static sensitive devices. Always use an ESD wrist strap or similar individual grounding device when handling SFP transceiver modules or coming in contact with modules. To remove an SFP 1. -
Page 34: Troubleshooting
T-Marc 3306 Installation Guide Troubleshooting Most problems are caused by the following situations. Check for these items first when starting your troubleshooting: Table 4: Troubleshooting Chart Situation Action POWER LED is • Check connections between the switch, the power cord and the wall outlet. -
Page 35: Initial Device Configuration
T-Marc 3306 Installation Guide Initial Device Configuration The CLI is a fully comprehensive management interface on the device. It is the only management interface accessible on the serial console. Even if there is no network connectivity, the device can still be managed using a serial connection. - Page 36 T-Marc 3306 Installation Guide VLAN 1 10.3.136.108/16 DHCP 6. Set static IP address: TMC-3306# configure terminal TMC-3306(config)# interface vlan 1 TMC-3306(config-if-vlan)# ip address 10.3.134.211 255.255.0.0 TMC-3306# show ip interface brief Interface Address Method Status ---------------- -------------------- -------- ------ VLAN 1 10.3.134.211/16...
-
Page 37: Saving Startup Configuration To A Tftp Server
2. Enter the default password in the Password field: admin 3. The GUI displays the device front panel. Figure 11: T-Marc 3306 GUI Saving Startup Configuration to a TFTP Server To back up the device configuration, save the details as a text file on an external location, using the TFTP protocol. -
Page 38: Saving Startup Configuration Via Gui
T-Marc 3306 Installation Guide Example: Username:admin Password:admin TMC-3306#copy startup-config tftp://190.3.0.100 /backup/config.txt Saving Startup Configuration via GUI It is useful to save the startup configuration to your computer using the GUI because this method does need the TFTP server to be installed. -
Page 39: Transferring Startup Configuration Via Gui
T-Marc 3306 Installation Guide Transferring Startup Configuration via GUI It is useful to transfer the startup configuration from your computer using the GUI because this method does need the TFTP server to be installed. Reloading Factory Defaults To reset to factory settings, use the following command:... -
Page 40: Downloading The Software
You have at least Read permissions for the software-image file for your username. There is a minimum of 9.5 MB of free disk space on the T-Marc 3306 file-system. Step-By-Step Procedure 1. Log on to the device (through the console port or a Telnet session) and type in the your password (default password is admin). -
Page 41: Transferring Images Via Gui
T-Marc 3306 Installation Guide Transferring images via GUI It is useful to transfer the software image from your computer using the GUI because this method does need the TFTP server to be installed. Downloading the Software... -
Page 42: Appendix I: Ordering Information
Internal 24/48 DC power supply • Hardened to -40˚C to 65˚C • SyncE and 1588v2 support. • Mounting Kit (includes two extension brackets and screws to mount the brackets) Consult your Telco Systems’ representative to order any parts. Appendix I: Ordering Information... -
Page 43: Appendix Ii: Specifications
T-Marc 3306 Installation Guide Appendix II: Specifications Physical Specifications Width 220mm (8.7 Inches) Height 44.45 mm (1.75 Inches) 1RU Depth 134 mm (5.51 Inches) Weight 1.0 kg (<2.2 lbs) Power Supply AC Power Internal, auto-ranging transformer: 100~240VAC, 50~60Hz Power consumption...
Need help?
Do you have a question about the T-Marc 3306 and is the answer not in the manual?
Questions and answers