Diagnostic Associates DA-ST512 User Manual
Service tool
Hide thumbs
Also See for DA-ST512:
- User manual (3 pages) ,
- User manual (4 pages) ,
- User manual (4 pages)
Table of Contents
Advertisement
Quick Links
Advertisement
Table of Contents

Related Manuals for Diagnostic Associates DA-ST512


Summary of Contents for Diagnostic Associates DA-ST512
- Page 1 DA-ST512 (Service Tool) User Manual V5.1 25-02-20...
-
Page 3: Table Of Contents
Product Terms & Conditions Introduction Getting to Know the Device Registration and Set-up Installing the DA App Hub Registering your DA-ST512 Updating the DA-ST512 Device DA-ST512 Software Updating Advanced Software Updating DA-ST512 Trial Applications DA-ST512 Applications DA-ST512 Menu Application DA-ST512 Basic Operation... -
Page 4: Important Information
This User Manual is updated on a regular basis to ensure its content is up-to-date. Every effort is made to ensure that the latest version is supplied with your product, however this is not always practical. Therefore you should always check with the Diagnostic Associates website to determine if you have the latest version. -
Page 5: Product Terms & Conditions
Product Terms & Conditions In no event shall Diagnostic Associates Limited be liable for damages exceeding the original cost of the product. Diagnostic Associates Limited will be exempt from all claims whether based upon direct, indirect, special, incidental, or consequential damages resulting from the use of this product, its accompanying software, or its documentation. -
Page 6: Introduction
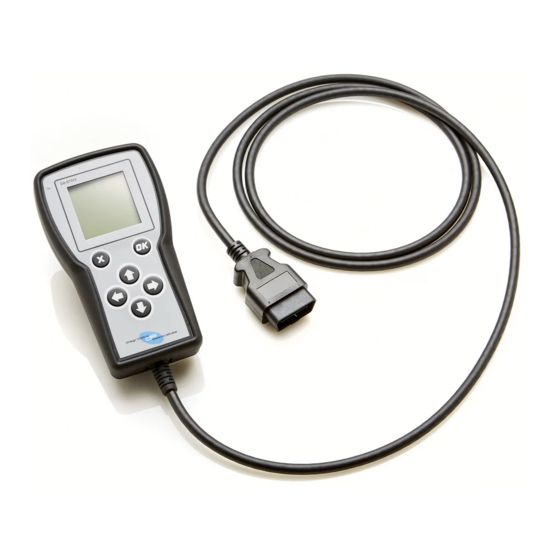
This PC application will allow you to connect the DA-ST512 to your PC to check for updates to your currently installed set of applications. It also allows you to install or remove (temporarily) recently purchased applications. The App Hub keeps a record of what you have purchased, what is installed and which version is installed. - Page 7 There are seven main parts to the device and these are shown on the picture above. Vehicle OBDII Connector : This is the end that connects to the vehicle OBDII diagnostic connector to provide power to the device and connection to the vehicle communications networks.
-
Page 8: Registration And Set-Up
Registration and Set-up Before you can use your DA-ST512 device on the vehicle you will need to first of all register your product to unlock it. All devices are shipped in a locked state as each device is tied to a customer in order to maintain the applications on the device and to maintain the warranty. -
Page 9: Registering Your Da-St512
The registration process requires your name, address and email to complete it. When complete it will allow the DA-ST512 to be used and allow access to software updates via the DA App Hub. By registering you will also receive emails when new software is available to download to your DA-ST512. -
Page 10: Updating The Da-St512 Device
Diagnostic Associates file server. Connect your DA-ST512 to your PC using the supplied USB cable. The yellow LED on the device will flash periodically, this is a ‘heartbeat’ to show that the device is powered by USB. -
Page 11: Advanced Software Updating
‘Update Device’. Note: Use the ‘Reset’ button to clear the selections in the DA App Hub in order to start again. This will not affect applications on the DA-ST512. DA-ST512 Software Trial Applications When new applications are available trial versions may be available to existing customers. -
Page 12: St512 Applications
Application updates can be checked for by connecting your DA-ST512 to the DA App Hub. It should be noted that, unless stated at purchase time, all applications will be updated for new vehicle and model year updates for a... -
Page 13: St512 Basic Operation
An application is started by selecting the desired application and pressing the ‘OK’ button. Feedback Session Data When the DA-ST512 device is connected to a vehicle the DA-ST512 will perform a complete sweep of the vehicle. This is only done for devices owned by JLR dealers, and for vehicles within their warranty period. -
Page 14: Service Interval Reset (Sir)
Service Interval Reset (SIR) Part of the base Application package. This application will perform the Service Interval Reset via diagnostic communication to the Instrument Cluster module. This will remove the service warning from the Instrument Cluster and reset the counter in preparation for the next service interval (including oil counter resets where appropriate). - Page 15 The following JLR vehicles and associated model years are supported by the SIR application at the time this user manual was produced. To obtain an up-to-date version of this table you should go to the Diagnostic Associates website. Supported JLR Vehicles...
-
Page 16: Electronic Park Brake Release (Epbr)
Electronic Park Brake Release (EPBR) Part of the base Application package. This application will perform the Electronic Park Brake Release via diagnostic communication to the EPBR module. This will force the brake to move to its mount position and then release the brake pads from the disc in readiness for inspection or replacement. - Page 17 The following JLR vehicles and associated model years are supported by the EPBR application at the time this user manual was produced. To obtain an up-to-date version of this table you should visit the Diagnostic Associates website. Supported JLR Vehicles...
-
Page 18: Tight Tolerance Mode Toggle (Ttmt)
Tight Tolerance Mode Toggle (TTMT) Part of the base Application package. This application is used to set the vehicle suspension to a known height so that vehicle geometry functions can be undertaken (such as wheel alignment and headlamp levelling etc.). Once in tight tolerance mode, the application can be used again to take the vehicle out of tight tolerance mode and return to customer mode. - Page 19 The following JLR vehicles and associated model years are supported by the TTMT application at the time this user manual was produced. To obtain an up-to-date version of this table you should visit the Diagnostic Associates website. Supported JLR Vehicles...
-
Page 20: Transport Mode Toggle (Tmt)
Transport Mode Toggle (TMT) Part of the base Application package. This application will perform the Transport Mode toggle via diagnostic communication. Therefore if the vehicle is already in its transport mode the application will disable the speed limit and dis- able the air suspension on applicable vehicles within the JLR range from 2010 vehicles on- wards. - Page 21 The following JLR vehicles and associated model years are supported by the TMT application at the time this user manual was produced. To obtain an up-to-date version of this table you should visit the Diagnostic Associates website. Supported JLR Vehicles...
-
Page 22: Diesel Exhaust Fluid (Def)
Diesel Exhaust Fluid Application This application allows the Diesel Exhaust Fluid (DEF or AdBlue®) level to be constantly monitored, and displays the amount required to refill the tank. It also provides service functions related to the DEF tank and Selective Catalyst Reduction (SCR) system, as described below. Diesel Exhaust Fluid Process On starting the application the main menu displays the following options - Exhaust fluid level... - Page 23 The following JLR vehicles and associated model years are supported by the Diesel Exhaust Fluid application at the time this user manual was produced. To obtain an up-to-date version of this table you should visit the Diagnostic Associates website. Supported JLR Vehicles...
-
Page 24: Dpf Dynamic Regeneration (Dpfdr)
Diesel Particulate Filter Dynamic Regeneration (DPFDR) Part of the base Application package. This application will perform the DPF dynamic regeneration procedure whilst the engine is run- ning. This is to clear the DPF of soot that has built up over time. Be aware during any road test to ensure that any cables or devices plugged in the OBDII connector do not impede the driver whilst undertaking the road test. - Page 25 The following JLR vehicles and associated model years are supported by the DPFDR application at the time this user manual was produced. To obtain an up-to-date version of this table you should visit the Diagnostic Associates website. Supported JLR Vehicles...
-
Page 26: Oil Level
Oil level Application This application will measure the engine oil level via diagnostic communication to the vehicle. A vertical bar graph of measured oil level will be displayed from minimum to maximum. The level will also be displayed as a percentage to the right of the graph, also displayed will be level of oil in mm, current capacity, dry fill capacity and oil temperature . - Page 27 The following JLR vehicles and associated model years are supported by the Oil Level application at the time this user manual was produced. To obtain an up-to-date version of this table you should visit the Diagnostic Associates website. Supported JLR Vehicles...
-
Page 28: J2534 Ids/Sdd Operation Mode
PC. Operation of the DA-ST512 keypad functions are disabled during this mode of operation. The DA-ST512 screen displays that it is in J2534 mode, it displays the connection status to the host IDS/SDD PC, the battery voltage read from the vehicle battery and the firmware version of the J2534 application. - Page 29 Unzip the files to a folder on the PC you want to use your DA-ST512 device with. Double-click on the setup.exe file to begin the installation. Note: If you do not have the .net Framework 4.0 on your PC it will be automatically installed now.
-
Page 30: Device Recovery
Device Recovery The DA-ST512 device has the ability to check the integrity of its own loaded software. It does this as soon as the device is powered up. If after power-up your device the yellow LED is flashing steadily and then illuminates constantly, then this means that the software on the device is corrupt. -
Page 31: Troubleshooting
Troubleshooting When the unit is turned on, the screen lights up and displays a splash screen. The power • supply to the device should be checked if there is no activity on the display. If there is power to the device then contact technical support. If the screen seems corrupt on starting the device, disconnect the device from the vehicle •... -
Page 32: Technical Support
Technical Support Diagnostic Associates Limited are open Monday through Friday, 7:30 a.m. to 5:00 p.m. GMT, to answer technical support questions. If you need assistance please email support@diagnostic-associates.com. If it necessary to return your device for repair, you will be asked for your contact information and be provided with a Return Merchandise Authorization number (RMA).
Need help?
Do you have a question about the DA-ST512 and is the answer not in the manual?
Questions and answers