Advertisement
Available languages
Available languages
Quick Links
Advertisement

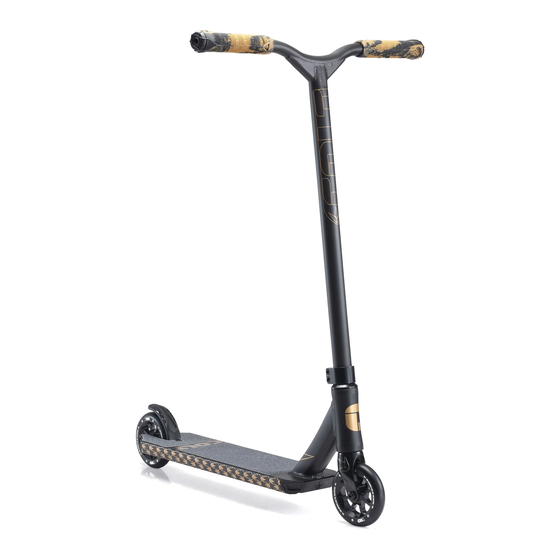
Summary of Contents for Blunt/Envy Scooters COLT
- Page 1 Owner’s Manual This product has been EN 14619 (Class A) tested Before using this product, please read and understand the entire manual. Please register your product with us to gain exclusive updates and content. Fill in your details at the website below WWW.BLUNTANDENVY.COM/REGISTER...
- Page 2 CONTENTS CONTENTS Safety Warnings................2 Before You Begin................3 Safety Tips ..................3 Check Before Riding................3 Assembly Instructions..............4 General Maintenance..............5 Warranty...................5 SAFETY WARNINGS AN IMPORTANT MESSAGE: This manual contains information for the safety of the user. It is in your best interests to review this information.
- Page 3 BEFORE YOU BEGIN BEFORE YOU BEGIN - Safety equipment such as knee pads and elbow pads should be worn at all times. - Never operate this scooter without a helmet. - Always ride on smooth and paved surfaces away from motor vehicles. - Scooter may encounter pitching motion/wheel entrapment or suddenly stop if it comes into contact with sharp bumps, rocks/sticks, sudden surface changes or drains.
- Page 4 KNOW YOUR SCOOTER 1 - Bars 2 - Hand Grips 3 - Clamp 4 - Deck 5 - Wheel 6 - Fork 7 - Brake 8 - Grip Tape 9 - Headset 10 - Nylon Front Plate & Rear Inserts Required tools for assembly 5mm Allen Key ( included) SCOOTER ASSEMBLY...
- Page 5 GENERAL MAINTENANCE Tightening your compression f your bars start to shake or move side to side, this means your compression needs to be tightened. Do so by removing your handle bars and using a spanner to tighten the compression bolt. Turning it in a clock-wise direction, tighten until some pressure is felt in the spanner.
- Page 6 MANUEL DU PROPRIÉTAIRE Ce produit a été testé selon la norme EN 14619 (classe A) Avant d’utiliser ce produit, veuillez lire et comprendre le manuel en entier.Si vous souhaitez obtenir des mises à jour exclusives et du contenu, enregistrez votre produit et vos coordonnées sur le site ci-dessous: WWW.BLUNTANDENVY.COM/REGISTER...
- Page 7 CONTENU Avertissement de sécurité..............2 Avant de commencer..............3 Conseils d’utilisation..............3 Équipement de sécurité..............3 Instructions de montage..............4 Entretien général................5 Garantie....................5 AVERTISSEMENTS DE SÉCURITÉ MESSAGE IMPORTANT: Ce manuel contient des informations importantes pour la sécurité de l’utilisateur. Il est dans votre intérêt de lire ces informations.
- Page 8 VERIFICATIONS AVANT UTILISATION - Des équipements de sécurité tels que des genouillères et des coudières doivent être portés en permanence. - Ne jamais utiliser cette trottinette sans casque. - Toujours rouler sur des surfaces lisses et recouvertes loin des véhicules à moteur. - La trottinette peut être s’arrêter brusquement si elle entre en contact avec des cailloux/des batons ou lors de changements brusques de surface.
- Page 9 CONNAITRE SA TROTTINETTE 1 - Guidon 2 - Poignée 3 - Collier de serrage 4 - Plateau 5 - Roue 6 - Fourche 7 - Frein 8 - Grip 9 - Jeu de direction 10 - Plaque avant en nylon Et inserts arrière Outils requis pour l’assemblage: clé...
- Page 10 Le fabricant ne peut être tenu pour responsable pour tout accident, perte ou dommage directs ou indirects qui surviendraient lors de l’utilisation de ce produit. Pour plus d’informations contactez Blunt/Envy Scooters. bluntandenvy.com/warranty-info * Dépend des lois commerciales de votre région...
- Page 11 Bedienungsanleitung Dieses Produkt wurde EN 14619 (Klasse A) wurden getestet Lesen und verstehen Sie das gesamte Handbuch, bevor Sie dieses Produkt verwenden. Bitte registrieren Sie Ihr Produkt bei uns, um exklusive Updates rund um ihr Produkt zu erhalten. Bitte geben Sie Ihre Daten auf der folgenden Website ein: WWW.BLUNTANDENVY.COM/REGISTER...
-
Page 12: Table Of Contents
INHALTSVERZEICHNIS Sicherheitshinweise................2 Bevor Sie Beginnen................3 Empfohlene Fahrpraktiken............3 Sicherheitsausrüstung..............3 Montageanleitungen...............4 Allgemeine Wartung...............5 Garantie....................5 SICHERHEITSHINWEISE WICHTIGE HINWEISE: Dieses Handbuch enthält Informationen zur Sicherheit des Benutzers. Es liegt in Ihrem Interesse, diese Informationen zu überprüfen. Kinder sollten von einem Erwachsenen begleitet werden, der alle folgenden Warnungen, Vorsichtsmaßnahmen, Anweisungen und Sicherheitsthemen erklären und ihnen helfen kann, diese vollständig selber zu verstehen. -
Page 13: Bevor Sie Beginnen
BEVOR SIE BEGGINEN - Sicherheitsausrüstung wie Knie- und Ellbogenschützer sollte immer getragen werden . - Fahren Sie diesen Roller niemals ohne Helm. - Fahren Sie immer auf glatten und asphaltierten Flächen, die nicht in der Nähe von Strassen liegen. - Der Scooter kann auf Nickbewegungen / Radeinklemmungen stoßen oder plötzlich anhalten, wenn er mit scharfen Stößen, Steinen / Stöcken, plötzlichen Oberflächenveränderungen oder Abflüssen in Berührung kommt . - Page 14 KENNE DEINE SCOOTER 1 - Lenker 2 - Handgriffe 3 - Klemme 4 - Deck 5 - Rad 6 - Gabel 7 - Bremse 8 - Griffband 9 - Headset 10 - Frontplatte aus Nylon & Geschachtelte Enden Erforderliches Werkzeug für die Montage: 5 mm Inbusschlüssel (im Lieferumfang enthalten) SCOOTER MONTAGE...
-
Page 15: Allgemeine Wartung
ALLGEMEINE WARTUNG Nachziehen der Komprimierung (compression) Wenn der Lenker zu schütteln beginnt oder von einer Seite zu anderen Seite bewegt, dann bedeutet dies, dass Ihre Kompression neu angezogen werden muss. Nehmen Sie dazu den Lenker ab und ziehen Sie die Druckschraube mit einem Inbusschlüssel fest. Drehen Sie ihn im Uhrzeigersinn gedreht haben, ziehen Sie ihn bis zu einem gewissen Druck an.


Need help?
Do you have a question about the COLT and is the answer not in the manual?
Questions and answers