Table of Contents
Advertisement
Available languages
Available languages
Quick Links
LED-SOLAR-WANDLEUCHTE / LED SOLAR WALL LIGHT /
APPLIQUE MURALE SOLAIRE À LED
LED-SOLAR-WANDLEUCHTE
Montage-, Bedienungs- und Sicherheitshinweise
APPLIQUE MURALE SOLAIRE À LED
Instructions de montage, d'utilisation et consignes de sécurité
SOLARNA LAMPA ŚCIENNA LED
Wskazówki montażu, obsługi i bezpieczeństwa
LED SOLÁRNE NÁSTENNÉ SVIETIDLO
Pokyny pre montáž, obsluhu a bezpečnostné pokyny
IAN 311196
LED SOLAR WALL LIGHT
Assembly, operating and safety instructions
LED-SOLAR-WANDLAMP
Montage-, bedienings- en veiligheidsinstructies
LED SOLÁRNÍ NÁSTĚNNÉ SVÍTIDLO
Pokyny k montáži, obsluze a bezpečnostní pokyny
Advertisement
Chapters
Table of Contents

Summary of Contents for LIVARNO LUX 311196
- Page 1 Instructions de montage, d‘utilisation et consignes de sécurité Montage-, bedienings- en veiligheidsinstructies SOLARNA LAMPA ŚCIENNA LED LED SOLÁRNÍ NÁSTĚNNÉ SVÍTIDLO Wskazówki montażu, obsługi i bezpieczeństwa Pokyny k montáži, obsluze a bezpečnostní pokyny LED SOLÁRNE NÁSTENNÉ SVIETIDLO Pokyny pre montáž, obsluhu a bezpečnostné pokyny IAN 311196...
- Page 2 DE / AT / CH Montage-, Bedienungs- und Sicherheitshinweise Seite GB / IE Assembly, operating and safety instructions Page FR / BE Instructions de montage, d‘utilisation et consignes de sécurité Page NL / BE Montage-, bedienings- en veiligheidsinstructies Pagina Wskazówki montażu, obsługi i bezpieczeństwa Strona Pokyny k montáži, obsluze a bezpečnostní...
- Page 3 HG03508A...
- Page 4 HG03508B...
-
Page 5: Table Of Contents
Legende der verwendeten Piktogramme ..........Seite Einleitung ..........................Seite Bestimmungsgemäße Verwendung ..................Seite Teilebeschreibung ........................Seite Technische Daten ........................Seite Lieferumfang ..........................Seite Allgemeine Sicherheitshinweise ...............Seite Sicherheitshinweise für Batterien / Akkus ................Seite Funktion ..........................Seite 10 Vor der Inbetriebnahme ..................Seite 10 Montage ..........................Seite 10 Akkus wechseln ........................Seite 12 Winterbetrieb ...........................Seite 12 Reinigung und Pflege ....................Seite 13... -
Page 6: Legende Der Verwendeten Piktogramme
Legende der verwendeten Piktogramme Erfassungswinkel Volt, Gleichstrom Bewegungsmelder: ca. 100 ° Spritzwassergeschützt Akkus inklusive Erfassungsbereich: ca. 5 m LED-Lebensdauer LED-Solar-Wandleuchte beschrieben und für die angegebenen Einsatz- bereiche. Händigen Sie alle Unterlagen bei Weitergabe des Produkts an Dritte mit aus. Einleitung Bestimmungsgemäße Wir beglückwünschen Sie zum Kauf Ihres neuen Verwendung... -
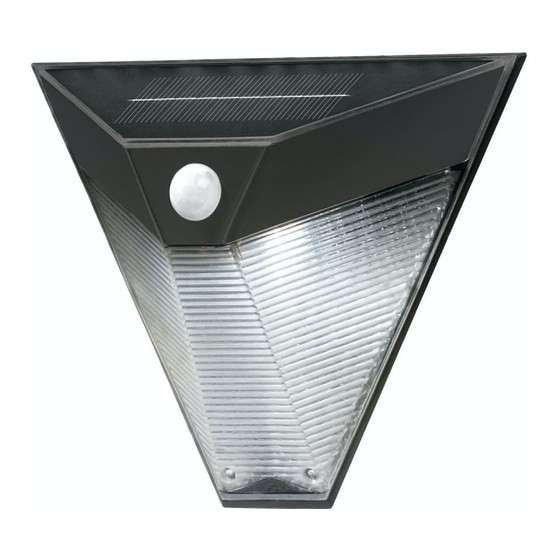
Page 7: Teilebeschreibung
Technische Daten Dieses Produkt ist nicht zur Raum- beleuchtung im Haushalt geeig- net. Betriebsspannung: 3,6 V Dieses Produkt eignet sich für extreme Tem- Akku: 3 x Ni-MH-Akku 1,2 V peraturen bis zu -21 °C. 900 mAh, AAA LEDs: 4 x ca. 0,5 W (Die LEDs sind nicht austauschbar.) Teilebeschreibung Solarzelle:... -
Page 8: Allgemeine Sicherheitshinweise
3 Schrauben (Ø 4 x 30 mm) für Gebrauchs des Produkts unterwiesen wurden Modell HG03508A und die daraus resultierenden Gefahren ver- 2 Schrauben (Ø 4 x 30 mm) für stehen. Kinder dürfen nicht mit dem Produkt Modell HG03508B spielen. Reinigung und Benutzerwartung 3 Dübel Ø... - Page 9 EXPLOSIONSGEFAHR! Laden Verätzungen verursachen. Tragen Sie des- Sie nicht aufladbare Batterien halb in diesem Fall geeignete Schutzhand- niemals wieder auf. Schließen schuhe. Sie Batterien / Akkus nicht kurz und / oder Im Falle eines Auslaufens der Batterien / öffnen Sie diese nicht. Überhitzung, Brand- Akkus entfernen Sie diese sofort aus dem gefahr oder Platzen können die Folge sein.
-
Page 10: Funktion
Funktion Die Position „ON“ für den EIN- / AUS- Schalter verfügt über folgende Solarzelle Funktionen: Die Solarzelle wandelt Lichtenergie der Sonne Das konstant leuchtende Orientierungslicht in elektrische Energie um. Damit werden die im schaltet automatisch ein oder aus, sobald die Akkufach eingebauten Akkus aufgeladen. - Page 11 in die Wand bohren. Verwenden Sie eine Schrauben . Achten Sie darauf, dass der Bohrmaschine, um die Löcher in die Wand zu Pfeil auf der Markierung der Montageplatte bohren. Beachten Sie die Sicherheitshinweise ( UP) nach oben zeigt (Abb. A). Hinweis: Das beiliegende Montagematerial aus den Bedien- und Sicherheitshinweisen der Bohrmaschine.
-
Page 12: Akkus Wechseln
Akkus wechseln Schließen Sie das Akkufach, indem Sie den Akkufachdeckel mit den Verschlussschrauben Hinweis: Um eine gute Leistung der Solarzelle befestigen. zu gewährleisten, reinigen Sie die Solarzelle re- Stellen Sie den EIN- / AUS-Schalter wieder gelmäßig (siehe „Reinigung und Pflege“). auf die Position „ON“, bevor Sie das Produkt wieder auf die Haken der Montageplatte Gehen Sie zum Wechseln der Akkus folgender-... -
Page 13: Reinigung Und Pflege
Reinigung und Pflege Reinigen Sie Sensor und Solarzelle regel- mäßig, um eine einwandfreie Funktion zu Schalten Sie das Produkt zur Reinigung aus. gewährleisten. Verwenden Sie zur Reinigung ein leicht ange- Halten Sie insbesondere die Solarzelle im feuchtetes, fusselfreies Tuch mit einem milden Winter schnee- und eisfrei. -
Page 14: Entsorgung
Problem Ursache Lösung Akku entlädt sich inner- Solarzelle ist verschmutzt. Solarzelle reinigen. halb von kurzer Zeit. Solarzelle ist falsch ausgerichtet. Solarzelle neu ausrichten (siehe „Montage“). Schlechte Wetterbedingungen. Siehe „Winterbetrieb“. Akkus sind defekt. Akkus austauschen (siehe „Akkus wechseln“). Entsorgung Das Produkt und die Verpackungs- materialien sind recycelbar, entsorgen Die Verpackung besteht aus umweltfreundlichen Sie diese getrennt für eine bessere... -
Page 15: Garantie
Werfen Sie Ihr Produkt, wenn es verbrauchte Batterien / Akkus bei einer kommu- ausgedient hat, im Interesse des nalen Sammelstelle ab. Umweltschutzes nicht in den Hausmüll, sondern führen Sie es einer fachge- Garantie rechten Entsorgung zu. Über Sam- melstellen und deren Öffnungszeiten können Sie sich bei Ihrer zuständigen Das Produkt wurde nach strengen Qualitätsricht- Verwaltung informieren. - Page 16 ersetzt. Diese Garantie verfällt, wenn das Produkt beschädigt, nicht sachgemäß benutzt oder gewartet wurde. Die Garantieleistung gilt für Material- oder Fabrikationsfehler. Diese Garantie erstreckt sich nicht auf Produktteile, die normaler Abnutzung ausgesetzt sind (z. B. Batterien) und daher als Verschleißteile angesehen werden können oder Beschädigungen an zerbrechlichen Teilen, z.
- Page 17 List of pictograms used .....................Page 18 Introduction ........................Page 18 Intended use ..........................Page 18 Parts description ........................Page 19 Technical data ..........................Page 19 Scope of delivery ........................Page 19 General safety instructions ...................Page 20 Safety instructions for batteries / rechargeable batteries ............Page 20 Function ..........................Page 22 Before use...
-
Page 18: List Of Pictograms Used
List of pictograms used Motion sensor detection angle: Volt, Direct current approx. 100 ° Splashproof Batteries included Detection range: approx. 5 m LED lifespan LED Solar wall light the specified applications. If you pass the prod- uct on to anyone else, please ensure that you also pass on all the documentation with it. -
Page 19: Parts Description
This product is suitable for extreme tempera- LEDs: 4 x approx. 0.5 W (LEDs tures down to -21 °C. not replaceable.) Solar cell: approx. 5.5 V, approx. 100 mA Parts description Sensor: Range: max. 5 m, detection angle: approx. 100 ° hori- Rawlplug zontal, approx. -
Page 20: General Safety Instructions
2 Rawlplugs Ø 6 mm for Model HG03508B Never leave children unsupervised with the 1 Assembly, operating and safety instructions packaging material. The packaging material represents a danger of suffocation. Children frequently underestimate the dangers. General safety Keep children out of the area you are work- instructions ing in. - Page 21 batteries / rechargeable batteries and / or In the event of a leakage of batteries / re- open them. Overheating, fire or bursting can chargeable batteries, immediately remove be the result. them from the product to prevent damage. Never throw batteries / rechargeable Only use the same type of batteries / recharge- batteries into fire or water.
-
Page 22: Function
Function The “ON“ position for the ON / OFF switch features the following Solar cell functions: The solar cell converts energy from sunlight If the orientation light is constantly lit up, it will into electricity. Using this electricity, the installed automatically switch on or off once the solar rechargeable batteries are charged in the... - Page 23 Note: The enclosed mounting material is wall. Always observe all safety instructions for the power drill in the manual for the power suitable for ordinary masonry construction. drill. Death or injury due to electric shock may Other wall substrates may require other fas- otherwise result.
-
Page 24: Replacing The Rechargeable Batteries
Replacing the Close the battery compartment by fixing the rechargeable batteries battery compartment lid with the fixing screws. Return the ON / OFF switch to the position Note: Regularly clean the sensor and solar “ON“ before you return the product to the cell to ensure proper functionality (refer to hooks of the mounting plate. -
Page 25: Cleaning And Care
Cleaning and care Regularly clean the sensor and solar cell to ensure proper functionality. Before cleaning, switch the product off. Keep the solar cell free of snow and ice, Use a slightly dampened, lint-free cloth and especially in winter. mild cleaning agent to clean. Regularly check the sensor and solar cell... -
Page 26: Disposal
Problem Cause Solution Battery quickly loses The solar cell is dirty. Clean the solar cell its charge. Solar cell is positioned Reposition the solar cell (refer to incorrectly “Installation“) Poor weather conditions Refer to “Winter-time use“ Defective rechargeable Replace rechargeable batteries batteries (see “Replacing the rechargeable batteries“) -
Page 27: Warranty
Warranty household waste. Information on col- lection points and their opening hours can be obtained from your lo- The product has been manufactured to strict cal authority. quality guidelines and meticulously examined before delivery. In the event of product defects Faulty or used batteries / rechargeable batteries you have legal rights against the retailer of this must be recycled in accordance with Directive... - Page 28 considered consumables (e.g. batteries) or for damage to fragile parts, e.g. switches, rechar- geable batteries or glass parts. 28 GB/IE...
- Page 29 Légende des pictogrammes utilisés ...............Page 30 Introduction ........................Page 30 Utilisation conforme .........................Page 30 Descriptif des pièces ........................Page 31 Caractéristiques techniques .....................Page 31 Contenu de la livraison ......................Page 31 Instructions générales de sécurité ..............Page 32 Consignes de sécurité relatives aux piles / aux piles rechargeables ........Page 33 Fonctionnement ......................Page 34 Avant la mise en service...
-
Page 30: Légende Des Pictogrammes Utilisés
Légende des pictogrammes utilisés Angle de détection du détecteur Volt, courant continu de mouvement : env. 100 ° Protégé contre les projections Piles fournies d'eau Zone de détection : env. 5m Durée de vie des LED Applique murale solaire à LED domaines d‘application spécifiés. -
Page 31: Descriptif Des Pièces
Caractéristiques techniques Ce produit n‘est pas destiné à servir d‘éclairage de pièce dans un foyer domestique. Tension de service : 3,6 V Ce produit résiste aux températures extrêmes, Pile : 3 x pile Ni-MH 1,2 V inférieures à -21°C. 900 mAh, AAA LED : 4 x env. -
Page 32: Instructions Générales De Sécurité
1 Plaque de montage l‘utilisation sûre du produit et comprennent 3 Vis (Ø 4 x 30 mm) pour modèle HG03508A les risques liés à son utilisation. Les enfants 2 Vis (Ø 4 x 30 mm) pour modèle HG03508B ne doivent pas jouer avec le produit. Le net- 3 Chevilles Ø... -
Page 33: Consignes De Sécurité Relatives Aux Piles / Aux Piles Rechargeables
Consignes de sécurité par ex. sur des radiateurs / exposition directe relatives aux piles / aux aux rayons du soleil. piles rechargeables Lorsque les piles / piles rechargeables fuient, évitez tout contact du produit chimique avec DANGER DE MORT ! Rangez les piles / la peau, les yeux ou les muqueuses ! Rincez piles rechargeables hors de la portée des les zones touchées à... -
Page 34: Fonctionnement
Risque d‘endommagement du produit l‘interrupteur MARCHE / ARRÊT se trouve en Exclusivement utiliser le type de pile / pile position «ON». rechargeable spécifié. La charge de piles complètement déchargées Insérez les piles / piles rechargeables confor- dure de 1 à 2 jours environ en été, lorsque le mément à... -
Page 35: Montage
longue durée de fonctionnement, les LED ne sont il existe un risque mortel ou un danger de pas contrôlées à pleine puissance sur cette posi- blessures par électrocution. tion d‘interrupteur. Dès que le capteur enre- Choisir l‘emplacement de montage du gistre un mouvement, le produit émet une lumière produit en fonction des critères suivants : particulièrement brillante (voir Fig. -
Page 36: Remplacement Des Piles
Remplacement des piles la plaque de montage ( UP) soit orientée vers le haut (ill. A). Remarque : Le matériel de montage fourni Remarque : Nettoyer la cellule solaire de convient à la fixation de l‘article sur des ou- manière régulière afin de garantir son bon fonc- vrages de maçonnerie usuels. -
Page 37: Fonctionnement En Hiver
Nettoyage et entretien Refermez le compartiment à piles en fixant son couvercle avec les vis prévues à cet effet. Rallumez le produit en plaçant l‘interrupteur Éteignez le produit pour le nettoyer. MARCHE / ARRÊT en position «ON» avant Pour le nettoyage, utilisez un chiffon légère- de replacer le produit sur les crochets de la ment humide et non pelucheux ainsi qu‘un plaque de montage. -
Page 38: Dépannage
Dépannage Problèmes Cause Solution Le produit ne L'interrupteur MARCHE / ARRÊT Placez l'interrupteur MARCHE / s‘allume pas. est sur la position «OFF». ARRÊT en position «ON». Les piles sont vides. Recharger les piles au moyen d'un chargeur externe. La lumière vacille. Les piles sont presque vides. -
Page 39: Mise Au Rebut
Mise au rebut Afin de contribuer à la protection de l’environnement, veuillez ne pas jeter L’emballage se compose de matières recyclables votre produit usagé dans les ordures pouvant être mises au rebut dans les déchetteries ménagères, mais éliminez-le de ma- locales. -
Page 40: Garantie
spéciaux. Les symboles chimiques des métaux ce produit, nous assurons à notre discrétion la lourds sont les suivants : Cd = cadmium, Hg = réparation ou le remplacement du produit sans mercure, Pb = plomb. Pour cette raison, veuillez frais supplémentaires. La garantie prend fin si le toujours déposer les piles / piles rechargeables produit est endommagé... - Page 41 Legenda van de gebruikte pictogrammen .......... Pagina 42 Inleiding ..........................Pagina 42 Correct gebruik ........................Pagina 42 Beschrijving van de onderdelen ..................Pagina 43 Technische gegevens ......................Pagina 43 Omvang van de levering ..................... Pagina 43 Algemene veiligheidsinstructies ..............Pagina 44 Veiligheidsinstructies voor batterijen / accu‘s ..............
-
Page 42: Legenda Van De Gebruikte Pictogrammen
Legenda van de gebruikte pictogrammen Detectiehoek bewegingsmelder: Volt, gelijkstroom ca. 100 ° Spatwaterdicht Inclusief batterijen Detectiebereik: ca. 5 m Led-levensduur LED-solar-wandlamp toepassingsgebieden. Overhandig alle docu- menten bij doorgifte van het product aan derden. Inleiding Correct gebruik Hartelijk gefeliciteerd met de aankoop van uw nieuwe product. -
Page 43: Beschrijving Van De Onderdelen
Technische gegevens Dit product is geschikt voor extreme tempe- raturen tot -21°C. Voedingsspanning: 3,6 V Batterij: 3 x Ni-MH-batterij Beschrijving van 1,2 V , 900 mAh, AAA de onderdelen Led‘s: 4 x ca. 0,5 W (De led‘s kunnen niet worden ver- Plug vangen.) Montageplaat... -
Page 44: Algemene Veiligheidsinstructies
1 Montageplaat geïnstrueerd werden met betrekking tot het 3 Schroeven (Ø 4 x 30 mm) voor model veilige gebruik van het product en zij de HG03508A hieruit voortvloeiende gevaren begrijpen. 2 Schroeven (Ø 4 x 30 mm) voor model Kinderen mogen niet met het product spelen. HG03508B Reiniging en onderhoud mag niet door kinde- 3 Pluggen Ø... - Page 45 EXPLOSIEGEVAAR! Laad niet brandwonden veroorzaken. Draag daarom in oplaadbare batterijen nooit op. dit geval geschikte veiligheidshandschoenen. Sluit de batterijen / accu‘s niet Als de batterijen / accu‘s lekken, dient u deze kort en / of open deze niet. Daardoor kan direct uit het product te halen om beschadi- de batterij oververhit raken, in brand vliegen gingen te vermijden.
-
Page 46: Werking
Werking De positie „ON“ voor de AAN-/ UIT-schakelaar heeft de volgende Zonnecel functies: De zonnecel zet lichtenergie van de zon om Het permanent brandende oriëntatielicht schakelt in elektrische energie. Daarmee worden de in zich automatisch in of uit, zodra de zonnecel het batterijvakje ingebouwde accu‘s schemering registreert. - Page 47 wand te boren. Neem de veiligheidsinstruc- schroeven . Let erop, dat de pijl op de ties uit de bedienings- en veiligheidsinstructies markering van de montageplaat ( UP) van de boormachine in acht. Anders bestaat naar boven wijst (afb. A). Aanwijzing: het bijgevoegde montage- er kans op (dodelijk) letsel als gevolg van een elektrische schok.
-
Page 48: Batterijen Vervangen
Batterijen vervangen Schakel de AAN-/UIT-knop weer op de po- sitie „ON“, voordat u het product weer in Opmerking: om een goede functie van de de haken op de montageplaat hangt. zonnecel te waarborgen, dient u de zonnecel regelmatig te reinigen (zie ‚Reiniging en onder- Gebruik in de winter houd‚). -
Page 49: Storingen Oplossen
Controleer voornamelijk de sensor en de Houd de zonnecel voornamelijk in de zonnecel regelmatig op verontreiniging. winter sneeuw- en ijsvrij. Reinig de sensor en de zonnecel regelmatig om een goede werking te kunnen waarborgen. Storingen oplossen Probleem Oorzaak Oplossing Het product schakelt AAN- / UIT-schakelaar staat AAN- / UIT-schakelaar op ON zetten. -
Page 50: Afvoer
Afvoer Gooi het afgedankte product omwille van het milieu niet weg via het huisvuil, De verpakking bestaat uit milieuvriendelijke maar geef het af bij het daarvoor grondstoffen die u via de plaatselijke recycling- bestemde depot of het gemeentelijke containers kunt afvoeren. milieupark. -
Page 51: Garantie
Garantie De garantie geldt voor materiaal- en productie- fouten. Deze garantie is niet van toepassing op Het product wordt volgens strenge kwaliteits- productonderdelen, die onderhevig zijn aan richtlijnen zorgvuldig geproduceerd en voor normale slijtage en hierdoor als aan slijtage on- levering grondig getest. - Page 52 Legenda zastosowanych piktogramów ..........Strona 53 Wstęp ........................... Strona 53 Zastosowanie zgodne z przeznaczeniem ................Strona 53 Opis części ..........................Strona 54 Dane techniczne ........................Strona 54 Zawartość ..........................Strona 54 Ogólne wskazówki dot. bezpieczeństwa ..........Strona 55 Wskazówki bezpieczeństwa dla baterii / akumulatorów ..........Strona 56 Funkcja ..........................
-
Page 53: Legenda Zastosowanych Piktogramów
Legenda zastosowanych piktogramów Kąt wykrywania czujnika ruchu: Wolt, prąd stały ok. 100 ° Ochrona przed pryskającą wodą Z bateriami w zestawie Zakres wykrywania: ok. 5 m Żywotność diod LED Solarna lampa ścienna LED produktu wyłącznie zgodnie z jego poniżej opisanym przeznaczeniem. W przypadku prze- kazania produktu innej osobie należy dołączyć... -
Page 54: Opis Części
Dane techniczne przeznaczony wyłącznie do prywatnego użytku, a nie do zastosowania komercyjnego. Napięcie robocze: 3,6 V Produkt ten nie nadaje się również Akumulator: 3 x akumulator Ni-MH jako oświetlenie pomieszczeń w 1,2 V , 900 mAh, AAA gospodarstwie domowym. Diody LED: 4 x ok. -
Page 55: Ogólne Wskazówki Dot. Bezpieczeństwa
1 płyta montażowa użycia produktu i rozumieją wynikające z 3 śruby (Ø 4 x 30 mm) dla modelu HG03508A niego zagrożenia. Dzieci nie mogą bawić 2 śruby (Ø 4 x 30 mm) dla modelu HG03508B się produktem. Czyszczenie i konserwacja 3 kołki ø... -
Page 56: Wskazówki Bezpieczeństwa Dla Baterii / Akumulatorów
Wskazówki bezpośredniego działania promieniowania bezpieczeństwa dla słonecznego. baterii / Jeśli wyciekną baterie / akumulatory, należy akumulatorów unikać kontaktu skóry, oczu i błon śluzowych z chemikaliami! Dotknięte miejsca natychmiast ZAGROŻENIE ŻYCIA! Baterie / akumula- przepłukać czystą wodą i udać się do lekarza! ZAKŁADAĆ... -
Page 57: Funkcja
Wskazówka: Czas świecenia wynosi ok. Włożyć baterie / akumulatory zgodnie z oznaczeniem biegunów (+) i (-) na baterii / 1 godzinę, pod warunkiem, że akumulator był akumulatorze i produkcie. ładowany przez ogniwo solarne przez ok. Jeśli to konieczne, oczyścić styki baterii / 6 godzin. - Page 58 Montaż solarnego wyznaczane jest przez montaż na pionowej ścianie. Wskazówka: Należy całkowicie usunąć 2. Zakres detekcji czujnika wynosi (w zależ- materiał opakowania z produktu. ności o wysokości zamontowania, optymalna wysokość to 2 m) maks. 5 m, przy kącie de- Przed przystąpieniem do wiercenia otworu tekcji w poziomie 100 °...
-
Page 59: Wymiana Akumulatorów
Wskazówka: W pozycji „OFF“ wyłą- Ustawić przełącznik WŁĄCZ / WYŁĄCZ czona jest funkcja lampy, jak i ładowania. na pozycji „OFF“ (rys. G). Nałożyć produkt na płytkę montażową w Odkręcić śruby mocujące pokrywy komory taki sposób, aby zawieszki płyty monta- akumulatorów i zdjąć... -
Page 60: Czyszczenie I Pielęgnacja
Czyszczenie i pielęgnacja zimowym należy sprawdzać, czy ogniwo so- larne – mimo niskiego położenia słońca – w żadnym momencie dnia nie pozostaje W celu czyszczenia wyłączyć produkt. w cieniu. W razie konieczności usuwać lód lub Do czyszczenia należy użyć lekko zwilżonej, śnieg. W przypadku gdy ze względów pogodo- niestrzępiącej się... -
Page 61: Utylizacja
Problem Przyczyna Rozwiązanie Akumulator rozła- Ogniwo solarne jest zabru- Oczyścić ogniwo solarne. dowuje się w krót- dzone. kim czasie Ogniwo solarne jest nieprawi- Na nowo ustawić ogniwo solarne dłowo ustawione. (patrz „Montaż“). Złe warunki pogodowe. Patrz „Użytkowanie w okresie zimowym”. Akumulatory są uszkodzone. Wymienić... -
Page 62: Gwarancja
Z uwagi na ochronę środowiska nie akumulatory należy przekazywać do komunal- wyrzucać urządzenia po zakończe- nych punktów gromadzenia odpadów niebez- niu eksploatacji do odpadów domo- piecznych. wych, lecz prawidłowo zutylizować. Informacji o punktach zbiorczych i Gwarancja ich godzinach otwarcia udziela od- powiedni urząd. - Page 63 Świadczenie gwarancyjne obejmuje wady ma- teriałowe i fabryczne. Gwarancja nie obejmuje części produktu ulegających normalnemu zuży- ciu, uznawanych za części zużywalne (np. ba- terie) oraz uszkodzeń części łamliwych, np. przełączników, akumulatorów lub wykonanych ze szkła.
- Page 64 Legenda použitých piktogramů ..............Strana 65 Úvod ............................Strana 65 Použití ke stanovenému účelu....................Strana 65 Popis dílů ..........................Strana 66 Technické údaje ........................Strana 66 Obsah dodávky ........................Strana 66 Všeobecná bezpečnostní upozornění ............Strana 67 Bezpečnostní pokyny pro baterie a akumulátory ............... Strana 67 Funkce ..........................
-
Page 65: Legenda Použitých Piktogramů
Legenda použitých piktogramů Úhel dosahu pohybového Volt, stejnosměrný proud senzoru: cca 100 ° Ochrana před stříkající vodou Včetně baterií Dosah: cca 5 m Životnost LED LED solární nástěnné svítidlo uvedených místech. Při předání výrobku třetí osobě předejte i všechny podklady. Úvod Použití... -
Page 66: Popis Dílů
Technické údaje Tento výrobek není vhodný k osvětlení místností v domácnosti. Provozní napětí: 3,6 V Tento výrobek je vhodný k používání při Akumulátor: 3 x Ni-MH akumulátor extrémních teplotách až do -21 °C. 1,2 V , 900 mAh, AAA LED: 4 x cca 0,5 W (LED nelze vyměnit.) Popis dílů... -
Page 67: Všeobecná Bezpečnostní Upozornění
3 šrouby (Ø 4 x 30 mm) pro model nebezpečí, která z jeho používání vyplývají. HG03508A S výrobkem si děti nesmí hrát. Děti nesmí 2 šrouby (Ø 4 x 30 mm) pro model bez dohledu provádět čištění ani uživatel- HG03508B skou údržbu. - Page 68 NEBEZPEČÍ VÝBUCHU! kontaktu s pokožkou způsobit její poleptání. Nenabíjecí baterie nikdy znovu Noste proto vhodné rukavice. nenabíjejte. Baterie nebo akumu- V případě vytečení ihned odstraňte baterie látory nezkratujte ani je neotevírejte. Hrozí nebo akumulátory z výrobku, abyste zabrá- přehřátí, nebezpečí požáru nebo jejich nili jeho poškození! prasknutí.
-
Page 69: Funkce
Funkce Poloha „ON“ vypínače má následující funkce: Solární článek Konstantně svítící orientační světlo se zapíná nebo Solární článek přeměňuje světelnou energii vypíná jakmile zaregistruje solární článek ze slunečního záření na elektrickou energii. Tím stmívání nebo rozednívání. K dosažení dlouhé se nabíjí akumulátorové články v přihrádce doby svícení... -
Page 70: Výměna Akumulátorových Článků
Při výběru místa k montáži výrobku dbejte Pro zapnutí svítidla přestavte vypínač na následující: ZAP / VYP do polohy „ON“ (obr. G). Upozornění: v poloze „OFF“ je svítidlo i 1. Solární článek potřebuje co nejpřímější nabíjení vypnuté. sluneční záření. Optimální je směřování po- Na montážní... -
Page 71: Provoz V Zimě
Provoz v zimě Při výměně akumulátorových článků postupujte takto: Vysuňte výrobek nahoru tak, aby se závěs Z důvodu slabšího slunečního záření může v zimě uvolnil z upevnění (obr. B). dojít k redukci nabíjení akumulátorů , a tím k Sejměte výrobek ze stěny. zmenšenému výkonu výrobku. -
Page 72: Odstranění Poruch
V zimě odstraňujte sníh a led, především ze solárního článku. Odstranění poruch Problém Příčina Řešení Výrobek se nezapíná. Nastavte vypínač ZAP / VYP Přepněte vypínač ZAP / VYP do je v poloze „OFF“. polohy „ON“. Akumulátory jsou vybité. Nabijte akumulátory pomocí externí... -
Page 73: Zlikvidování
Zlikvidování odborné likvidaci. O sběrnách a je- jich otevíracích hodinách se můžete Obal se skládá z ekologických materiálů, které informovat u příslušné správy města můžete zlikvidovat prostřednictvím místních sběren nebo obce. recyklovatelných materiálů. Vadné nebo vybité baterie resp. akumulátory se Při třídění odpadu se řiďte podle musí, podle směrnice 2006/66/ES a jejích pří- označení... -
Page 74: Záruka
Záruka poškození křehkých, choulostivých dílů, např. vypínačů, akumulátorů nebo dílů zhotovených Výrobek byl vyroben s nejvyšší pečlivostí podle ze skla. přísných kvalitativních směrnic a před odesláním prošel výstupní kontrolou. V případě závad máte možnost uplatnění zákonných práv vůči prodejci. Vaše práva ze zákona nejsou omezena naší níže uvedenou zárukou. - Page 75 Legenda použitých piktogramov ..............Strana 76 Úvod ............................Strana 76 Používanie v súlade s určeným účelom ................Strana 76 Popis častí ..........................Strana 77 Technické údaje ........................Strana 77 Obsah dodávky ........................Strana 77 Všeobecné bezpečnostné upozornenia ..........Strana 78 Bezpečnostné...
-
Page 76: Legenda Použitých Piktogramov
Legenda použitých piktogramov Uhol dosahu senzora pohybu: Volt, jednosmerný prúd cca. 100 ° S ochranou proti striekajúcej vode Vrátane batérií Oblasť snímania: cca. 5 m Životnosť LED LED solárne nástenné svietidlo uvedených oblastiach používania. V prípade postúpenia výrobku ďalším osobám odovzdajte Úvod aj všetky dokumenty patriace k výrobku. -
Page 77: Popis Častí
Technické údaje na súkromné používanie a nie na komerčné účely alebo pre iné oblasti nasadenia. Prevádzkové napätie: 3,6 V Tento výrobok nie je vhodný na Akumulátorová osvetlenie miestností v domácnosti. batéria: 3 x Ni-MH-akumuláto- rová batéria 1,2 V Tento výrobok je vhodný pre extrémne 900 mAh, AAA teploty až... -
Page 78: Všeobecné Bezpečnostné Upozornenia
1 hlavný prístroj Tento výrobok môžu používať deti od 8 rokov, 3 Ni-MH-akumulátorové batérie, AAA, 1,2 V ako aj osoby so zníženými psychickými, sen- 900 mAh, (už zabudované) zorickými alebo duševnými schopnosťami 1 montážna doska alebo s nedostatkom skúseností a vedomostí, 3 skrutky (Ø... -
Page 79: Bezpečnostné Upozornenia Týkajúce Sa Batérií / Akumulátorových Batérií
Bezpečnostné vykurovacích telesách / priamom slnečnom upozornenia týkajúce sa žiarení. batérií / akumulátorových Ak batérie / akumulátorové batérie vytiekli, batérií zabráňte kontaktu pokožky, očí a slizníc s chemikáliami! Ihneď vypláchnite postihnuté NEBEZPEČENSTVO OHROZENIA miesta väčším množstvom čistej vody a okam- ŽIVOTA! Batérie / akumulátorové... -
Page 80: Funkcia
Poznámka: Doba svietenia je cca. 1 hodina, Vložte batérie / akumulátorové batérie podľa označenia polarity (+) a (-) na batérii / aku- ak bola akumulátorová batéria cca. 6 hodín mulátorovej batérii a výrobku. nabíjaná prostredníctvom solárneho článku. Pred vložením vyčistite kontakty na batérii / akumulátorovej batérii a v priečinku pre Pred uvedením do batérie! -
Page 81: Montáž
prepne naspäť na konštantne svietiace orien- 2. Senzor má v závislosti od montážnej tačné svetlo (pozri obr. H). výšky (ideálna je výška 2 m) oblasť dosahu max. 5 m - pri uhle dosahu 100 ° horizon- tálne a 90 ° vertikálne. Montáž... -
Page 82: Výmena Akumulátorových Batérií
zasahovali do upínaní na zadnej strane Uvoľnite upevňovacie skrutky krytu priečinka výrobku. Posuňte výrobok smerom dole, až pre akumulátorové batérie a vyberte ho kým závesné zariadenia nezapadnú do (obr. D). upínaní (obr. B). Vyberte akumulátorové batérie z priečinka Po montáži prekontrolujte pevné upevnenie pre akumulátorové... -
Page 83: Čistenie A Údržba
Čistenie a údržba preto kontrolujte, či je solárny článok napriek nízkemu stavu slnečného svetla po celý deň nezatienený. Ak je to potrebné, odstráňte ľad Pred čistením výrobok vypnite. alebo sneh. Na čistenie použite mierne navlhčenú han- Ak by bola doba svietenia kvôli poveternostnej dričku, ktorá... -
Page 84: Likvidácia
Problém Príčina Riešenie Akumulátorová batéria Solárny článok je znečistený. Očistite solárny článok. sa vybije v krátkom Solárny článok je nesprávne Solárny článok nanovo nasmerujte čase. nasmerovaný. (pozri „Montáž“). Zlé poveternostné podmienky. Pozri „Prevádzka v zime“. Akumulátorové batérie sú Vymeňte akumulátorové batérie defektné. -
Page 85: Záruka
Záruka na odbornú likvidáciu. Informácie o zberných miestach a ich otváracích hodinách získate na Vašej príslušnej Tento výrobok bol dôkladne vyrobený podľa správe. prísnych akostných smerníc a pred dodaním svedomito testovaný. V prípade nedostatkov Defektné alebo použité batérie / akumulátorové tohto výrobku Vám prináležia zákonné... - Page 86 na časti produktu, ktoré sú vystavené normálnemu opotrebovaniu, a preto ich je možné považovať za opotrebovateľné diely (napr. batérie) alebo na poškodenia na rozbitných dieloch, napr. na spínači, akumulátorových batériach alebo čas- tiach, ktoré sú zhotovené zo skla. 86 SK...
- Page 87 Model-No.: HG03508A / HG03508B Version: 11 / 2018 Stand der Informationen · Last Information Update Version des informations · Stand van de informatie Stan informacji · Stav informací · Stav informácií: 11 / 2018 · Ident.-No.: HG03508A / B112018-8 IAN 311196...
Need help?
Do you have a question about the 311196 and is the answer not in the manual?
Questions and answers