Table of Contents
Advertisement
Electric-Powered Stairclimbers
For People with Walking Difficulties
Liftkar PT-U
Liftkar PT-S
Liftkar PT-A
INSTRUCTION MANUAL
SANO Transportgeraete GmbH
Am Holzpoldlgut 22
4040 Linz/Lichtenberg
Austria
Tel.: +43 (0) 7239 / 510 10
Fax: +43 (0) 7239 / 510 10 14
office@sano.at
www.sano.at
USA Distributor MOBILITY LIFTER, LLC
Issued: 06/2018
Subject to updates!
US
Advertisement
Table of Contents

Related Manuals for SANO Liftkar PT


Summary of Contents for SANO Liftkar PT
- Page 1 Electric-Powered Stairclimbers For People with Walking Difficulties Liftkar PT-U Liftkar PT-S Liftkar PT-A INSTRUCTION MANUAL SANO Transportgeraete GmbH Am Holzpoldlgut 22 4040 Linz/Lichtenberg Austria Tel.: +43 (0) 7239 / 510 10 Fax: +43 (0) 7239 / 510 10 14 office@sano.at www.sano.at...
- Page 2 2/52...
-
Page 3: Table Of Contents
5.1 Climber unit, battery pack and handle unit ............20 5.1.1 Adjust handle ....................21 5.1.2 Headrest......................21 5.2 Additional preparations (depending on model) ..........22 5.2.1 Operating seat position on Liftkar PT-S ............22 5.2.2 Loading a wheelchair onto a Liftkar PT-U (general information) ...... 24 3/52... - Page 4 5.2.5 How to unload a self-propelled wheelchair (PT-U) ........... 29 5.2.6 How to unload a transport wheelchair (PT-U) ..........30 5.2.7 Loading a wheelchair onto a Liftkar PT-A ............31 5.2.8 Detaching the Liftkar PT-A from the wheelchair ..........33 Operation on stairs ..................
- Page 5 9.8 Second Hand Usage ..................47 Trouble shooting .................... 47 Warranty and product liability ............... 48 11.1 Warranty......................48 11.2 Product liability ....................48 11.3 Declaration of conformity.................. 48 11.4 Registered patents ................... 49 11.5 Please note ...................... 50 5/52...
-
Page 6: Introduction
The Liftkar PT is a mobile stair-climber, meaning you can take it with you to use on any stairs. Liftkar PT gives you more freedom as a result. At the same time, professionals or caregivers that have been trained and certified, no longer need to strain their backs on the stairs. - Page 7 Liftkar PT is easier to transport. ▪ The Liftkar PT is supplied with a powerful, replaceable 5 Ah / 24 Volt battery pack, which should always be fully charged before using the stairclimber. If, for whatever reason, the battery pack should run out of power while in operation on stairs, move the stairclimber down the stairs and replace or recharge the battery.
-
Page 8: Description/Technical Data
Note: with some wheelchairs it may be necessary to raise or remove any anti-tip devices. If the anti-tip devices are fixed then they will need to be modified to the removable or foldable type. Liftkar PT-U.…………….…………….…………………..item no. 045 728 8/52... -
Page 9: Technical Data For Pt-U Model
3.1.1 Technical data for PT-U model • Safe working load: 130 kg (incl. wheelchair) 160 kg/ 352 lbs Maximum weight never to be exceeded • Maximum width of backrest: 495 mm/ 19.49 in. • Maximum track width of wheelchair: 730 mm/ 28.74 in. (measured on outside (of wheels) •... -
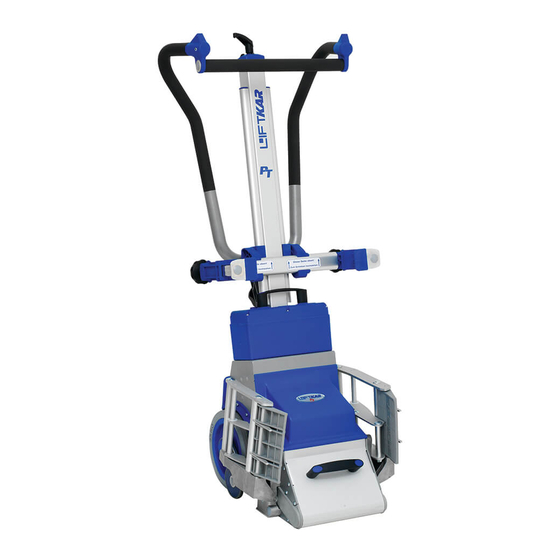
Page 10: S Model With Integrated Seat
This compact design of seat and main wheels with a diameter of just (200 mm/ 7.87 inches) allows for plenty of clearance. Liftkar PT-S item no. 045 724 3.2.1 Technical data for PT-S model • Safe working load: (passenger weight) 160 kg/ 352 lb. -
Page 11: Scope Of Supply For Model Pt-S
This model is designed to accommodate all Quick Release wheelchairs by use of special adapters. Each adapter is specific to the wheelchair brand and model. Passenger weight with wheelchair is 160kg/ 352 lbs. Liftkar PT-A ……. item no. 045 722 11/52... -
Page 12: Technical Data For Pt-A Model
If one of these components is missing or damaged, please contact your dealer. Important: Your wheelchair must be fitted with special adapters before it can be transported using the Liftkar PT stairclimber. Please contact your dealer immediately if this is not the case. 12/52... -
Page 13: Technical Data Applying To All Models
(professional) use. For professional use it is highly recommended to have a replacement battery pack, and a mobile charger. Liftkar PT cannot be in use during replacement of battery. • Protection against overloading:... -
Page 14: Technical Data For Battery Pack
3.5 Technical data for battery pack Weight of battery: 4,3 kg Capacity: 5,2 Ah Voltage: 24 VDC (2x 12 VDC – 5,2 Ah) Type of battery: maintenance-free, leak-safe AGM cell (approved by DOT and IATA for air freight) Fuse: internal fuse (30 Amp) and electronic cut-out at charging contact Charging contact: DC jack ø... -
Page 15: Battery Pack
3.6.2 Battery pack Charging socket 1 Power outlet 2 Carrying handle 3 3.6.3 Climber unit Lifting frame 1 Support wheels on lifting frame 2 Main wheels 3 Automatic step edge brakes 4 Spring-loaded contacts to battery power outlet 5 Mounting socket for handle unit column 6 15/52... -
Page 16: Control Features
4.1.1 Main switch (1) Use this switch to switch the stairclimber on via a safety circuit. Press it again to switch off. The Liftkar PT switches itself off automatically after 10 minutes. 4.1.2 Speed selector switch (2) Use this switch to choose the climbing speed of the lifting frame mechanism. (See section 3.7 for absolute figures) -
Page 17: Mode Switch (3)
Flashing green: Warning! Continuous mode is switched on. Otherwise normal. Red (not flashing): The Liftkar PT is at too flat an angle to the rear or leaning too far forward. If the angle is not upright enough the angle sensor blocks operation of the climbing mechanism. -
Page 18: Beeper Function For Correct Transport Angle
4.1.5 Beeper function for correct transport angle By default the beeper function is active. While the beeper function is active an acoustic signal is given as soon as the stairclimber is no longer in the ideal stairclimbing angle. To deactivate press the main switch (1) for approx. 30 seconds. A short acoustic beep signal indicates that the function is now off. -
Page 19: Clamping Nut On Adjustable Handle
To find out how far the clamping should tightened, Sano recommends rotating the nut clockwise with the handle positioned low down so that the operator can attempt to push the handle downwards using the weight of the upper body. -
Page 20: Preparation Before You Start
5 Preparation before you start 5.1 Climber unit, battery pack and handle unit The following preparations need to be made to the Liftkar PT as a base unit: Fit battery pack over the brown contact housing on the climber unit with the recess pointing towards the handle mounting socket (photo 1). -
Page 21: Adjust Handle
(plug is disconnected between socket and column) and the Liftkar PT can no longer be switched on. The spring may not be strong enough to push the column upwards in all situations, but if the spindle is not engaged properly only a very slight movement of the column will cause the plug to disconnect so that the unit cannot be used on steps. -
Page 22: Additional Preparations (Depending On Model)
5.2.1 Operating seat position on Liftkar PT-S With the Liftkar PT-S and its integrated seat you pull the seat up into place. The stairclimber is immediately ready for operation with its self-locking scissor design. - Page 23 When carrying, grab the crossbar and the bottom of the backrest for the handle unit, hold battery by the handle, and the climbing unit by the black handle and footrest. 23/52...
-
Page 24: Loading A Wheelchair Onto A Liftkar Pt-U (General Information)
Note 4: Make sure that the wheelchair's parking brakes are properly adjusted and in full working order. Especially on self-propelled wheelchairs (large wheels) Wheelchair should not be used if brakes are not in working order. Brakes should always be set when Liftkar PT-U is in use. - Page 25 Part B Part A 25/52...
-
Page 26: How To Load A Self-Propelled Wheelchair (Pt-U)
5.2.3 How to load a self-propelled wheelchair (PT-U) Pull backrest clamps apart Align centrally with wheels touching platforms (not on platforms) Without motor: tilt PT forwards until backrest With motor: gradually raise PT on lifting frame (push button „up“) until clamps reach clamps reach backrest backrest Engage clamps with backrest and tighten... - Page 27 Tilt PT backwards Tilt PT backwards while passenger reverses wheelchair onto platforms Pull wheelchair onto platforms with both hands Apply brakes to wheelchair wheels Tilt PT back (into balanced position), and off you go 27/52...
-
Page 28: How To Load A Transport Wheelchair (Pt-U)
5.2.4 How to load a transport wheelchair (PT-U) Open backrest clamps Align centrally and move onto platforms With motor: gradually raise PT Without motor: tilt PT forwards on lifting frame (push button until clamps reach backrest „down“) until clamps reach backrest Apply brakes (if fitted) to transport chair wheels... -
Page 29: How To Unload A Self-Propelled Wheelchair (Pt-U)
5.2.5 How to unload a self-propelled wheelchair (PT-U) Tilt PT forwards until front wheels of wheelchair touch the ground Tilt PT forwards with one hand and release backrest clamp on one side with the other hand Now release backrest clamp on the other side Tilt PT back until it rests on the ground Release wheelchair... -
Page 30: How To Unload A Transport Wheelchair (Pt-U)
5.2.6 How to unload a transport wheelchair (PT-U) Tilt PT forwards until front wheels of transport chair touch the ground Tilt PT forwards with one hand and release backrest clamp on one side with the other hand Now release backrest clamp on the other side Tilt PT back until it rests on the ground... -
Page 31: Loading A Wheelchair Onto A Liftkar Pt-A
5.2.7 Loading a wheelchair onto a Liftkar PT-A With this model the stair-climber unit is secured to the wheelchair using an adapter mounting. A special adapter mounting to the wheelchair. These mountings are fitted to each side of the climber unit for anchoring axles with adjusting rings (PT-A, photo 1). - Page 32 (otherwise there is a risk of causing an accident ( Press DOWN on the UP/DOWN switch to lower the wheelchair plus stairclimber onto the Liftkar PT wheels. The unit is now ready for climbing stairs. (The next section (chapter 6) describes the stair climbing procedure in detail.) Note 4: If the wheelchair wheels have been removed then it is also possible to move the wheelchair around on the Liftkar PT wheels.
-
Page 33: Detaching The Liftkar Pt-A From The Wheelchair
5.2.8 Detaching the Liftkar PT-A from the wheelchair First press UP on the UP/DOWN switch to raise the whole unit until there is enough space to fit the large wheelchair wheels (remember to engage low speed). Insert the wheel axles into their sockets and apply the parking brake so that the wheelchair cannot roll away while the stairclimber is being detached. -
Page 34: Operation On Stairs
• The crossbar is better than the handle for adjusting the angle of the Liftkar PT. Proper hand positioning would be one hand on the crossbar and the other hand on the left or right handle (with UP/DOWN switch). -
Page 35: Climbing Up Stairs
6.2 Climbing UP stairs Set the adjustable handle to the correct height (see 5.1.1 and 4.3) Switch on the Liftkar PT with the main switch (if it is not already switched on). Set speed selector switch to the lowest speed (I). - Page 36 Please note though that it is essential that you always have one hand on the handle, even while the weight is leaning against you. Now you can move the Liftkar PT back to the next step and repeat the same procedure.
-
Page 37: Climbing Down Stairs
1-4 applies: Set the adjustable handle to the correct height (see 5.1.1 and 4.3) Switch on the Liftkar PT with the main switch (if it is not already switched on). Set speed selector switch to the lowest speed (I). -
Page 38: Operation On Spiral Staircases
UP) • For moving DOWN start on the inside of the staircase. (The Liftkar PT moves outwards when climbing DOWN) If you do start moving too close to the banisters/wall then shift the unit to the side by reversing (on a landing or wider step if possible) and start again at a tighter angle. -
Page 39: Parking The Liftkar Pt On The Stairs
6.6 Ideal transport angle The Liftkar PT is equipped with an electronic angle detection system. As soon as the stairclimber is no longer at the ideal angle the system stops the climbing mechanism and an audio indicator activates. If the angle is too low in relation to the steps then the LED in the control unit turns red as long as one of the UP/DOWN switches is pressed. -
Page 40: Operation On A Ramp
7.1 Moving DOWN a ramp To move down a ramp you need to hold the Liftkar PT facing forwards; using the step edge brakes you can control the descent of the Liftkar PT (with wheelchair) by leaning the unit back until the brakes take effect. -
Page 41: Charging The Battery Pack
Note: if the battery pack is not fully charged, or it looses its charge suddenly, not only will the speed of the Liftkar PT be slower, but its capacity is reduced as well. This means that overload mode may be reached even with a relatively light load. -
Page 42: Technical Data
The charger unit is designed exclusively for charging AGM cell batteries containing liquid, gel-type and fabric-type electrolyte (such as the battery pack supplied with the Liftkar PT). - It is not permissible to charge NiCd or NiMH batteries or primary cells. -
Page 43: Mobile Charger (Optional)
8.2 Mobile charger (optional) This extremely powerful charger features an automatic 3-stage system using digital control technology. The first stage is quick charging and the second stage is for maintaining the charge. With a 3-stage system it is even easier to see how full the battery pack is. -
Page 44: Use Only For The Purpose Intended
8.3 Connecting charger unit to battery pack The battery pack can be charged separately or while it is mounted on the stairclimber. (see photos below) The Liftkar PT is not ready for operation if the battery pack is being recharged on the stairclimber. -
Page 45: Maintenance, Care And Transport
9.1 Maintenance Liftkar PT stairclimbers are durable, low-maintenance products. However, Sano recommends you have a check carried out at least once every two years on all moving components, electrical and mechanical connections, the quick- change battery pack and the charger unit. Please contact your Liftkar PT service specialist for details. -
Page 46: Brakes And Inside Rims Of Main Wheels
Please check the brakes after each cleaning. The easiest and most reliable method of checking the brakes is to tilt the Liftkar PT backwards at an extreme angle (the LED is then red). In this position it must not be possible to move the Liftkar PT forwards. -
Page 47: Second Hand Usage
9.8 Second Hand Usage All second-hand units MUST be inspected for a safety check and attendant certified by an authorized specialist. All operators must have proof of having been trained in how to operate the stairclimber. IMPORTANT: In addition to the intervals, described above, all safety checks must be carried out in full each time there is a change of operator and each time the stair-climber is put into operation after a period of down time, even if the stair-climber appears to be undamaged and operating normally at first sight. -
Page 48: Warranty And Product Liability
11 Warranty and product liability 11.1 Warranty The warranty period for the climbing unit and handle unit on all Liftkar PT stairclimbers is 24 months. Battery packs have a warranty period of 6 months. In both cases the warranty period starts on the day the product is received. -
Page 49: Declaration Of Conformity
11.3 Declaration of conformity SANO Transportgeraete GmbH takes sole responsibility in declaring that LIFTKAR stairclimbers comply with: the essential requirements of the EU directive for medical products 93/42/EWG, Appendix I the guidelines 2014/35/EG relating to electromagnetic compatibility the applicable basic safety and health requirements of the EU guidelines for... -
Page 50: Registered Patents
11.4 Registered patents The climbing system is protected by international patents registered in Europe, USA and Japan. The handle unit is also protected by two patents. A patent is also registered for the wheelchair loading system featured on the Universal model. 11.5 Please note The manual was created carefully. - Page 51 51/52...
- Page 52 SANO Transportgeraete GmbH SANO Deutschland GmbH SANO UK Powered Stairclimbers Ltd. Am Holzpoldlgut 22 Geigelsteinstraße 10 Bristol Court, Betts Avenue 4040 Lichtenberg / Linz 83080 Oberaudorf Martlesham Heath Austria Deutschland Ipswich, Suffolk IP5 3RY, England Tel. 43 (0) 7239 / 510 10 Tel.
Need help?
Do you have a question about the Liftkar PT and is the answer not in the manual?
Questions and answers