Advertisement
Quick Links
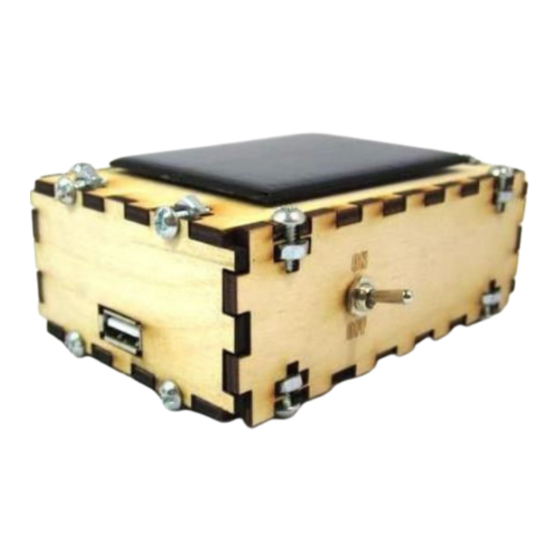
Solar USB 2.0 Kit
Instructions
Intro:
Solar USB Charger 2.0
Everyone has USB gadgets. It's pretty much a fact of life. Another fact of life is that these USB gadgets also continually run out of power when you most need them.
No need to fear, solar power is here! Ditch those crazy wall adapters, throw out the laptop, and start making your own solar charger!
This guide will show you step by step instructions on how to assemble the Solar USB 2.0 Kit. This kit will charge most small USB devices such as cell phones, mp3
players, iPods, and iPhones.
This project was designed for beginner makers and students. It requires a base knowledge of soldering. While you can charge small gadgets, this project is not
appropriate for camping or to be relied on for extreme emergencies.
Difficulty: Easy
Grade Level: 8th and up (age 12+)
Time: 30 to 60 minutes
sales@fuelcellstore.com
USA: 1 (855) 251-0016
International: +1 (979) 703-1925
Product Code: 1221502
Brand: Brown Dog Gadgets
Advertisement

Summary of Contents for Brown Dog Gadgets 1221502
- Page 1 USA: 1 (855) 251-0016 International: +1 (979) 703-1925 Solar USB 2.0 Kit Product Code: 1221502 Instructions Brand: Brown Dog Gadgets Intro: Solar USB Charger 2.0 Everyone has USB gadgets. It's pretty much a fact of life. Another fact of life is that these USB gadgets also continually run out of power when you most need them.
-
Page 2: Parts And Tools
Step 1: Parts and Tools Included Parts: • USB Charging Circuit • 6V 80mA Solar Cell • 3 AA Holder • 3 Rechargeable AA Batteries @ 2600mAh • Toggle Switch • Wire • Shrink Tubing • Laser Cut Enclosure w/ Screws Tools Needed: •... -
Page 3: Battery Power
Step 1: Parts and Tools (cont..) USB Charging Circuit USB charging requires 5V at around 500mA of power to charge most gadgets. In order to meet these criteria in a small package we use a USB Charging Circuit, which boosts low voltage (2V) DC up to 5V DC. Nothing comes free though; we trade our increased volts for fewer amps. To avoid this tradeoff, we could use larger solar panels and larger batteries, but this would result in a larger, heavier, and more expensive charger. - Page 4 Step 2: Solder The Solar Cell 1) Cut three six inch lengths of wire. 2) Using a wire stripper, expose about ¼ inch of wire on each end of all three wires. If you have our kit, this may already be done. You can also strip the battery pack wires at this time.
- Page 5 Step 4: Connect the Toggle Switch 1) Grab the twisted together negative (-) wires from the battery pack/ solar cell. Solder this to the middle pin on your toggle switch. 2) Take the last 6 inch piece of wire and solder it to either one of the remaining outside pins. It doesn't matter which one. Tip: If you can't thread the wire through the little holes on the Toggle Pins don't worry.
- Page 6 Step 5: Connect the USB Charging Circuit The circuit in our kit has metal tabs coming off of the board which you will solder wires on to. If you found your own USB Charging Circuit it may have through hole connectors. 1) On the under side of the board locate the positive (+) and negative (-) symbols.
-
Page 7: Testing And Troubleshooting
Step 6: Testing and Trouble Shooting At this point your project should work. Grab a small USB gadget and plug it in. We like to test ours with a USB LED Light, but a phone or MP3 player will work as well. If everything works, use a lighter, hair dryer, or heat gun to close up your shrink tubing over the diode. - Page 8 Step 8: The End Your Solar USB 2.0 Kit charger is now complete! Once again, please keep in mind that this charger will not charge larger gadgets such a big phones and tablets. It's also not suitable for camping or emergencies due to the fact that it takes several days to charge up.