
Summary of Contents for Restek Pack In A Box
- Page 1 Pack In A Box Dual Piston Pump Operator’s Manual cat.# 26408 Chromatography Products www.restek.com www.restek.com 1-800-356-1688 • 1-814-353-1300...
-
Page 2: Table Of Contents
2.5 Instrument Installation 2.5.1 Mobile Phase Reservoirs 2.5.2 Inlet Tubing and Filters 2.5.3 Outlet Tubing 2.5.4 Priming the Pump 2.5.5 Long Term Pressure Calibration Accuracy 2.6 Preparation for Storage or Shipping 2.6.1 Isopropanol Flush 2.6.2 Packaging for Shipping Operation 3.1 Front Panel Controls and Indicators 3.1.1 Prime/Purge Valve 3.1.2 Filter/Outlet 3.1.3 Control Panel 3.1.3.1 Digital Display 3.1.3.2 Keypad 3.1.3.3 Status LEDs 3.1.3.4 Power-up Configuration 3.1.3.5 Power-up Tests 3.2 Rear Panel Remote Inputs www.restek.com... - Page 3 Fuse Replacement 5.9 Battery Replacement Quick Guide to Problem Solving List of Replacement Parts Appendix A A.1 Rear Panel Serial Communications Port A.1.1 Hardware Implementation A.1.2 Hand Shaking A.1.3 Command Interpreter A.2 Rear Panel 4-Pin and 10-Pin Terminal Board Connectors A.2.1 Pressure Fault and Motor Stall Fault Output A.2.1.1 Upper and Lower Pressure Limit Range A.2.2 General Information on Inputs A.2.3 General Information on Run, Stop, and Enable Inputs A.2.4 Run and Stop Inputs A.2.5 Enable Input A.2.6 General Information on Voltage and Frequency Inputs A.2.7 Voltage Input A.2.8 Frequency Input Appendix B B.1 Quick Set Pump control Appendix C C.1 Column Packer Hardware www.restek.com...
-
Page 4: Introduction
0 to 6000 psi (with pulse damper) Pressure Accuracy ±1% of full-scale pressure Pressure Zero Offset –0.2 psi Pressure Control Accuracy <10% or 100 psi whichever is larger Dimensions 5.5” high x 10.375” wide x 17.5” deep Weight 30 lb Power 100–240 VAC, 50–60 Hz, 45W (main voltage supply not to exceed ±10%) Environmental Indoor use only Altitude Maximum 2000 M Temperature 10–30° C Relative Humidity 20–90% Remote Inputs RS232 Installation 2.1 Unpacking and Inspection Prior to opening the shipping container, inspect it for damage or evidence of mishandling. If it has been damaged or mishandled, notify the carrier before opening the container. Once the container is opened, inspect the contents for damage. Report any dam- age to the carrier immediately. Save the shipping container. Check the contents against the packing list. 2.2 Location/Environment The preferred environment for the dual head pump is normal laboratory conditions. The area should be clean and have a stable temperature and humidity. The instrument should be located on a stable flat surface with surrounding space for ventilation and the necessary electrical and fluid connections. (Reference IEC 1010 installation category II, and pollution degree 2 environment) 2.3 Electrical Connections Unpack the dual head pump; position the pump there so that is at least a four inch clearance on all sides to permit proper ventila- tion. Using the power cord supplied with the pump, or equivalent, plug the pump into a properly grounded electrical outlet. WARNING: Do not bypass the safety ground connection as a serious shock hazard could result. www.restek.com... -
Page 5: Solvent Preparation
2.4.2 Cavitation Cavitation occurs when inlet conditions restrict the flow of solvent and vapor bubbles are formed during the inlet stroke. The key to preventing cavitation is to reduce inlet restrictions. The most common causes of inlet restrictions are crimped inlet lines and plugged inlet filters. Inlet lines longer than 48" (120 cm) or less than 0.085" (2 mm) ID may also cause cavitation. Placing the solvent reservoirs below the pump level also promotes cavitation. The optimal location of the reservoirs is slightly above the pump level, but it is adequate to have them on the same level as the pump. 2.4.3 Filtration Solvent filtration is good practice for the reliability of the dual head pump and other components in a HPLC system. Solvents should always be filtered through a 0.5 micron filter prior to use. This ensures that no particles will interfere with the reliable operation of the piston seals and check valves. Solvents in which buffers or other salts readily precipitate must be filtered more often. After filtration, the solvents should be stored in closed, particle-free bottles. 2.4.4 Solvents With Harmful Effects All portions of the dual head pump that contact mobile phase are manufactured of type 316 stainless steel, sapphire, ruby, or fluo- rocarbon polymer. Some of these materials are extremely sensitive to acids (including some Lewis acids) and acid halides. Avoid using solvents that contain any amount of hydrochloric acid. Some solvents and salts you should specifically avoid are: Aqua Regia Hydrochloric Acid Bromine Hydrofluoric Acid Chlorine (anhydrous) Hydrofluorsilicic Acid Copper Chloride Hydrogen Peroxide Ferric Chloride Iodine Ferrous Chloride Mercuric Chloride Freon® 12 (wet) Hydrobromic Acid Guanidine Some users of HPLC systems have observed that chloroform and carbon tetrachloride slowly decompose to liberate hydrochloric acid, which, as noted above, attacks stainless steel. Do not leave these solvents in the system for a prolonged period. You may also want to avoid ammonium hydroxide. Although ammonium hydroxide will not harm the pump itself, it is likely to damage the stators and rotors in injection valves. www.restek.com... -
Page 6: Instrument Installation
20 micron slip-on inlet filter. 2.5.3 Outlet Tubing Outlet tubing is not supplied with the pump. It should be " OD, type 316 stainless steel. Tubing with a 0.020" ID normally is used before the injection valve. Tubing with a 0.010" inner diameter normally is used after the injection valve. The tubing must be cut squarely, with no burrs. It should not be crimped and the center hole must be open. 2.5.4 Priming the Pump Be sure all of the connections downstream of the prime/purge valve are closed. Connect a syringe to the prime/purge valve. Open the prime/purge valve 1 to 2 turns counter-clockwise. Run the pump at a flow rate of 3 to 5 mL/min. Prime the pump by pulling mobile phase and any air bubbles through the system and into the syringe (a minimum of 20 mL). Close the prime/purge valve and stop the pump. 2.5.5 Long Term Pressure Calibration Accuracy This note applies if your pump is equipped with an electronic pressure transducer. The transducer has been zeroed and calibrated at the factory. Over the life of the pump, some drift may occur. For example, it is typical for the zero to drift < 10 psi after about 1 year of operation (i.e., with no back pressure on the pump a reading of 1-9 psi may be displayed). A similar drift may also occur at higher pressures, and are typically less than 1% (e.g. <50 psi at 6,000 psi back pressure). If pressure calibration and/or drift are a concern, consult the factory. The pump can be shipped back to Restek for recalibration. Alternatively, written calibration and zero-reset procedures are available. Consult Restek to receive these instructions. 2.6 Preparation for Storage or Shipping 2.6.1 Isopropanol Flush Disconnect the outlet tubing from the pump. Insert the inlet filter in isopropanol. Open the prime/purge valve and use a syringe to draw a minimum of 50 mL. Close the prime/purge valve and pump a minimum of 5 mL of isopropanol to exit. Leave the inlet tubing connected to the pump. Place the inlet filter in a small plastic bag and attach it to the tubing with a rubber band. Plug the outlet port with the shipping plug, leave a length of outlet tubing on the pump, or cover the outlet port with plastic film. 2.6.2 Packaging for Shipping CAUTION: Re-package in the original carton, if possible. If the original carton is not available, wrap the pump in several layers of bubble wrap and cushion the bottom, top, and all four sides with 2" of packaging foam. An HPLC pump is a delicate instrument and must be carefully packaged to withstand the shocks and vibration of shipment. Operation 3.1 Front Panel Controls and Indicators Figure 3-1. Dual Head Pump Front Panel... -
Page 7: Filter/Outlet
3.1.3.1 Digital Display The 4-digit display shows the pump’s maximum flow rate (mL/min.), pressure setting (psi), the set upper or lower pressure limit (psi), the actual pressure (psi), or actual flow rate (mL/min.) when operating. Choice of display is selected with the MODE button. Pressure is set from the Pressure Mode Only (steady psi light). 3.1.3.2 Keypad When pressed, this button alternately starts and stops the pump. When pressed, this button increases the pressure in pressure mode or the maximum flow rate in flow mode. When pressed, this button decreases the pressure in pressure mode or the maximum flow rate in flow mode. When the PRIME button is pressed, the pump runs at the maximum flow rate. It will stop when any button is pressed. MODE Use this button to cycle through five display modes: maximum flow rate, pressure setting, upper pressure limit, lower pressure limit or actual pressure. A status LED to the right of the digital display indicates which mode is active. A steady psi light indicates set pressure, a flashing psi light indicates actual pressure. A steady mL/min. light indicates maximum set flow rate, a flashing mL/min. light indicates actual flow rate. Fast And Slow Button Repeat On The Up And Down Arrow Buttons: If the UP-ARROW or DOWN-ARROW button is held down for more than approximately one half second, the button press will repeat at a slow rate of approximately 10 times a second. Once slow button repeat has begun, fast button repeat can be initiated by using a second finger to press down the second arrow button. During fast button repeat, the button press will repeat at a rate of approximately 100 times a second. Switching back and forth between repeat speeds can be accomplished by pressing and releasing the second arrow button while holding the first arrow button down. www.restek.com... -
Page 8: Status Leds
LO PRESS When lit, the display shows the user-set lower pressure limit in psi. PSI (Flashing) When flashing, the digital display shows the actual pressure in psi. ML/MIN (Flashing) When flashing, the display shows the actual flow rate in mL/min. PUMP RUN Lights to indicate that the pump is running. FAULT Lights when a fault occurs and stops the pump. 3.1.3.4 Power-up Configuration Pressure Compensation: On power-up, press the PRIME button on the front panel while pressing the Power On switch under the front display panel. The pump will display a number from 0 to100. This represents the running pressure of the pump which is 0 psi to 10000 psi. Each digit represents 100 psi. To change the pressure compensation number use the up arrow and down arrow buttons. When you have selected the correct pressure compensation press the RUN button to return to normal operation of the pump. Ramp Speed Adjustment & Packing Method : On power-up, press the PRIME button and the down arrow button on the front panel while pressing the Power On switch under the front display panel. The pump will first display a 0 or a 1 (packing method – see below) then a number from 10 to 500. The 10 to 500 number is the percentage of the factory setting for the rate of change algorithm used to adjust the pump’s speed as it ramps up and down to maintain the pressure setting. To change this percentage, use the up arrow and down arrow buttons. When you have selected the desired value for ramp speed adjustment, press the RUN button to return to the normal operation of the pump. The 0 or 1 is for Fast Packing On or Off. This controls the speed at which the pressure will build in the system. Pressing the PRIME button on power-up will select Fast Packing On. This is best used for a larger-sized silica column. Pressure will be allowed to rise to the user set maximum flow rate as rapidly as possible before it is slowed and stabilized at the set pressure. Pressing the MODE button on power-up will select Fast Packing Off. This is used when column size or material will cause a very rapid pressure rise before it settles to a low flow rate. If the pressure rise becomes too rapid, the pump will slow down until the pressure rise slows, and the pump will slow as it narrows in on the set pressure. Press the RUN button to return to the normal operation of the pump. NOTE: Lowering the maximum flowrate in flow mode (mL/min. indicator lit) will also have a significant effect on how rapidly the pressure rises. Non-volatile Memory Reset: If the pump is operating erratically, there is the possibility that the memory has been corrupted. To reset the memory and restore the pump to its default parameters, press and hold the up arrow button when the power is switched on. Release the button when the display reads “rES”. The parameters stored in non-volatile memory (i.e., the flow rate, the pres- sure compensation, the voltage/frequency select, the lower pressure limit, and the upper pressure limit) will be set to the factory default values. The head type setting is the only parameter not changed by the non-volatile memory reset function. If the firm- ware is upgraded to a newer version, a non-volatile memory reset will automatically occur the first time the power is switched on. www.restek.com... -
Page 9: Power-Up Tests
4-digit hexadecimal checksum will be displayed. To exit this mode, press the RUN/STOP button. If the checksum displayed does not match the checksum printed on the EPROM’s label, the EPROM must be replaced. Note: If the pump is operating correctly, the firmware version and checksum can be displayed, then written in the manual for future comparison. This will save time dur- ing future troubleshooting since the pump cover will not have to be removed to read the EPROM label. Serial Port Loop Back Test Mode: If an external device will not communicate to the pump via the serial port, the serial port loop back test can be used to verify that the serial port is functioning properly. During power-up press and hold the up arrow and the down arrow buttons when the power is switched on, then release the buttons. The display must read “C00” for the first half of the test to pass. Plug in the serial port loop back plug (a modular plug with pins 2 & 5 jumpered together and pins 3 & 4 jumpered together.). The display must read “C11” for the second half of the test to pass. To exit this mode, press the RUN/STOP button. 3.2 Rear Panel Remote Input An RS-232C modular jack is provided on the back panel. A computer, with appropriate software, can be used as a remote control device for pump operation via this connection. Figure 3-2. Dual Head Pump Rear Panel Note: For external connections and serial communications see Appendix A at the back of this manual. Theory of Operation 4. 4.1 Mechanical Operation 4.1.1 Liquid System Flow Path The flow path of the dual head pump starts at the inlet of the pump head, passes through the pump head and the prime/purge valve, into the pulse damper, then finally through the bulkhead filter and out the front panel of the pump. 4.1.2 Pump Cycle The pump cycle consists of two phases, the pumping phase and the refill phase. During the operation of the pump, one pump piston displaces fluid at a constant rate from one head, while the other piston is refilling the other pump head with fluid. When that piston is finished displacing fluid, the other piston immediately starts. This results in a constant, stable flow from the pump at high pressure. www.restek.com... -
Page 10: Electronic Control
The dual head pump has a built-in pressure transducer, which senses fluid pressure. The output is sent to the microprocessor circuit, which provides the information presented on the digital display. This pressure information is compared with the user-set upper and lower pressure limits to control pump shut-off if the limits are exceeded. 4.2.2 DC Power Supply A switching regulator provides the DC voltage necessary to run the motor and electronics. AC input power for the pump must be between 85 and 265 VAC, and 47 to 63 Hz. The AC line is filtered and fused by the power entry module. Internally a fuse located on the motor drive printed circuit board protects the motor supply voltage, and the low voltage conversions have thermal and short-circuit protection. 4.2.3 Remote Interfacing An RS-232C modular jack is provided on the back panel. See Section 3.2 for information on pump operation via this connection. 4.2.4 Motor Stall Detector The motor can stall and create a loud buzzing sound if the flow path connected to the pump’s outlet becomes plugged, if the pres- sure exceeds the maximum pressure rating of the pump, or if the mechanism jams. In the event a motor stall occurs, the electrical current being supplied to the motor is turned off and the fault light is turned on. The motor stall detector is enabled or disabled during power-up by pressing and holding the RUN/STOP and PRIME buttons when the power is switched on. Release the buttons when the display reads “SFE”. To enable the motor stall detector press the up arrow button and the display will read “On”. To disable the motor stall detector press the down arrow button and the display will ready “OFF”. To exit this mode and store the current setting in non-volatile memory, press the RUN/STOP button. The motor stall detector uses a timer to determine if the camshaft has stopped turning or if the refill switch is defective. The timer begins timing after the pump accelerates or decelerates to its set-point flow rate. If the motor stall detector has been enabled, and the cam shaft stops turning or the refill switch stops operating, the fault will be detected between the time it takes to complete 1 to 2 pump cycles. A pump cycle is defined as the time it takes for the camshaft to complete one complete revolution. One revolution of the camshaft produces a delivery phase and a refill phase. Each specific flow rate has a corresponding cycle time. For a pump with an analytical (standard) 10 mL/min. pump head, the cycle time is approximately: 30 seconds at 0.1 mL/min., 3 seconds at 1.00 mL/min., and 0.3 seconds at 10.00 mL/min. For a pump with a preparative (macro) 50 mL/min. pump head, the cycle time is approximately: 30 seconds at 0.4 mL/min., 3 seconds at 4.00 mL/min., and 0.3 seconds at 40.00 mL/min. The fault is canceled by using one of the following methods: (1) by pressing the RUN/STOP button on the front panel, (2) by sending a stop command “ST” via the serial communications port on the back panel, or (3) by connecting the PUMP-STOP input to COM on the back panel, or removing the connection between the PUMP-RUN input and COM if the PUMP-STOP input is permanently jumpered to COM on the back panel. Note: the PUMP-RUN, PUMP-STOP, and COM are an option and do not exist on the standard pump. Maintenance Cleaning and minor repairs of the dual head pump can be performed as outlined below. Note: Lower than normal pressure, pressure variations, or leaks in the pumping system all can indicate possible problems with the piston seal, piston, or check valves. Piston seal replacement could be necessary after 1000 hours of running time. See Section 5.2.3. www.restek.com... -
Page 11: Filter Replacement
Removing the Pump Head 1. Turn OFF the power to the dual head pump. 2. Unplug the power cord. 3. Remove the inlet line and filter from the mobile phase reservoir. Be careful not to damage the inlet filter or crimp the PTFE tubing. 3. Remove the inlet line from the inlet check valve. 4. Remove the outlet line from the outlet check valve. 5. Carefully remove the two knurled nuts at the front of the pump head. CAUTION: Be careful not to break the piston when removing the pump head. Twisting the pump head can break the piston. 6. Carefully separate the pump head from the pump. Move the pump head straight out from the pump and remove it from the piston. Be careful not to break or damage the piston. Also remove the seal and seal backup washer from the piston if they did not stay in the pump head. 7. Carefully separate the flush housing from the pump. Move the flush housing straight out from the pump and remove it from the piston. Be careful not to break or damage the piston. Figure 5-2. Stainless Steel Non-Self-Flushing Pump Head Assembly 5.2.2 Cleaning the Pump Head Assembly Note: If you choose to remove the piston seals, you should have a new set on hand to install after cleaning. It is not recommended that you reinstall used piston seals since they are likely to be scratched and damaged during removal and would not provide a reli- able seal if reused. If you decide to remove the seals, use only the flanged end of the plastic seal removal tool supplied with the seal replacement kit and avoid scratching the sealing surface in the pump head. See Section 5.2.3 for seal replacement instructions. www.restek.com... -
Page 12: Replacing Piston Seals
1. Remove the pump head as described in Section 5.2.1. 2. Insert the flanged end of the seal insertion/removal tool into the seal cavity on the pump head. Tilt the tool slightly so that the flange is under the seal and pull out the seal. CAUTION: Using any other “tool” will scratch the finish. 3. Repeat the procedure for the low-pressure seal in the flush housing. 4. Inspect and, if necessary, clean the pump head as described in Section 5.2.2. 5.2.3.2 Cleaning the Piston 1. Once the pump head and self-flush housing are removed, gently remove the seal back-up plate by using either a toothpick or small screwdriver in the slot on top of the pump housing. 2. Grasp the metal base of the piston assembly so that you avoid exerting any sideward load on the sapphire rod, and remove the piston from the slot in the carrier by sliding it up. 3. Use the scouring pad included in the seal replacement kit to clean the piston. Gently squeeze the piston within a folded section of the pad and rub the pad along the length of the piston. Rotate the piston frequently to assure the entire surface is scrubbed. Do not exert pressure perpendicular to the length of the piston, as this may cause the piston to break. After scouring, use a lint- free cloth, dampened with alcohol, to wipe the piston clean. 4. Grasp the metal base of the piston assembly, and insert it into the slot in the piston carrier until it bottoms in the slot. 5.2.3.3 Replacing the Seals 1. Place a high-pressure replacement seal on the rod-shaped end of the seal insertion/removal tool so that the spring is visible when the seal is fully seated on the tool. Insert the tool into the pump head so that the open side of the seal enters first, facing the high-pressure cavity of the pump head. Be careful to line up the seal with the cavity while inserting. Withdraw the tool, leaving the seal in the pump head. When you look into the pump head cavity, only the polymer portion of the seal should be visible. 2. Place the seal back-up washer over the high-pressure seal. Place the seal back-up plate back into the pump housing if it was removed. Orientation is not important in these cases. 3. Attach the pump head as described in Section 5.2.5. 4. Condition the new seal as described in Section 5.3. www.restek.com... -
Page 13: Changing The Piston
<3 mL/min. 3000-4000 psi 3-4mL/min. 5.4 Check Valve Cleaning Many check valve problems are the result of small particles interfering with the operation of the check valve. As a result, most problems can be solved by pumping a strong solution of liquid, laboratory grade detergent through the check valves at a rate of 1 mL/min. (3 mL/min. for the 50 mL pump head) for one hour. After washing with detergent, pump distilled water through the pump for fifteen minutes. Always direct the output directly to a waste beaker during cleaning. If this does not eliminate the problem, the check valve should be replaced. 5.5 Cleaning the Pump 1. Disconnect the column inlet tube from the column; direct to a waste beaker. 2. Set the flow rate to maximum. 3. Pump 100% isopropanol through the pump and injector for 3 min. 4. Pump 100% filtered, distilled water through the pump and injector for 3 min. 5. Pump a 20% nitric acid/water solution through the pump for 3 min. 6. Flush the pump and injector with 100% filtered, distilled water for at least 3 min. WARNING: Use standard laboratory procedures and extreme care when handling strong acids and bases. 7. Pump 100% isopropanol through the pump for 3 min. The pump is now prepared for any mobile phase or short- or long-term shutdown. 5.6 Cleaning the cabinet The cabinet may be cleaned with tap water or mild soap solution. 5.7 Lubrication The dual head pump has modest lubrication requirements. The bearings in the pump housing and piston carrier are permanently lubricated and require no maintenance. A small dab of a light grease such as Lubriplate 630-AA on the cam is the only recom- mended lubrication. Be sure not to get lubricant on the body of the piston carrier, as this can retard its movement and interfere with proper pumping. Note: Keeping the interior of the pump free of dirt and dust will extend the pump’s useful life. www.restek.com... -
Page 14: Fuse Replacement
5.8 Fuse Replacement Three fuses protect the dual head pump. Two of the fuses are located in the power entry module at the rear of the cabinet and are in series with the AC input line. The other fuse is located on the motor power circuit board and is in series with the 48 VDC supply. Troubleshooting the fuses is straightforward. If the power cord is plugged in, the ON/OFF power entry switch is ON, and the fan does not run, check the two fuses in the power entry module. To gain access to these fuses, gently pry off the cover plate with a small flat-bladed screwdriver. Replace with fuses of the correct rating: 1 A slow-blow 250 VAC. If the front panel appears to function normally but the pump motor does not run, check the fuse located on the motor power circuit board. Replace it with a 5 A slow-blow fuse. 5.9 Battery Replacement The battery provides power for the memory that holds the current pump configuration. If the pump is set at a flow rate other than 1.00 or 10.0 and the power is turned off, when the power is turned back on the flow rate should appear as it was set. If this flow rate does not appear the battery must be replaced. 1. Unplug the unit. 2. Remove the cover. 3. Turn the unit so that the control panel is to the right. The battery can be seen in the lower right corner of the circuit board: it is circular and has a positive pole mark (+) on the top. Gently pull it from its socket. 4. With the positive mark (+) up, gently slide the new battery into the battery socket. Be sure the battery is all the way into place. It must contact the base of the battery socket. 5. Replace the cover. 6. Plug the unit back into a properly grounded outlet. www.restek.com... -
Page 15: Quick Guide To Problem Solving
2. If problem persists, remove tubing from 2. Pump runs to maximum system one piece at a time until you find pressure and shuts down. clogged piece. Most clogs occur outside pump itself. No power when pump turned Blown fuses in 1. Power surge. 1. Replace only with appropriate fuses 1A on. Fan does not run. power entry 2. Internal short. 250VAC. module. 2. Contact service technician if problem persists. Front panel appears OK but Blown fuse on 1. Power surge. 1. Replace only with appropriate fuse. pump motor does not run. motor power 2. Internal short. 2. Contact service technician if problem persists. circuit board. Self-flush heads leak flush Flush area not 1. Large (size 016) O-ring 1. Replace O-ring. solution. sealed. flattened and no longer seals. 2. Tighten head. 2. Head not sufficiently tightened. 3. Replace leaky parts. 3. Scratches in mating surfaces. 4. Leaky self-flush seal. www.restek.com... -
Page 16: List Of Replacement Parts
Prime Purge Valve Rebuild Kit 160554* Head Kit Replacement, 12mL 880354* Series II-IV Piston, 12mL 880617 Transducer/Tee Assembly 880139 Dual Head SMT Board Set (pump serial # > 20,000) 880112 Dual Head Board Set (pump serial # < 20,000) 880122 Front Panel Assembly 880904 Dual Head Overlay * Part number for single piece, 2 are required for the dual piston pump. Appendix A A.1 Rear Panel Serial Communications Port An RS-232C modular jack is provided on the back panel. A computer, with appropriate software, can be used as a remote controlling device for pump operation via this connection. A.1.1 Hardware Implementation The REMOTE INPUT serial communications port is configured for 9600 baud, 8 data bits, 1 stop bit, and no parity. The connector is a standard RJ-11 modular telephone type jack. When looking at the connector on the rear panel of the pump, pin 1 is at the top and pin 6 is at the bottom. The pin-out is: Pin Function 1, 6 Ground 2 DSR (Handshaking input to pump) 3 RXD (Serial data input to pump) 4 TXD (Serial data output from pump) 5 DTR (Handshaking output from pump) www.restek.com... -
Page 17: Hand Shaking
A.1.3 Command Interpreter The pump’s high-level command interpreter receives and responds to command packets. The pump will not send a message except when prompted, and it will send a response to every valid command as described below. The response to an invalid com- mand is “Er/”. Each command is characterized by a unique two-letter command code, and only one command can be issued per line. Case is not important; that is, the command codes “PR” “Pr” “pR” and “pr” are all equivalent. Response strings sent by the pump are ter- minated by the “/” character. If the pump’s response is “Er/”, send a “#” to clear any characters which may be remaining in the command buffer. The pump will automatically clear all characters in the command buffer after one second elapses from the time at which the last character of an incomplete command was sent. The command packets are as follows: Command Response Comments OK/ Sets the pump to the RUN state. OK/ Sets the pump to the STOP state. FLxxx OK/ Sets the flow rate to x.xx or xx.x mL/min. where the range is fixed for the pump head size, i.e., for 0.01 to 9.99 mL/min. xxx = 001 to 999, for 0.1 to 39.9 mL/min. xxx = 001 to 399. FOxxxx OK/ Sets the flow rate to xx.xx or xxx.x mL/min. where the range is fixed for the pump head size, i.e., for 0.01 to 10.00 mL/min. xxxx = 0001 to 1000, for 0.1 to 40.0 mL/min. xxxx = 0001 to 0400. FMxxxx OK/ Sets the flowrate to x.xxx mL/min., i.e., for 0.001 to 9.999mL/min. xxxx = 0001 to 9999. for 10.00 to 12.00mL/min. xxxx = 1000 to 1200. OK,x/ Reads the pump’s current pressure, where: (x, xx, xxx, or xxxx) x, xx, xxx, or xxxx = current pressure in psi www.restek.com... - Page 18 Reads the fault status, where: x = motor stall fault (0 = no, 1 = yes) y = upper pressure limit fault (0 = no, 1 = yes) z = lower pressure limit fault (0 = no, 1 = yes) OK/ Disables the keypad. (Default status at power-up is enabled.) OK/ Enables the keypad. PCxx OK/ Sets the pressure compensation value, where xx = the operating pressure (in psi divided by 100), i.e., for 0 psi xx = 00, for 5000 psi xx = 50. OK,x/ Reads the pressure compensation value in hundreds of psi, i.e., (x or xx) for 0 psi x = 0, for 5000 psi xx = 50. HTx OK/ Sets the pump head type, where: x = 1 for a stainless steel 12 mL/min. pump head x = 2 for a plastic 12 mL/min. pump head x = 3 for a stainless steel 50 mL/min. pump head x = 4 for a plastic 50 mL/min. pump head x = 5 for a stainless steel 6 mL/min. pump head x = 6 for a plastic 6 mL/min. pump head The pump is stopped and the pressure compensation and pressure limits are initialized when the head type is changed. OK,x/ Reads the pump head type, where: x = 1 for a stainless steel 12 mL/min. pump head x = 2 for a plastic 12 mL/min. pump head x = 3 for a stainless steel 50 mL/min. pump head x = 4 for a plastic 50 mL/min. pump head x = 5 for a stainless steel 6mL/min. pump head x = 6 for a plastic 6 mL/min. pump head www.restek.com...
-
Page 19: Rear Panel 4-Pin And 10-Pin Terminal Board Connectors
OK/ Resets the pump configuration to its default power-up state. (no response) Clears all characters from the command buffer. Sets external voltage control Sets external frequency control If the pump’s response is “Er/”, send a “#” to clear any characters which may be remaining in the command buffer. The pump will automatically clear all characters in the command buffer after one second elapses from the time at which the last character of an incomplete command was sent. A.2 Rear Panel 4-Pin and 10-Pin Terminal Board Connectors A 4-pin terminal board connector and a 10-pin terminal board connector are provided on the back panel. Any device capable of providing the proper run/stop logic level, flow rate control frequency, or flow rate control voltage can be used as a remote con- trolling device for pump operation via this connection. The terminal board connectors can be removed for ease of connecting wires, if desired, by pulling firmly rearward, and should be reinserted firmly afterward. A.2.1 Pressure Fault and Motor Stall Fault Output The pump’s output is on the 4-pin terminal board connector. The pinout is: Function EVENT 1 EVENT 2 EVENT 3 GROUND This output is produced internally by a reed relay which has SPDT contacts with a 0.25 amp maximum, 50 VDC maximum, 0.2 ohm rating. The 4-pin connector allows wires to be connected to the EVENT 1 (Pole), EVENT 2 (NC), and EVENT 3 (NO) terminals. When the pump stops due to the sensed pressure exceeding the set pressure limits or if a motor stall fault occurs, the connection between the EVENT 1 terminal and the EVENT 2 and EVENT 3 terminals is affected. EVENT 2 is normally closed (connected to EVENT 1) until a fault occurs, then opens. EVENT 3 is normally open (not connected to EVENT 1) until a fault occurs, then closes. A.2.1.1 Upper and Lower Pressure Limit Range The pressure sensing transducer provides accurate, wide range pressure monitoring. Because of the sensitivity of the transducer, the zero reading may shift up to 0.1% of the full pressure scale over years of operational use. The user should also be aware that the resistance to flow of the fluid being pumped through the tubing and fittings may cause the pressure to vary with the flow rate and the viscosity of the mobile phase employed. www.restek.com... -
Page 20: General Information On Run, Stop, And Enable Inputs
Function VOLTAGE COM VOLTAGE IN FREQ IN ENABLE IN PUMP-RUN PUMP-STOP No connection No connection No connection A.2.3 General Information on Run, Stop, and Enable Inputs The PUMP-RUN, PUMP-STOP, and ENABLE IN inputs operate from an internal 5 VDC source and each one draws approxi- mately 0.008 amps when connected to COM. To activate either the PUMP-RUN, PUMP-STOP, or ENABLE IN input connect it to COM. Any device capable of switching 0.008 amps can be connected between the PUMP-RUN, PUMP-STOP, or ENABLE IN input and COM, such as a switch contact, a relay contact, an open collector output, an open drain output, or any output with a high logic level output of 3.8 to 6.0 volts and a low logic level output of 0.0 to 0.5 volts. A switch contact or a relay contact is preferred since this type of connection will provide isolation between the pump and the controlling device. The COM terminal is internally connected to the pump’s chassis ground and should be connected to the controlling device’s ground or zero volt terminal when the controlling device has an open collector output, an open drain output, or any output with logic level output. A.2.4 Run and Stop Inputs The pump’s motor can be commanded to run or stop from the back panel inputs when the pump’s flow rate is controlled from the front panel or when the pump’s flow rate is controlled by the voltage or frequency input. There are two modes of operation for the run and stop inputs which are described below: Dual Signal Pulse: In this mode of operation both the PUMP-RUN and PUMP-STOP inputs are normally at a high logic level. To start the pump, pulse the PUMP-RUN input to a low logic level for a minimum of 500 mS. To stop the pump, pulse the PUMP-STOP input to a low logic level for a minimum of 500 mS. Single Signal Level: To enable this mode of operation the PUMP-STOP input must be permanently connected to COM with a jumper wire. To start the pump, put a low logic level on the PUMP-RUN input. To stop the pump, put a high logic level on the PUMP-RUN input. A.2.5 Enable Input When activated (ENABLE IN is at a low logic level), the ENABLE IN input disables flow rate control on the front panel and enables flow rate control on the back panel. A.2.6 General Information on Voltage and Frequency Inputs Special programming and circuitry allow this pump to be operated remotely with the flow rate controlled by voltage or frequency inputs. To select the remote mode of operation: www.restek.com... -
Page 21: Voltage Input
A.2.7 Voltage Input The remote voltage flow control is implemented by connecting a negative input to the rear panel VOLTAGE COM connection and a positive input to the VOLTAGE IN connection. A 0-5VDC input corresponds to 0 to 5 mL/min. for 5 mL pumps, 0-10 VDC to 0 to 10 mL/min. for 10mL pumps and 0 to 40 mL/min. for 40 mL pumps. Any device capable of sourcing at least 0.0005 amps will work. Also, the voltage control mode must be selected and enabled as described in section A.2.5 above. The voltage source, which drives the VOLTAGE IN and VOLTAGE COM connections, must be isolated from the safety ground to prevent a ground loop current. If the pump’s displayed flow rate jumps up and down erratically, suspect a ground loop problem. A.2.8 Frequency Input The remote frequency flow control is implemented by connecting a negative input to the COM connection and +5 VDC square wave input to the FREQ IN connection. Any device capable of sinking and sourcing at least 0.008 amps will work. A 0 to 5,000 Hertz input frequency will correspond to 0 to 5 mL/min. flow rate for 5 mL pumps. A 0 to 10,000 Hertz input frequency will correspond to 0 to 10 mL/min. flow rate for 10mL pumps and 0 to 40 mL/min. for 40mL pumps. Also, the frequency control mode must be selected and enabled as described in section “A.2.5” above. Appendix B Quick-Set Pump Control Serial Pump Control Software Installation: • Run the Quick-Set “setup.exe” program file & follow prompts. • Due to the many versions of Windows in use, your PC may have newer files than the ones being loaded. You will be prompted for a course of action, when in doubt,” keep” your existing files or “ignore” other messages. General Information: • If unsure of any pump settings or whether your model pump allows certain settings, the software will report back an error message if the command is not allowed. “11111” is an error code meaning that the communication is probably not available or communication has been broken. Splash Screen: Date code & revision www.restek.com... - Page 22 Startup Screen: • Initial screen is for locating the pump or detector. • If communication does not initialize or if the pump is not on this list: click on the “Poll Com Port For Device” button. • This will scan 9 possible PC COM ports for the attached device. • When the device is found, click on the” Continue” button. • Be sure the device is found before moving on. This assigns a port to open for all remaining screens. Main Screen: • General pump information is displayed along with firmware identification. • Information screens are updated automatically, however, refresh buttons are available for pump information. • Basic operations and basic flow rate buttons are available. • Flow rate buttons for higher flows are available if the pump head type is set for the larger flow varieties. • Multiple pumps (located by the previous screen) can be brought to the active screen by selecting the pump in the COM’s window. - This window will automatically be displayed if multiple pumps are located on COM ports on the computer. - The pump information window will update only when it is selected (“clicked on”). It updates with the information for the pump on the COM port selected. www.restek.com...
- Page 23 • See the pump operations manual for detailed pump specifications. • Pump head type, external control type, and pressure transducer limitations (not available for all pumps) can be modified from the menu bar -- Pump Setup Not all pumps allow all options selectable. Constant Pressure Column Packing Pump Control • Constant pressure pump specific controls can be accessed through Pump Constant Pressure. • The constant pressure pump’s continuous flow modification firmware requires some specific communication needs. Delays may be seen in the startup and updates of this screen. • Up to 5 timed changes in flow rate may be programmed (see above). • When time events are programmed, the Timer control will appear in the top middle of the screen. • Up to 3 timed “triggers” of the pumps relay output may be set. Note: Pump firmware must be compatible. This is the “el” and “eh” serial command. The test button can confirm the operation. The “Save Settings” and “Load Settings” buttons will store the pump setups for future use. • See the constant pressure pump manual for descriptions of these pump settings • Pump flow and pressure may be graphed and logged (to a comma and space delimited text file). • Zero pressure readings are not graphed. • All entries in the test file are time stamped. • Text files are easily imported into EXCEL but do not require EXCEL on the machine collecting the data. • Absolute accuracy of the polling interval is not guaranteed, this is a Windows limitation. • The graph will start when the “Poll for Flow and Pressure” button has been selected. www.restek.com...
- Page 24 Graphing controls printed for future display. options detected. for user. The delay or transition time of the relay switching may be modified if needed. Four Pump Linear Gradient Control • Up to four pumps can be controlled and monitored in a time based linear gradient. • – Advanced ---- Quad Pump Control • Virtual Pump will be shown (at the top of the form) only for the number of pumps detected on COM ports. • Gradient setups can be saved to text files and reloaded when needed. • Gradient percentages will be calculated as they are entered into the chart. • 100% will be set for the first solvent; enter the needed percentage starting at the second solvent. • A “Graphical Gradient Display” tab is located on Gradient Table. This will plot the programmed gradient for the user to verify the entered data. www.restek.com...
- Page 25 Enter the desired to use in the current percentage of the total flow. More gradient. lines will automatically be added. Advanced Constant Flow Pump Controls • Advanced controls and data collection for constant flow pump controls can be accessed through – Advanced -- Direct Entry and Data Acquisition • Flow commands as specified in the pump manual can be entered. • Pump flow and pressure may be graphed and logged (to a comma and space delimited text file). • All entries in the test file are time stamped. • Text files are easily imported into EXCEL but do not require EXCEL on the machine collecting the data. • Absolute accuracy of the polling interval is not guaranteed; this is a Windows limitation. • The graph will start when the Poll for Flow and Pressure button is pressed. • To log the data click the Log Data button and follow the prompts. • Data may be logged multiple times per second or as slow as one point every 15 minutes. www.restek.com...
- Page 26 Additional Menu Items: Manually Assigning COM ports. • COM ports can be manually assigned through — Configure -- Assign Com Ports PC connection to the pump • A wiring diagram is available under — Configure -- RS232 Connection • A timer is available under – Testing -- Timer • Basic up / down functions are available. • The PC’s speaker can be used to indicate when time has expired or reached the set point . • The Scroll Bar is used to set the time. www.restek.com...
-
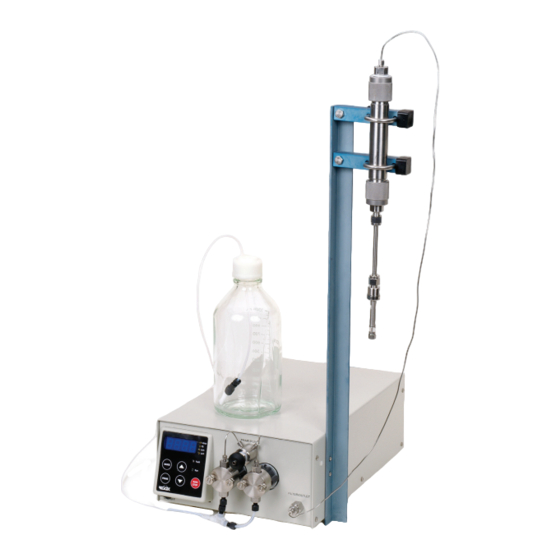
Page 27: Column Packer Hardware
", ", or " OD high performance LC columns. The unique quick-connect inlet with special fluorocarbon elastomer o-ring allows fast sealing without wrenches during the critical phase of the packing operation. The maximum pressure rating is 15,000psi (103mPa). The manufacturer recommends the use of a pre- column for best results and supplies a bored-through coupling for this purpose. Column Assembly Slide the external nut onto the column tubing and place the ferrule on the end of the tubing. Place the end fitting, with the appropriate frit in place, in a vise and hold the column fully seated in the column end fitting socket. Tighten the nut with a wrench 1.25 turns. One end of the column is now completed. Turn the column to the opposite end and repeat the above procedure. This will properly position the ferrules and complete the assembly of the column. Warranty (Pumps and Column Ovens) The product described in this manual, other than seals, check valves, inlet/outlet filters, pistons, and pulse damper, is warranted against defective material and workmanship for a period of three (3) years from the date of shipment. Seals and valves, whether sold indepen- dently or as component parts of other products, are warranted against defective material and workmanship for a period of ninety (90) days from date of shipment. In the event of such a defect, Restek will repair or replace the product or necessary parts therein, at its discretion, and such repair or replacement shall be the sole remedy of this warranty. This warranty is subject to the following conditions: 1. Any servicing of the products must be performed by trained personnel. 2. The products must not be subjected to abuse or improper installation or application. 3. Warranty does not extend past thirty (30) days for transducer calibration, voltage calibration, and similar features that may be part of the product. 4. This warranty shall be void as to any products exposed to: (i) highly corrosive chemicals including, but not limited to halide acids, halide salts, concentrated organic or inorganic acids or their salts, any concentrated chemical that will complex metal ions, carbon tetrachloride which can contain significant amounts of hydrochloric acid, tetrahydrofuran, high concentrations of chlorinated solvents (which can affect PEEK® components); (ii) foreign materials in the driving media or pumped media; (iii) application of pressures beyond published ratings. THERE ARE NO WARRANTIES, EXPRESS OR IMPLIED, WHICH EXTEND BEYOND THIS DESCRIPTION. Restek neither assumes, nor authorizes any person to assume for it, any other liability in connection with the sale and use of the products. DAMAGES ARE LIMITED STRICTLY TO REPLACEMENT OF THE PRODUCTS. SSI EXPRESSLY DISCLAIMS LIABILITY FOR INCIDENTAL AND CONSEQUENTIAL DAMAGES RESULTING FROM THE USE OF THE PRODUCTS. - Page 28 Contact Technical Service at 1-800-356-1688, 1-814-353-1300, ext. 4, or support@restek.com (or contact your Restek representative) if you have any questions about this product or any other Restek product. Restek U.S. • 110 Benner Circle • Bellefonte, PA 16823 phone: 1-814-353-1300 • 1-800-356-1688 • fax: 1-814-353-1309 • www.restek.com Restek France •...
Need help?
Do you have a question about the Pack In A Box and is the answer not in the manual?
Questions and answers