Table of Contents
Advertisement
Quick Links
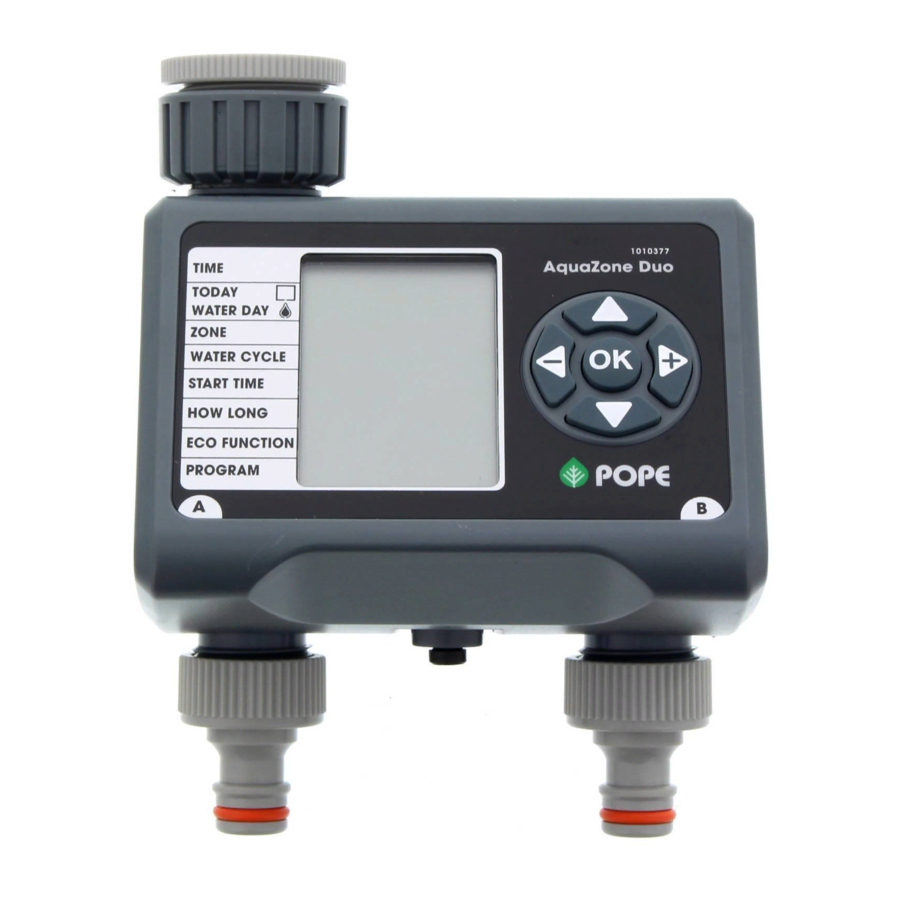
AquaZone Duo Water Timer
With the AquaZone Duo Water Timer, you can
program up to four automatic watering cycles for
each of its two zones. An Eco Function helps reduce
wasteful water run off, and watering can be
suspended when rain is forecast
Battery Installation
Pull out the battery holder from the back of the timer and insert two (2)
AA Alkaline batteries, making sure that the orientation is as shown on the
diagram in the holder. Re-insert the battery holder.
Replace the batteries when the battery status is
Do not use rechargeable batteries.
Setting the Time
Use the
and
buttons to set the correct time. Press
Hint - hold the button down to increase the scrolling speed.
The factory default clock setting is for 12-hour time.
To change to 24-hour time, press and hold
To return to 12-hour time, press and hold
Setting the Day
Use the
and
buttons to move the
week (e.g.
for Tuesday) and press
Setting the Watering Day
Watering can be programmed to occur on selected days of the week, or at two
or three day intervals.
1. Watering on selected days.
Use the
and
buttons to move the flashing water drop
watering day of the week.
Press
to confirm
or cancel
2. Watering every second or third day
Use the
and
buttons to move the flashing water drop
past the weekdays to "2nd" or "3rd".
Press
to confirm
or cancel
At least one watering day or watering period must
be set before moving to the next step.
Press
to move to the next step.
Setting the Watering Day
1. Select the Zone
Use the
and
buttons to move the
to confirm.
2. Select the Water Cycle
a. Use the
and
buttons to move the
to confirm.
b. Set Start Time
Use the
and
buttons to set the required watering start time and press
to confirm.
c. Set How Long
Use the
and
buttons to set the required watering duration (up to 240
minutes) and press
to confirm.
d. Activate Eco Function
The Eco Function creates pauses in the watering cycle, reducing water
run-off by allowing time for the ground to absorb the water.
WATER MIN and PAUSE MIN can be customised for different applications
(irrigation or lawn and garden), landform (flat or sloping) and soil density
(clay or sand).
1010377
.
to confirm.
for 10 seconds.
for 10 seconds.
indicator to the current day of the
to confirm.
to the desired
the watering day of the week.
to the desired
the selection.
indicator to
and press
indicator to
and press
Three examples are:
• Irrigation – wat er 5 minutes, pause 2 minutes
• Flat Lawn – water 4 minutes, pause 1 minute
• Sloping Lawn – water 2 minutes, pause 2 minutes
Once the ECO function has been programmed and activated, it is
applied to all the programmed water cycles. If it is not needed, the ECO
function may be skipped by leaving WATER MIN set to 0.
i. Set up WATER MIN
Use the
and
buttons to set the required WATER MIN duration
(up to 19 minutes), then press
ii. Set up PAUSE MIN
Use the
and
buttons to set the required PAUSE MIN duration
(up to 19 minutes), then press
3. To set up WATER CYCLES 2, 3 and 4 for Zone A,
repeat Programming steps 2a to 2d
4. To set up WATER CYCLES 1, 2, 3 and 4 for ZONE B,
repeat Programming steps 1 to 3.
Activate Programming
1. Use the
and
buttons to move the
to confirm.
Rain Delay
If rain is forecast, you can suspend the auto program for up to 6 days from
the time you program the delay.
1. Use the
and
buttons to move the
to confirm.
2. Use the
and
buttons to set the number of days of delay required,
and press
twice, to confirm.
Manual Watering
To water manually at any time, regardless of the programmed auto sequence:
1. Use the
and
buttons to move the
to confirm.
2. Select the Zone using the
and
to
or
and press
to confirm.
3. Set How Long by using the
and
duration and press
to confirm.
4. If required, activate Eco Function, as in Programming step 2d. If not required,
leave the WATER MIN time set to 0.
5. Repeat steps 2 to 4 for the other zone, if required.
6. Press
twice to confirm and start watering. The display alternately shows
Zone A and its remaining watering time, and Zone B and its remaining
watering time, changing each 5 seconds.
Disabling the Program
To suspend automatic watering for an extended period, use the
buttons to move the
indicator to
Installation
1. Attach the timer to the tap and hoses.
2. Turn on the tap and leave it on. Once the watering programs are activated,
the timer will control the water flow, as programmed.
The timer can be programmed before installation
Care and Maintenance
1. For outdoor use only.
2. Maximum operating water pressure: 800kPa.
3. Operating water temperature range: 0°C to 38°C.
4. To store the timer when not in use:
a. Turn off the tap and remove the timer
b. Set the timer to Manual to open the valve and empty out all of the water
c. Remove the batteries
d. Dry the timer and store in a dry place.
to confirm.
to confirm.
indicator to
and press
indicator to
and press
indicator to
and press
buttons to move the
indicator
buttons to set the required watering
and
and press
to confirm.
Advertisement
Table of Contents


Need help?
Do you have a question about the AquaZone Duo Water Timer and is the answer not in the manual?
Questions and answers