
Summary of Contents for MetalTech Jobber Plus
- Page 1 Jobber Plus Instruction Manual April 14, 2009 Press Control 3441 Saint Croix Court Punta Gorda, FL 33950 Phone 800-516-5516 Fax 888-761-8725...
-
Page 3: Table Of Contents
Table of Contents Safety Message ..........................3 Jumpers ............................5 Direction of Rotation ........................5 Mounting The jobber Plus ......................5 E-Cam Installation .........................5 Installation Instructions ........................5 Palm Buttons ..........................6 Air Pressure Switches ........................6 Grounding ............................6 Dual Solenoid ..........................6 Programming ..........................6 Passwords............................6 E-Cam Programming ........................7 Variable Speed Machines ......................9... - Page 4 Notes Page - 4 J o b b e r P l u s M T C C...
-
Page 5: Safety Message
The Jobber Plus should never be accessed by anyone other than properly trained personnel so designated by the purchaser and or employer. If the machine operator is not properly trained to set up the machine or the Jobber Plus, then a setup person so designated should perform the setup. - Page 6 Jobber Plus. The machine on which the Jobber Plus and light curtains are to be installed MUST be capable of stopping motion anywhere in the stroke or cycle in a safe time as prescribed by the OSHA formula for safe stopping times.
-
Page 7: Jumpers
Installation Instructions If you follow this step by step procedure, you will find that installing the Jobber Plus is easier than any other punch press control on the market. Jumpers Do NOT remove any of the factory installed jumpers until the control is installed and func- tioning without any additional components. -
Page 8: Palm Buttons
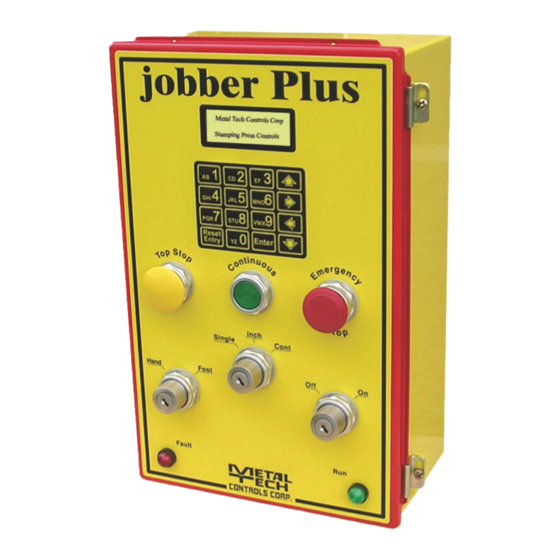
Programming the machine setup is done from a special setup menu using the programming keypad (Part No. 900-E00146). To enter the programmable functions of the Jobber Plus the machine cannot be in motion. Plug the ribbon cable into the back of the LCD display. The socket is keyed so it only goes in one way. -
Page 9: E-Cam Programming
If you selected “Single Speed” you will be asked to cycle the machine for a number of times until the control has determined that the machine is stopping within 5 degrees of TDC. MTCC Jobber Plus P a g e - 9... - Page 10 Because of limited space on the display instructions are sometimes truncated to fit the screen. The display above is asking you to cycle the machine by pressing the palm buttons and hold- ing them until the machine attempts to stop at TDC. When it stops, the display will show the angular position in degrees.
-
Page 11: Variable Speed Machines
MACHINE SPEED SET UP COMPLETED Just as with the first (slowest setting) done previously, cycle the machine until the control determines the proper stopping angle. MTCC Jobber Plus P a g e - 11... -
Page 12: Adjusting Tdc
There may be times when you will need to make adjustments to the stop angle factor pro- gramed into the Jobber Plus. But before you do, answer these questions: Did you check to see if you have the proper counter balance pressure set? Proper counter balance pressure improves your stopping time and therefore the stopping angle can be more accurate. -
Page 13: Changing Passwords
VARIABLE SPEED MACHINES: The Jobber Plus version provides automatically compensated top stop, “ACTS”. ACTS is only available when the user has selected VARIABLE SPEED from the machine setup menu. When you entered the four speed ranges during the initial machine setup the control auto- matically created a speed table by inserting additional angle settings between the four speed ranges, creating a total of seven speed ranges. -
Page 14: Adjusting The Stop Max
Adjusting the STOP MAX If after operating the machine you find that the stopping time is higher than determined by the test (usually caused by the normal heating of the brake lining during use), you can adjust the setting by entering the SETUP menu as previously described and selecting func- tion CHANGE STOP MAX. -
Page 15: Micro Inch
User Programmable Outputs The Jobber Plus version comes with two user programmable output relays. These relays will come on and go off at any programmed angle (rotary position of the machine). To set the cam relays enter the SETUP menu as previously described and select the SETUP USER RELAYS function. -
Page 16: Wiring Diagram- Low Voltage
Wiring Diagram- Low Voltage 12 to 24 vdc Inch Single Cont* Terminal (01) Terminal (02) (03) Cont. Arm PB (04) Terminal (05) (06) Top Stop PB (07) Terminal (08) Auxiliary Emergency Stop PB Must be Locking Type! (09) (10) Terminal (11) Hand / Foor Selector SW Terminal (12) Air Pressure SW - Counter Balance... -
Page 17: Multipule Operator Stations
Multipule Operator Stations The Jobber Plus provides for the use of two operator stations. The first operator station is wired to terminals 15, 16 and 17. Operator Installation of two operator stations requires a "keyed" selector switch connected to ter- minal 26. - Page 18 Page - 18 J o b b e r P l u s M T C C...
-
Page 19: Board Layout
75 - Brown Or Continuous on Demand Input Or Continuous on Demand Input Metal Tech Controls Corp Buzzer NOTE: All inputs that are not used must me jumpered to 12VDC MTCC Jobber Plus P a g e - 1 9... -
Page 20: Operating The Press
The Red and Green panel lights will flash in this mode of operation. The Jobber Plus is now ready to run. Apply 12 to 24 vdc to terminals 23 and 24, (these inputs should be from separate sources, and independent of each other for safe operation). The machine will cycle continuously until inputs 23-24 go low (de-energized), the Top-Stop push button is pressed or there is an emergency situation. -
Page 21: Diagnostic Error Messages
Do not turn the power off before reading the message. If you do, you will get the message POWER FAILURE, which was the last error to occur. MTCC Jobber Plus P a g e - 2 1... -
Page 22: Warranty
WARRANTY Metal-Tech Controls Corp. - herein after referred to as MTCC warrants its products to be free from defects of material and workmanship and will, without charge, replace or repair any equipment found defective upon inspection at its factory, provided the equipment has been returned, transportation prepaid, within TWO years from date of shipment. - Page 23 Notes Jobber Plus MTCC P a g e - 2 3...
- Page 24 Page - 24 J o b b e r P l u s M T C C...
Need help?
Do you have a question about the Jobber Plus and is the answer not in the manual?
Questions and answers