Table of Contents
Advertisement
Advertisement
Table of Contents

Summary of Contents for Delta STRYKER
- Page 1 STRYKER HD 4.5-30×56 FFP 5-50×56 SFP...
- Page 3 Focusing (Diopter adjustment) Mounting Zeroing Turrets scale zeroing Using the zero-lock mechanism Power adjustment Illuminated reticle Parallax adjustment Sunshade 14 RETICLES CHARACTERISTICS 1. Stryker HD 4.5-30x56 FFP 2. Stryker HD 5-50x56 SFP 16 CARE AND MAINTENANCE List of spare parts...
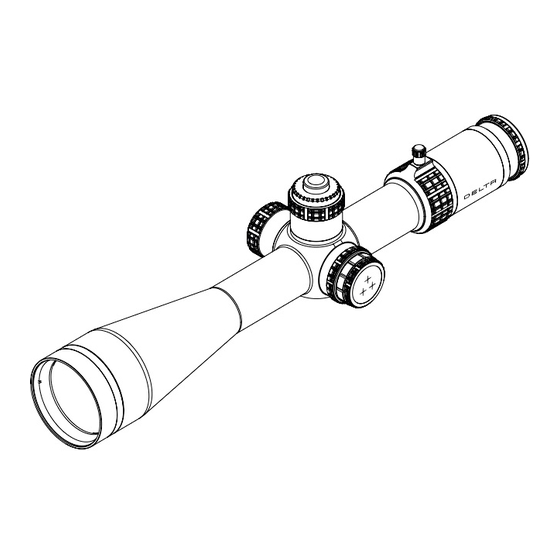
- Page 4 Thank you for purchasing our riflescope. We hope that it will serve you well for many years. To maximize your enjoyment of the riflescope, please read this manual carefully. STRUCTURE OF THE RIFLESCOPE Fig. 1 1. Objective lens 6. Diopter ring 2.
- Page 5 The riflescope has open turrets equipped with a ZeroLock mechanism. The Stryker HD 4.5-30x56 FFP model is only 365 mm long and weighs only 1014g, while the Stryker HD 5-50x56 SFP model is only 363 mm long and weighs only 1100g.
- Page 6 USE OF THE RIFLESCOPE CAUTION! Viewing the sun can cause serious eye injury, never look at the sun with this product or even the naked eye! Focusing (Diopter adjustment) Hold the scope about 7-10 cm (3 - 4 inches) from your eye and look through the eyepiece at a featureless, flatly lit bright area such as a wall or open sky.
- Page 7 CAUTION! If you decide to mount the scope yourself check the specification note at the end of this manual to ensure that this would not void the warranty. With the rings pre-installed onto the firearm, separate the top and bottom halves of the rings. Set the scope in the cradles formed by the bottom ring halves.
- Page 8 CAUTION! Avoid over-tightening the rings. This can damage the scope, affecting performance or rendering it inoperable. There should be a slight even gap on the left and right sides of both sets of rings, between the top and bottom halves. We recommend tightening the bolts with a torque wrench with a force not exceeding 1.7-1.8 Nm.
- Page 9 For elevation adjustment, turn the elevation adjustment screw clockwise to lower the point of impact and counterclockwise to raise the point of impact. For windage adjustment, turn windage adjustment screws clockwise to move the point of impact to the left and counterclockwise to move the point of impact to the right .
- Page 10 In the case of the Stryker HD riflescope version with lockable turrets, to zero the scale, unscrew the ring on the top of the turret by hand (fig 5). Being careful not to change the position of the knob, remove the scale and set it so that the „0”...
- Page 11 Using the zero-lock mechanism The riflescope is equipped with the „ZeroLock” mechanism that allows the user to set a lock for the vertical adjustment turret for specific settings - most often after zeroing the riflescope for a given shooting distance, e.g. 100m. This mechanism sets a hard stop on the elevation zero, so the user cannot accidentally be a whole turn of elevation out when dialling back to zero after taking a longer shot that required multiple turns of elevation on...
- Page 12 Power adjustment To change magnification, simply rotate the magnification ring to align the desired number on the power scale with the index dot. The adjustment ring is located between the eyebell and tube of the riflescope. For your comfort of use, the ring has an additional lever.
- Page 13 Sunshade Stryker HD riflescopes come with a sunshade that increases the comfort of aiming especially in strong sunlight and also protects from rain splashes on the objective lens. To mount it, screw it...
- Page 14 RETICLES CHARACTERISTICS Stryker HD 4.5-30x56 FFP LRD-1P, LRD-1T and DLR-1 reticles were designed for ambitious shooters for PRS and tactical shooting at medium and long distances. The reticles ensure maximum comfort of shooting and high functionality throughout the zoom range (4.5-30x).
- Page 15 The additional side ruler allows accurate measurement of the target in the upper zoom range with the accuracy of up to 0.1 Mil (1 cm). Stryker HD 5-50x56 SFP DLS-1, DLS-2 and DLS-3 reticles, created especially for long shots, are the essence of precision and usability. These reticles are placed in the second focal plane and have been scaled to a magnification of 40x.
- Page 16 DLS-3 Precise reticle, scaled in arc minutes (MOA). The central aiming point only covers 0.1 MOA (2.9 mm at 100 m). The 0.02 MOA (0.58 mm) bars have markers spaced at convenient intervals of 1 MOA (smaller) and every 5 MOA (larger) to make adjustments for bullet drop or windage.
- Page 17 Store the scope in a moisture-free environment. Avoid storing the scope in hot places, such as the passenger compartments of vehicles on hot days. The temperatures could adversely affect the lubricants and sealants. A vehicle’s trunk, a gun cabinet or a closet is preferable.
- Page 18 Delta Optical Nowe Osiny, ul. Piękna 1 05-300 Mińsk Mazowiecki www.deltaoptical.pl...
Need help?
Do you have a question about the STRYKER and is the answer not in the manual?
Questions and answers