Advertisement
Quick Links
Classic Finger�p
Pulse Oximeter
PO6L
User Manual
Syringa UK Ltd
www.medigenix.co.uk
customercare@syringa-uk.co.uk
Unit G Daux Road, Billingshurst, RH14 9SR, United Kingdom
iHealth Labs Europe SAS
36 Rue de Ponthieu, 75008, Paris , France
Instruc�ons to User
Thank you for purchasing the MediGenix Classic Finger�p Pulse Oximeter.
This user manual is wri�en and compiled in accordance with the council direc�ve MDD93/42/EEC for medical
oximeters and harmonised standards. In case of modifica�ons and so�ware upgrades, the informa�on
contained in this document is pa�ent to change without no�ce.
The user manual describes the oximeter's features, requirements, main structure, func�ons, specifica�ons,
correct methods for transporta�on, installation, usage, opera�on, repair, maintenance and storage as well as
the safety procedures to protect both the user and the equipment. Refer to the respec�ve sec�ons for details.
Please read the user manual carefully before using this oximeter. The opera�ng procedures described below
should be strictly followed. Failure to do so may cause abnormal results, equipment damage and human injury.
The manufacturer is NOT responsible for the safety, reliability and performance issues and any monitoring
abnormality, human injury and equipment damage due to user negligence regarding the opera�on instruc�ons.
The manufacturer's warranty does not cover such faults caused by user error or negligence.
Owing to con�nuous oximeter development there may be slight differences between this manual and the
oximeter you have received.
This is a medical oximeter, which can be used repeatedly.
WARNING:
An uncomfortable or painful feeling may appear if the oximeter is used con�nuously, especially for
microcirculation barrier pa�ents. It is recommended that the oximeter is not applied to the same finger
for more than 2 hours at a �me.
The oximeter cannot be clipped on tender, swollen or oedema �ssue.
The infrared light emi�ed from the oximeter is harmful to the eyes, so do not stare at the light.
Do not use the oximeter on fingers that have nail polish, false nails, gel nails or other makeup as this will
interfere with the results.
Ensure the fingernail is not too long.
Please refer to the correla�ve literature about clinical restric�ons and cautions.
This oximeter is not intended for treatment.
Cau�on: The user manual is published by our company. All rights reserved.
1
Safety
1.1 Instruc�ons for safe opera�on
Check the oximeter and accessories regularly to ensure there is no visible damage that may affect the
pa�ent's safety or monitoring performance. It is recommended that the oximeter should be inspected at
least once a week. Stop using the oximeter when there is obvious damage.
Necessary maintenance must be performed by qualified service technicians ONLY. Users are not permi�ed
to maintain it themselves.
The oximeter cannot be used together with oximeters not specified in this user manual.
This oximeter is calibrated before leaving the factory.
1.2 Warning
Explosive hazard - do NOT use the oximeter in an environment where inflammable gas such as ignitable
anaesthe�c agents, is present.
Do NOT use the oximeter while the pa�ent is being measured by MRI or a CT scan.
Do NOT use the oximeter on pa�ents who are allergic to rubber.
Follow local laws and regula�ons when disposing of the oximeter, accessories, and packaging (including
ba�eries, plas�c bag, foam and paper boxes).
Please check the packaging before using for the first �me to ensure the oximeter and accessories are in
accordance with the packing list.
1.3
A�en�on
Keep the oximeter away from dust, vibra�on, corrosive substances, explosive materials, high temperature
and moisture.
If the oximeter gets wet, please stop opera�ng it.
When the oximeter is moved from a cold environment to a warm or humid environment, please do not use
it immediately but rather wait 20 minutes for the oximeter to adjust to the ambient temperature.
Do NOT operate the bu�on on the front panel with a sharp object.
High temperature or high-pressure steam disinfec�on of the oximeter is not permi�ed. Refer to "Cleaning,
disinfec�on and maintenance" in sec�on 8 in the manual.
Do not submerge the oximeter in liquid. When it needs cleaning, please refer to "Cleaning, disinfec�on and
maintenance" in sec�on 8 in the manual.
Fingers which are too thin or too cold, are likely to affect the normal measurement of a pa�ent's SpO
pulse rate. Clip the oximeter onto a thicker finger such as the thumb or middle finger and ensure the finger
is posi�oned deep enough into the probe for measurement to be effec�ve.
Do not use the oximeter on infants or neonatal pa�ents.
The oximeter is suitable for children over four years old and adults. Pa�ents should weigh between 40kg
and 110kg.
The oximeter may not work for all pa�ents. Discon�nue use if you are unable to achieve stable readings.
The data updates in less than 5 seconds and changes according to individual pulse rates.
If abnormal condi�ons appear on the screen during the testing process, remove the oximeter and then
reinsert the finger to restore normal use.
The oximeter has a normal lifespan of 3 years since using for the first �me.
The lanyard a�ached to the oximeter is made from non-allergenic material. Discon�nue using the lanyard if
a pa�ent appears sensi�ve to it. In addi�on, pay a�en�on to the use of the lanyard and avoid wearing it
around the neck so as to not cause harm.
The oximeter does not have an abnormal reading alarm func�on. Do not use the oximeter in situa�ons
where alarms are required.
Change the ba�eries when the low-ba�ery icon displays on screen.
Ba�eries must be removed if the oximeter is going to be stored unused for more than 1 month as ba�eries
may leak.
A flexible circuit connects the two parts of the oximeter. Do not twist or pull on the connec�on.
1.4
Indica�on for Use
The Finger�p Pulse Oximeter is a non-invasive oximeter intended for spot-checking oxygen satura�on of arterial
haemoglobin (SpO
) and the pulse rate of adult and paediatric pa�ents.
2
2
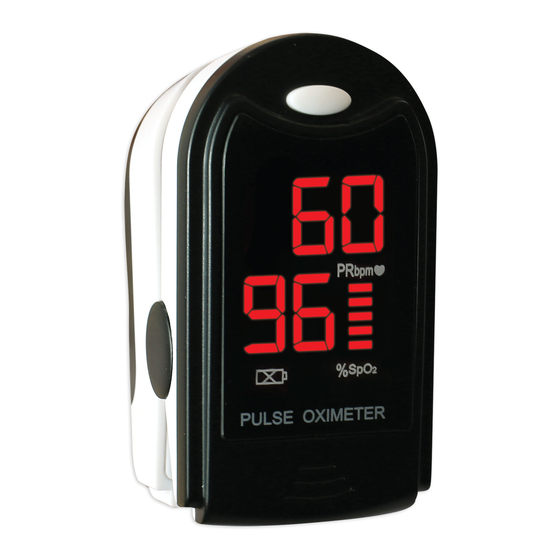
Overview
The oximeter is simple to operate, portable and uses very li�le ba�ery power. It is only necessary for the pa�ent
to insert a finger into the finger�p photoelectric sensor for a diagnosis. The screen will display the measured
value of Haemoglobin Satura�on (SpO2) and Pulse Rate.
2.1
Classifica�on
Class II a (MDD93/42/EEC IX Rule 10)
Class II (U.S.FDA)
2.2
Features
Simple to operate
Portable and lightweight (approx. 50g, including ba�eries) with a handy lanyard
Low power consump�on
The oximeter will automatically power off when no signal is received in 5 seconds
Low-ba�ery warning indicator
Pulse strength and rate is displayed
SpO2 percentage is displayed
2.3 Major Applica�ons and Scope of Applica�on
The Classic Finger�p Pulse Oximeter is used to measure human Haemoglobin Satura�on (SpO2) and pulse rate -
the so-called the O
concentra�on in the blood. It is an important bio-parameter for respira�on.
2
The oximeter is suitable for use in home and hospital environments (including clinical use in internist/surgery
and intensive care).
This oximeter is NOT intended for con�nuous monitoring.
The oximeter is not suitable for use in con�nuous supervision of pa�ents.
The problem of overra�ng could emerge if the pa�ent is suffering from toxicosis caused by carbon
monoxide. The oximeter is not recommended to be used under this circumstance.
2.4
Environment Requirements
Storage Environment
Temperature: -40℃~+60℃
Rela�ve humidity: ≤95%
Atmospheric pressure: 500hPa~1060hPa
Opera�ng Environment
Temperature: 10℃~40℃
Rela�ve Humidity: ≤75%
Atmospheric pressure: 700hPa~1060hPa
3
Principle and Cau�on
3.1
Principle of Measurement
An experienced formula of data processing is established by making use of Lambert Beer Law according to
Spectrum Absorp�on Characteris�cs of Reduc�ve Haemoglobin (Hb) and OxyHaemoglobin (HbO
near-infrared zones. The operation principle of the oximeter is: Photoelectric OxyHaemoglobin Inspec�on
Technology which is adopted in accordance with Capacity Pulse Scanning and Recording Technology, so that two
light beams of different wavelengths can be focused on the human finger�p through a perspec�ve clamp
finger-type sensor. The measured signal is obtained by a photosensi�ve element. The informa�on acquired is
displayed on screen through the electronic circuits and microprocessor.
CE0197
3.2
Cau�on
The finger should be placed properly (see Figure 5) or else it may cause inaccurate measurement.
The SpO
sensor and photoelectric receiving tube should be arranged such that the pa�ent's arteriole is
2
positioned in-between them.
Do not use the oximeter on the same limb that is receiving an intravenous injec�on/drip, or which is
restricted due to a blood pressure cuff or a compression bandage.
Make sure the op�cal path is free from any par�cle obstacles like rubberised fabric or dirt.
Excessive ambient light may affect the measuring result. This includes fluorescent lamps, dual ruby light,
infrared heaters, direct sunlight etc.
Strenuous ac�on of the pa�ent or extreme electrosurgical interference may also affect the accuracy.
Ensure the fingernail of the pa�ent is clean and free of nail polish, gel covering, ar�ficial nail etc.
3.3
Clinical Restric�ons
As the measurement is taken based on arteriole pulse, substan�al pulsa�ng blood flow of the pa�ent is
required. For a pa�ent with a weak pulse due to shock, low ambient/body temperature, major bleeding or
use of a vascular contrac�ng drug, the SpO
will be more sensi�ve to interference.
For those with a substan�al amount of staining dilu�on drug (such as methylene blue, indigo green and
acid indigo blue), carbon monoxide Haemoglobin (COHb), methionine (ME+Hb) or Thiosalicylic
Haemoglobin, and for some with icterus problem, the SpO
inaccurate.
Drugs such as dopamine, procaine, prilocaine, lidocaine and butacaine may also be a major factor blamed
for serious error of SpO
As the SpO
2
pa�ents with serious anaemia may also report good SpO
4
Technical Specifica�ons
4.1
Display Format: Digital tube Display
4.2
SpO
Measuring Range: 0% - 100%
2
4.3
Pulse Rate Measuring Range: 30 bpm - 250 bpm
4.4
Pulse Intensity Display: column display
4.5
Power Requirements: 2 ×1.5V AAA alkaline ba�ery
4.6
Power Consump�on: Less than 25 mA
4.7
Resolu�on: 1% for SpO
4.8
Measurement Accuracy: ±2% accuracy within 70%-100% SpO
than 70% is unspecified.
4.9
Measurement Performance in Weak Filling Condi�on: SpO
the pulse-filling ra�o is 0.4%. SpO
4.10 Resistance to surrounding light: The devia�on between the value measured in the condi�on of
man-made light or indoor natural light and that of darkroom is less than ±1%.
4.11 Func�on switch: The oximeter powers off when there is no finger in the oximeter.
4.12 Op�cal Sensor: Red light (wavelength is 660nm, 6.65mW); Infrared (wavelength is 880nm, 6.75mW)
5
Accessories
1 lanyard
2 AAA ba�eries
1 user manual
and
6
Installa�on
2
6.1
View of the Front Panel
6.2
Ba�ery
Observe the correct polarity when inserting the ba�eries as improper inser�on may damage the oximeter.
Step 1. Refer to Figure 3. and insert the 2 AAA ba�eries.
Step 2. Replace the cover.
6.3
A�aching the Lanyard
Step 1. Put the end of the rope through the hole.
Step 2. Put another end of the rope through the first one and pull to �ghten it.
Figure 4. A�aching the lanyard
7
Opera�ng Guide
7.1
Insert the 2 ba�eries correctly according to the polarity and then replace the cover.
7.2
Open the clip by pressing the hinge end of the oximeter.
7.3
As shown in Figure 5. posi�on the pa�ent's finger on the rubber cushions of the oximeter ensuring the
finger is set deep within the oximeter with the fingernail facing upwards.
7.4
Press the switch bu�on once on front panel.
7.5
Do not shake the finger. The pa�ent must be s�ll during the process and should not move around.
7.6
The results will display on screen and will con�nuously update.
7.7
Press the bu�on to reset the oximeter.
Fingernail and the luminescent tube should be on the same side.
8
Cleaning, disinfec�on and maintenance
8.1
Change the ba�eries when the low ba�ery indicator is displayed on screen.
8.2
Clean the surface of the oximeter before using it. Wipe the surface with a clean, so� cloth that has been
Figure 1. Opera�ng Principle
waveform (PLETH) will decrease. In this case, the measurement
2
measures.
2
value serves as a reference value for the judgement of anaemic anoxia and toxic anoxia, some
2
and 1 bpm for Pulse Rate
2
error is ±4%, pulse rate error is ±2 bpm or ±2% (select the larger value).
2
Figure 2. Front View
) in glow and
2
determina�on with this oximeter may be
2
measurement.
range. Accuracy for results that are less
2
and pulse rate can be shown correctly when
2
Figure 3. Battery Installa�on
Figure 5. Correct finger posi�oning
Advertisement

Summary of Contents for MediGenix PO6L
- Page 1 36 Rue de Ponthieu, 75008, Paris , France Instruc�ons to User Thank you for purchasing the MediGenix Classic Finger�p Pulse Oximeter. This user manual is wri�en and compiled in accordance with the council direc�ve MDD93/42/EEC for medical oximeters and harmonised standards. In case of modifica�ons and so�ware upgrades, the informa�on contained in this document is pa�ent to change without no�ce.
- Page 2 If the measured field strength in the location in which Accuracy ±2bpm or ±2% - select larger the PO6L is used exceeds the applicable RF compliance level above, the PO6L should be observed to Pulse Intensity verify normal operation. If abnormal performance is observed, additional measures may be necessary,...
Need help?
Do you have a question about the PO6L and is the answer not in the manual?
Questions and answers