Advertisement
Quick Links
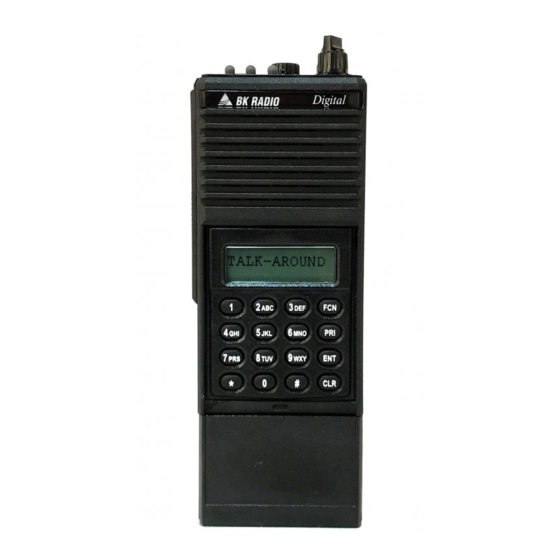
BENDIX KING DPHX PROGRAMMING AND CLONING INSTRUCTIONS
**The instructions below are for analog narrowband frequencies. If you need to program digital frequencies,
Use caution when field programming any radio. These instructions are designed for radio users with field
programming experience. If you are unfamiliar with these procedures, seek out someone who is.
1. Using a programming plug, hold red plug button then Function [FCN] key until display shows -- -- --
2. Enter Password (usually 000000), then press the Enter [ENT] key
3. Display will read
[FCN]key
4
decimal will insert automatically). THEN PRESS [ENT].
5. Display will show
6. Display will show RX CG, the Code Guard or Tone. To change, press [CLR], enter in desired 4 digits (the
decimal will insert automatically), THEN PRESS [ENT]. To skip press [FCN].
7. Display will show
8. Display will show
9.
decimal will insert automatically) THEN PRESS [ENT].
10. Display will show
11. Display will show TX CG, the Code Guard or Tone. To change, press [CLR], enter in desired 4 digits (the
decimal will insert automatically)THEN PRESS [ENT]. To skip press[FCN].
12. Display will show
13. Display will show
14. Display will show channel label. See page 9 below for label editing instructions. To skip press [FCN]
15. Display will read
1-14.
CLONING
1. Obtain programmed Master radio.
2. Turn on Master and Slave (your) radios and attach cloning cable between radios. Make sure all scan and
priority switches are OFF for both radios.
3. Select desired group to program in Slave radio
4. Access Programming mode of MASTER radio. (see above)
5. With Master radio display reading
6.
will appear in screen and flash.
7. Press the Function [FCN] key and
8. Turn off slave, and connect and program the next slave by pressing the [FCN] key once again.
NOTES:
1. In step 4 above, after you enter in a channel number, 15 for example, you may see 15N. The N means the
frequency is Narrowband.
2. Press the # key. You should see the N disappear, and now the channel is Wideband
If you have trouble keying in a tone or changing groups, your keypad may be locked. Look at your screen, and if it says
than press and hold the [FCN]
the Digital Programming section below.**
see
Select a channel by entering the channel you want (1-16) then press the
-- .* DO NOT CHANGE. Press [FCN]
.* DO NOT CHANGE-Press [FCN] to skip.
.* DO NOT CHANGE- Press [FCN] to skip.
--
DO NOT CHANGE. Press [FCN] to skip.
* DO NOT CHANGE. Press [FCN] to skip.
.* DO NOT CHANGE. Press [FCN] to skip.
Select next channel (press [PRI] for next channel) to program and repeat steps
flash VH-1)
- an error has occurred. Seek Help.
, press [CLR], then enter desired frequency (the
press [CLR], then enter desired frequency (the
press the * key on the Master radio
will appear without flashing as the slave radio is programmed
UNLOCKED.
8
*=DIGITAL FUNCTIONS
Advertisement

Subscribe to Our Youtube Channel
Summary of Contents for BENDIX KING DPHX
- Page 1 BENDIX KING DPHX PROGRAMMING AND CLONING INSTRUCTIONS **The instructions below are for analog narrowband frequencies. If you need to program digital frequencies, the Digital Programming section below.** Use caution when field programming any radio. These instructions are designed for radio users with field programming experience.
- Page 2 BENDIX KING - WHEN CHANGING. Zero Codes are specific to each group. COMMON SETTINGS Common settings are indicated with yellow highlights below. GROUP FLASHING In the table below, a function is enabled if a particular number is Grey. FUNCTION (ENABLED) In your radio, a function is enabled if the number is flashing.
- Page 3 LABEL EDITING Channel and Group Labels 1. To enter a new label, press the [FCN] key. The display becomes blank. 2. Press the [PRI] key repeatedly to cycle through characters 0-9, A-Z, -, *, $, /, +, %, \, _, <, >, h, blank, then back to the start again.
Need help?
Do you have a question about the KING DPHX and is the answer not in the manual?
Questions and answers