Advertisement
Quick Links
Advertisement

Summary of Contents for Megasat Werke HD 4 Combo V2
- Page 1 HD 4 Combo V2 user manual...
- Page 2 Inhaltsverzeichnis 1. Allgemeines 1.1 Sicherheitshinweise ....................03 1.2 Allgemeine Merkmale ....................03 1.3 Lieferumfang ........................03 2. Bezeichnungen und Tastenbelegung............... 04 3. Anleitung zur schnellen Messung ............... 06 4. Hauptmenü 4.1 Satelliten Fernsehen ....................07 4.1.1 Messen ........................ 08 4.1.2 Satellit bearbeiten ..................12 4.1.3 Multi TP (Transponder) ................
- Page 3 • Integrated power battery with up to 3 hours operating time • Firmware updates via mini-USB (USB to mini-USB adapter optionally available) 1.3 Delivery • Megasat HD 4 Combo V2 • 230 Volt charging adapter • 12 Volt car charging adapter •...
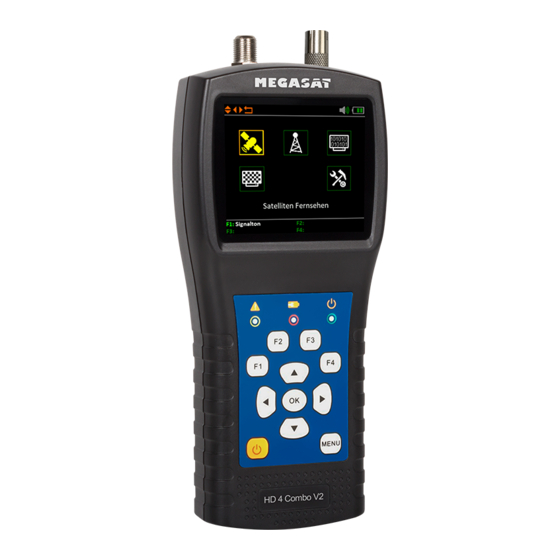
- Page 4 2. Designations and key assignment ENGLISH...
- Page 5 2. Designations and key assignment 1. ANT In Antenna signal input (DVB-T or DVB-C) 2. LNB In Satellite signal input (DVB-S) 3. LCD Display Shows the menu Red: the battery is charging / Blue: the battery is charged. Flashes briefly when the antenna is connected. Power indicator: Device is switched on or off.
- Page 6 3. Quick measurement guide 1. Connect the antenna to the LNB input of the meter. 2. Turn on the power of the measuring de- vice. The main menu appears. Use the pq t u buttons to navigate between the individual menu items and confirm the item „Measure“...
- Page 7 4. Main menu When you switch on the meter, the main menu opens automatically. Use the t u buttons or the pq buttons to navigate the menu. Press OK to enter the relevant sub-menu. Press MENU to return to the main menu. There are 6 menu items in total: •...
- Page 8 4. Main menu 4.1.1 Measurement 1. Satellit Shows the current satellite. Use the t u buttons to change the satellite. Press OK to move to the satellite list. Use the pq buttons to select the desired one and press OK to confirm. 2.
- Page 9 4. Main menu Satelliten edit Use the t u buttons to select the satel- lite you want to edit. 1. You can edit the name of the satellite with the F1 key. A keypad is display- ed which you can use to change the name and the degree.
- Page 10 4. Main menu Edit Transponder Use the t u keys to select the trans- ponder you want to edit. 1. You can change the value of the transponder with the F1 key. Use the pq keys to change the corres- ponding digits.
- Page 11 4. Main menu LNB settings Use the t u keys to select the LNB set- tings and confirm with OK. Confirm the „Customized“ item to access other settings such as DiSEqC or Unicable. Confirm the item „Customized“ to access further settings such as DiSEqC or Unicable.
- Page 12 4. Main menu 4.1.2 Edit satellite In this menu you can edit the satellite and transponder list. Use the t u but- tons to switch between the satellite list and transponder list. 1. Press the F1 key to access the LNB settings.
- Page 13 4. Main menu 4.1.3 Multi TP (Transponder) If you want to calibrate a satellite system with a Quattro LNB, this control helps you to have a complete overview of all LNB levels. Here you can see all levels of the LNB (HL / VL / HH / VH).
- Page 14 4. Main menu 4.1.4 Spectrum analysis Shows the current frequency and the signal strength in dBµV. Shows the range of the power level (0~100 dBµV). Use thet u buttons to search for the desired frequency and display the corres- ponding value. Use the pq buttons to navigate to the horizontal line.
- Page 15 4. Main menu 4.1.5 Angle calculation Use the t u buttons to select the desired satellite. Press OK to select the location. Use the navigation keys to change the value. The longitude and latitude are automatically calculated. If you have selected „Customised“, you will have to determine your location your- self.
- Page 16 4. Main menu Compass Note: Before use, you must calibrate the meter. To do this, swing it back and forth in the shape of a figure eight (8). Example: You are in Berlin and want to adjust the satellite „Astra 19.2° East“. The values how you have to adjust the mirror are: •...
- Page 17 4. Main menu Alignment Note: Before use, you must calibrate the meter. To do this, swing it back and forth in the shape of a figure eight (8). Shows the position of the selected satellite. Shows you the direction of the meter. Operation The meter is equipped with a motion sensor.
- Page 18 4. Main menu 4.1.6 Satellite identification 1. If necessary, change the LNB frequency (default: 9750-10600). 2. If necessary, change the LNB power supply. Select between AUTO, 18 V, 13 V, or OFF. 3. 22 KHz switching (only adjustable with manual LNB setting). 4.
- Page 19 4. Main menu 4.2 Terrestrial television The menu item „Terrestrial TV“ consists of 6 submenus: • Measure • Auto Scan • Channel list • Spectrum • Multichannel • Antenna Power ENGLISH...
- Page 20 4. Main menu 4.2.1 Measurement 1. Kanal Shows the current channel. Use the t u buttons to change the channel. Press OK to move to the channel list. Use the pq buttons to select the desired one and press OK to confirm. 2.
- Page 21 4. Main menu 4.2.2 Auto Scan Performs an automatic search of the va- rious frequencies. On the frequencies marked in green, you are currently receiving a DVB-T signal. On frequencies marked in red, there is no signal at the current location or the signal is too weak.
- Page 22 4. Main menu 4.2.4 Spectrum Shows the current frequency and signal strength in dBµV. Shows the range of the power level (0~100 dBµV). Switch with the t u buttons to search for the desired frequency and display the corresponding value. Navigate with the pq keys to the horizontal line .
- Page 23 4. Main menu 4.2.5 Multi channel This display shows the level (dµBV) of 6 channels simultaneously. Use the t u buttons to select a channel, press OK to add another channel to the list. Note: You can change the preset channels. However, these are reset to the pre- set values after leaving the menu.
- Page 24 4. Main menu 4.3 Cable Television The menu item „Cable TV“ consists of 6 submenus: • Measure • Auto Scan • Channel list • Spectrum • Multichannel • Tilt ENGLISH...
- Page 25 4. Main menu 4.3.1 Measurement 1. Kanal Shows the current channel. Use the t u buttons to change the channel. Press OK to move to the channel list. Use the pq buttons to select the desired one and press OK to confirm. 2.
- Page 26 4. Main menu 4.3.2 Auto Scan Performs an automatic search of the va- rious frequencies. On the frequencies marked in green, you are currently receiving a DVB-C signal. On frequencies marked in red, there is no signal or the signal is too weak. After completing the search process, you can display the list of received fre- quencies and transfer them to the fre-...
- Page 27 4. Main menu 4.3.4 Spectrum Shows the current frequency and signal strength in dBµV. Shows the range of the power level (0~100 dBµV). Switch with the t u buttons to search for the desired frequency and display the corresponding value. Navigate with the pq keys to the horizontal line .
- Page 28 4. Main menu 4.3.5 Multi channel This display shows the level (dµBV) of 6 channels simultaneously. Use the t u buttons to select a channel, press OK to add another channel to the list. Note: You can change the preset channels. However, these are reset to the pre- set values after leaving the menu.
- Page 29 4. Main menu 4.4 Analog Television The procedure for measuring analogue TV is the same as for cable TV. The menu item „Analogue TV“ consists of 3 submenus: • Measure • Spectrum • Tilt ENGLISH...
- Page 30 4. Main menu 4.5 System settings Signal tone Enable or disable the key tones. Auto standby Set the auto standby time. Choose between OFF, 10 min, 20 min or 30 min. Language Set the language of the menu. Factory setting To return the device to its factory settings, confirm with OK.
- Page 31 5. Specifications General ƒ Measurement of DVB-S / -S2 / -T / -T2 / -C / -C2 / Analogue TV ƒ 2.7 inch (6.9 cm) LCD colour display (400 x 360 pixels) ƒ Optical and acoustic signal display ƒ Rechargeable battery: Li-Ion (7.4 V / 1400 mA/h) up to 3 hours of operation ƒ...
- Page 32 5. Specifications DVB-T / T2 ƒ Displays: Power, VBER (DVB-T), LBER (DVB-T2) SNR and CBER ƒ Real-time spectrum analysis ƒ Scope display ƒ Automatic channel search ƒ Frequency range DVB-T/-T2: 42 MHz ~ 1005 MHz ƒ FFT type DVB-T: 2k, 8k ƒ...
- Page 33 Conformity information Megasat Werke GmbH hereby declares that the following equipment is in conformity with the essential requirements and other relevant provisions of Directive 2014/30/EU and 2014/35/EU and the Radio Equipment Directive 2014/53/EU Megasat HD 4 Combo V2 (Art.-Nr. 2600022) The declaration of conformity for these products is available: Megasat Werke GmbH, Industriestraße 4a, D-97618 Niederlauer...
- Page 34 Version: 1.0 (January 2021) // Technical changes, misprints and errors reserved. Megasat Werke GmbH | Industriestraße 4a | D-97618 Niederlauer | www.megasat.tv | info@megasat.tv...
Need help?
Do you have a question about the HD 4 Combo V2 and is the answer not in the manual?
Questions and answers