Advertisement
Quick Links
Advertisement

Summary of Contents for Inclusive Technology Inclusive ClassVR
- Page 1 Setup and User Guide V 1.0 www.inclusive.co.uk/inclusive-classvr...
-
Page 2: Table Of Contents
Contents Section 1 – The Inclusive ClassVR Case and Headset Section 2 – Learn the Basics Set Up and Manage the Inclusive ClassVR Section 3 – Headsets Section 4 – Using the Inclusive ClassVR Portal Section 5 – Technical Setup Guide Section 6 –... -
Page 3: The Inclusive Classvr Case And Headset
Section 1 The Inclusive ClassVR Case and Headset 1.1. Connecting the power cable to the case Open the case by pushing the latch buttons down. Attach the power lead to the back of the case making sure it is fully inserted. - Page 4 1.2. The USB hub The USB hub mounted in the top left corner of the case is used to charge each headset via the connected cables. When the unit is charging you will see a green light appear on the hub.
- Page 5 Make sure the power button on the headset is facing up when placed back into the case. This ensures that the micro USB socket will be on the correct side.
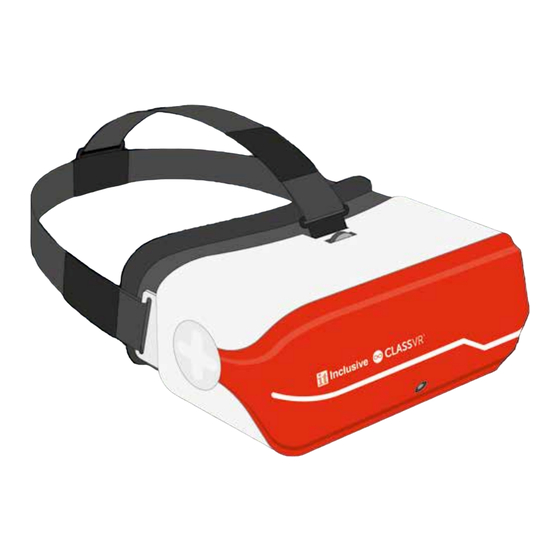
- Page 6 1.5. The VR headset at first glance Keypad controls Volume up Back button (long-press to switch display mode) Power button Select/Action button Volume down...
- Page 7 Head Strap Reset Button Face Padding Focus Adjustment 3.5 mm Headphone Out Left View Navigation Pad Memory Card Proximity Sensor Camera USB A Right View Speakers Micro USB Power Light...
- Page 8 1.6. How to adjust the head strap Pull the straps through the slots, then use the velcro to tighten the straps so the headset fits securely and comfortably on each student’s head.
- Page 9 1.7. How to replace the padding Pull the foam face rest gently away from the plastic, so the velcro releases. Replace the foam in the desired position, making sure the soft fabric is aligned with the plastic grips. 1.8. How to adjust the focus To adjust the focus on the VR headset, just turn the wheel left or right until the viewable image becomes sharp.
-
Page 10: Learn The Basics
ClassVR headsets work? 2.1. Turning your headset on To turn your Inclusive ClassVR headset on, simply press and hold the power button on the left side of the headset for five seconds. You will see the ClassVR logo appear followed by the menu screen. - Page 11 2.2. Gesture controls While students are wearing the Inclusive ClassVR headset and it is not being controlled by the teacher, they can navigate using simple ‘select’ gestures or button presses. Thumbs-up Pinch Okay Sign Select/Action Button To select an experience: Turn your head to find the icon you would like to select.
- Page 12 To go back to the menu screen: While wearing the headset, shake your head smoothly from side-to-side, or press the back button on the left side of the headset. To navigate left and right without turning around: Tilt your head to the left to scroll towards the left of the screen. Tilt it to the right to scroll right.
-
Page 13: Set Up And Manage The Inclusive Classvr Headsets
Set Up and Manage the Inclusive ClassVR Headsets 3.1. Log in to your school’s Inclusive ClassVR Portal To manage your Inclusive ClassVR headsets, you’ll need to log in to the Inclusive ClassVR Portal (http://portal.classvr.com) for your school. If your information was provided to us prior to delivery as a Key Contact, you should receive an email invitation from Avantis. - Page 14 ‘Teacher’ user type; this gives them the ability to use all the day-to-day functions of the Inclusive ClassVR Portal. IT Technicians and Computing Co-Ordinators should be invited as the ‘Admin’ user type. Simply enter their email address and click ‘Send Invite’.
- Page 15 This tool will generate a QRKey that you can scan with each Inclusive ClassVR headset. Follow the steps below: Select the correct network type. Enter your school’s SSID (network name). Make sure you enter this exactly as it appears (including spaces and capital/lowercase letters).
- Page 16 Devices pane; the headsets should be listed here. If you do not see all the devices you would expect, you may need to enrol them in your school’s organisation. You can find the enrolment QRKey in the Admin section of the Inclusive ClassVR portal, under the name of your school:...
-
Page 17: Using The Inclusive Classvr Portal
Section 4 Using the ClassVR Portal To access the Inclusive ClassVR Portal, visit http://portal.classvr.com. You will see a login screen. Enter your email address and password. If you are the Key Contact for your school, Avantis will send you an email inviting you to join. Otherwise, your Key Contact should send you an invitation by email. - Page 18 By default, all schools will be able to use the 500+ experiences in Inclusive ClassVR, and upload their own content via ClassCloud. Your saved playlists will be stored in the ‘My Playlists’ pane on the right. To use a playlist, drag it to the playlist pane and then either: Click the Send icon to allow students to explore the playlist independently.
- Page 19 Just click ‘Open’ to add them or drag images from your desktop and drop them anywhere on the main pane. Uploading Buckingham Palace You can view most image and video file types on your Inclusive ClassVR headsets, but the following will be most effective: Equirectangular JPG images Equirectangular MP4 videos Once you have uploaded the files to My Cloud or ClassCloud, drag and drop the ‘Tracks’...
- Page 20 4.3. Deliver In the Deliver section, you’ll see three panes: your Playlist at the left, a list of your school’s Inclusive ClassVR headsets at the right, and the currently-selected VR experience from the Playlist in the centre: You’ll notice that the devices on the right are greyed-out when you first open the Deliver section.
- Page 21 To direct your students’ attention to a specific part of the image, simply click on the point of interest on your preview. An eye will appear in this spot; inside your students’ headsets, they’ll see a dotted line guiding them towards that point: Teacher view Student view Don’t forget, you’ll be able to see on your preview image whether your students are...
- Page 22 From here, you can tell if your devices are connected to the network. Once they are in use (being worn), they will show as Active. This pane also gives you a useful warning if any of your Inclusive ClassVR headsets are running low on battery or have been in use for more than 15 minutes:...
- Page 23 Augmented Reality worksheets. You can find PDF versions of these resources on the ClassVR portal. In the Plan section of the Inclusive ClassVR Portal, look for Subscriptions in the Libraries area. Click Avantis Lesson Plans to view thumbnails of all the available PDFs.
- Page 24 Beacon Zone This filter allows you to select the set of Inclusive ClassVR headsets that you have in your classroom. Make sure you follow these steps: Bring the case and the headsets you wish to use into your classroom.
- Page 25 Now that you have some headsets in your Group, you can apply a filter so that only your Group is shown and controlled. Click the filter icon at the bottom of the devices pane, select Group as the filter type, and pick your Group from the dropdown menu.
-
Page 26: Technical Setup Guide
ClassVR headsets right away. Network Configuration 5.1. Check IP addresses You will require one IP address per Inclusive ClassVR headset. Ensure that there are enough available addresses within your school’s range. 5.2. URL whitelist The following URLs are used for communication between your Inclusive ClassVR headsets... - Page 27 Click the OK button to close the Internet Properties window. 5.5. Web browser updates To use the Inclusive ClassVR Portal, your colleagues should use the most recent version of Google Chrome, Microsoft Internet Explorer or Mozilla Firefox. Ensure that your...
-
Page 28: Troubleshooting
Inclusive ClassVR headsets. My headset won’t turn on. Make sure you press and hold the power button for five seconds. If the Inclusive ClassVR logo does not appear on the screen after releasing the button, plug your headset into the charging case and allow it to charge for at least two hours (see page 4). - Page 29 Check that all your headsets are correctly connected to the Wi-Fi (see page 14). If they are connected and are responding to commands from the Inclusive ClassVR Portal but are not showing 360 content correctly, ask your technician to check the whitelisting requirements (see page 26).
-
Page 30: Health And Safety
Read and follow all setup and operating instructions provided with your Inclusive ClassVR headsets. Your Inclusive ClassVR headset and management software are not designed for use with any unauthorised device, accessory and/or software. Use of an unauthorised device, accessory and/or software may result in injury to you or others, may cause performance issues or damage to your system and related services. - Page 31 Discomfort Stop using your Inclusive ClassVR headset immediately if you experience any of the following symptoms: seizures; dizziness; disorientation; altered, blurred, or double vision or other visual abnormalities; loss of awareness;...
- Page 32 www.inclusive.co.uk/inclusive-classvr...
Need help?
Do you have a question about the Inclusive ClassVR and is the answer not in the manual?
Questions and answers