
Related Manuals for GRASS VALLEY Infinity DMR 1000

Summary of Contents for GRASS VALLEY Infinity DMR 1000
- Page 1 Infinity DMR 1000 Digital Media Recorder Quick Start Guide SOFTWARE VERSION 12.1 071-8659-00 April 2009...
- Page 2 Product options and specifications subject to change without notice. The information in this manual is furnished for informational use only, is subject to change without notice, and should not be construed as a commitment by Grass Valley, Inc. Grass Valley, Inc. assumes no responsibility or liability for any errors or inaccuracies that may appear in this publication.
-
Page 3: Table Of Contents
Contents Grass Valley Product Support ..................5 Telephone Support ....................5 International Support Centers ..............5 Authorized Local Support Representative............ 5 General Safety Summary .................... 7 Unpack and check contents..................23 Front panel of the DMR 1000................24 Rear panel of the DMR 1000 ................25 Sample Analog SD configuration ................. -
Page 5: Grass Valley Product Support
Grass Valley Product Support To get technical assistance, check on the status of a question, or to report new issue, contact Grass Valley Product Support via e-mail, the Web, or by phone or fax. Finding more information Other documentation • Infinity DMR Documentation CD-ROM •... - Page 6 After–hours local phone support is also available for warranty and contract customers. Region Country Telephone Asia China +861 066 0159 450 Hong Kong, Taiwan, Korea, Macau +852 2531 3058 Japan +81 3 5484 6868 Southeast Asia - Malaysia +603 7805 3884 Southeast Asia - Singapore +65 6379 1313 Indian Subcontinent...
-
Page 7: General Safety Summary
Review the following safety precautions to avoid injury and prevent damage to this product or any products connected to it. CAUTION: This product contains no user-serviceable parts. Do not open the DMR. Only qualified Grass Valley personnel should perform service procedures. - Page 8 Injury Precautions Use Proper Power Cord To avoid fire hazard, use only the power cord specified for this product. Ground the Product This product is grounded through the grounding conductor of the power cord. To avoid electric shock, the grounding conductor must be connected to earth ground. Before making connections to the input or output terminals of the product, ensure that the product is properly grounded.
- Page 9 Remove Media Before Transporting To avoid potential damage to the recording media or drive, remove any media before transporting the DMR. Do Not Disconnect Power Source While Recording To avoid potential damage to the media, drives, or data loss, do not disconnect the power source (AC or DC) while the DMR is recording.
- Page 10 ATTENTION – refer to manual Service Safety Summary WARNING: Any service instructions are intended for use by qualified Grass Valley service personnel only. To avoid personal injury, do not perform any servicing unless you are qualified to do so. Refer to all safety summaries before performing service.
- Page 11 Changes or modifications not expressly approved by Grass Valley can affect emission compliance and could void the user’s authority to operate this equipment.
- Page 12 Safety Certification This product has been evaluated and meets the following Safety Certification Standards: Standard Designed/tested for compliance with: ANSI/UL60950, CAN/CSA Safety of Information Technology Equipment, including C22.2 No. 60950-00 Electrical Business Equipment (Third edition). 12/01/2000 IEC 950 Safety of Information Technology Equipment, including Electrical Business Equipment (Third edition, 1999).
- Page 13 WARNUNG: Warnungen weisen auf Situationen oder Vorgehensweisen hin, die Verletzungs- oder Lebensgefahr bergen. VORSICHT: Vorsichtshinweise weisen auf Situationen oder Vorgehensweisen hin, die zu Schäden an Ausrüstungskomponenten oder anderen Gegenständen oder zum zeitweisen Ausfall wichtiger Komponenten in der Arbeitsumgebung führen können. Hinweise am Produkt Die folgenden Hinweise können sich am Produkt befinden: GEFAHR —...
- Page 14 Dies ist eine Aufforderung, beim Wechsel von Sicherungen auf deren Nennwert zu achten. Die im Text angegebene Sicherung muss durch eine Sicherung ersetzt werden, die die angegebenen Nennwerte besitzt. Weist auf eine Schutzerdungsklemme hin, die mit dem Erdungskontakt verbunden werden muss, bevor weitere Ausrüstungskomponenten angeschlossen werden.
- Page 15 Richtiges Netzkabel verwenden Verwenden Sie nur das mitgelieferte Netzkabel oder ein Netzkabel, das den Spezifikationen für dieses Produkt entspricht. Gerät erden Schließen Sie den Erdleiter des Netzkabels an den Erdungskontakt an. Gerät nur mit angebrachten Abdeckungen und Gehäuseseiten betreiben Schalten Sie dieses Gerät nicht ein, wenn die Abdeckungen oder Gehäuseseiten entfernt wurden. Richtige Sicherung verwenden Verwenden Sie nur Sicherungen, deren Typ und Nennwert den Spezifikationen für dieses Produkt entsprechen.
- Page 16 Gerät ausreichend belüften Um eine Überhitzung des Geräts zu vermeiden, müssen die Ausrüstungskomponenten entsprechend den Installationsanweisungen belüftet werden. Legen Sie kein Papier unter das Gerät. Es könnte die Belüftung behindern. Platzieren Sie das Gerät auf einer ebenen Oberfläche. Antistatische Vorkehrungen treffen Es gibt statisch empfindliche Komponenten, die durch eine elektrostatische Entladung beschädigt werden können.
- Page 17 Consignes de sécurité Il est recommandé de lire, de bien comprendre et surtout de respecter les informations relatives à la sécurité qui sont exposées ci-après, notamment les consignes destinées à prévenir les risques d’incendie, les décharges électriques et les blessures aux personnes. Les avertissements complémentaires, qui ne sont pas nécessairement repris ci-dessous, mais présents dans toutes les sections du manuel, sont également à...
- Page 18 DANGER — risque de danger imminent pour l’utilisateur. AVERTISSEMENT — Risque de danger non imminent pour l’utilisateur. MISE EN GARDE — Risque d’endommagement du produit, des installations ou des autres équipements. Symboles apposés sur le produit Les symboles suivants peut être apposés sur le produit : Signale la présence d’une tension élevée et dangereuse dans le boîtier de l’équipement ;...
- Page 19 Signale la présence de composants sensibles à l’électricité statique et qui sont susceptibles d’être endommagés par une décharge électrostatique. Utilisez des procédures, des équipements et des surfaces antistatiques durant les interventions d’entretien. Avertissements Les avertissements suivants signalent des conditions ou des pratiques susceptibles d’occasionner des blessures graves, voire même fatales.
- Page 20 Utilisez ce produit exclusivement dans un environnement sec N’utilisez pas ce produit dans un environnement humide. Utilisez ce produit exclusivement dans un environnement non explosible N’utilisez pas ce produit dans un environnement dont l’atmosphère est explosible. Présence possible de courants de fuite Un raccordement à...
- Page 21 N’utilisez pas la carte CF avec un PC La carte CF a été spécialement formatée. Le logiciel enregistré sur la carte CF risque d’être effacé. N’utilisez pas l’équipement si un dysfonctionnement est suspecté Si vous suspectez un dysfonctionnement du produit, faites inspecter celui-ci par un membre qualifié du personnel d’entretien.
-
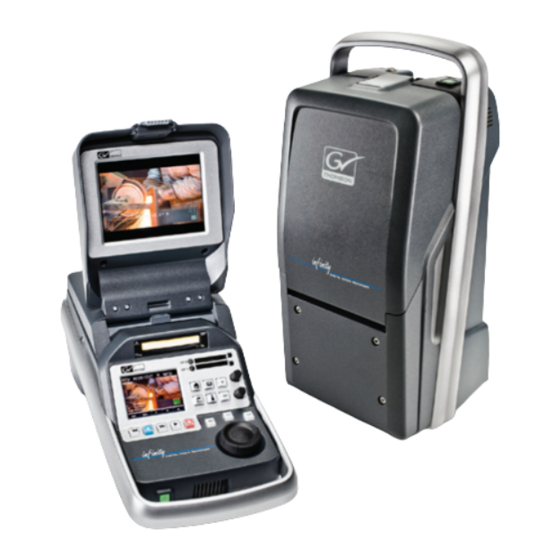
Page 23: Unpack And Check Contents
Unpack and check contents Before you begin, unpack and identify the following items: Infinity DMR Quick Start Guide Power Cord Documentation CD-ROM... -
Page 24: Front Panel Of The Dmr 1000
Connect inputs/outputs Connect the appropriate input and outputs. The input/output connections are described in the following illustrations. The DMR 1000 comes with an AC power cord. You can also use an external 15 V DC power source with standard XLR-style 4-pin connector (not included). Front panel of the DMR 1000 This is an example of the front panel of one model of the DMR 1000. -
Page 25: Rear Panel Of The Dmr 1000
Rear panel of the DMR 1000 LTC - input is Selecting the Digital HD/SD CVBS - analog readable Composite input video SD, also known forward and reverse disables the (depending on as Composite (via BNC Connectors) Reference input configuration) video Use this USB port Digital audio or the USB port on... - Page 26 Power on the DMR 1000 BACK Once you have plugged in an AC power cord or DC power supply, you can power on the DMR. The Power button is located on the left-hand side of the front panel, beneath the handle. Navigating the DMR 1000 There are several ways to navigate the DMR: The soft buttons on the touch screen...
- Page 27 Using the touch screen When you power on the DMR 1000, you see the main settings screen displayed on the LCD screen. The screen can be displayed in three different formats: default, day, and night (as shown below).
- Page 28 To access the different menus, use your finger to tap the screen buttons along the bottom. Use the soft Back button on the touch screen or the hard Back button on the DMR front panel. There are two types of function buttons: •...
-
Page 29: Sample Analog Sd Configuration
Configuring the DMR 1000 The DMR 1000 ships with default configuration settings. In general, you can leave most configuration settings at their default values. However, there are a few settings that you must configure. This page and the next provide two sample configurations: analog SD and digital HD. A list of all the possible configuration settings begins page Sample Analog SD configuration... -
Page 30: Sample Hd Configuration
Sample HD configuration If a configuration setting is not specified, you may leave it at the default setting Setting Path Value Audio input Set on the back of the DMR Line (See “Rear panel of the DMR 1000”) Audio Audio | channels | channel <1-4> SDI or AES 1-4 (set all 4 channels) channels Video... -
Page 31: Using Rev Media
Using REV media Inserting a REV disk Disk 1.To insert a disk in the REV drive, insert the disk in the direction ejection hole indicated by the arrow on the front of the disk and push firmly until it clicks into place. BACK 2.Wait a few seconds for the disk to be mounted. -
Page 32: Ejecting A Compactflash Card
Ejecting a CompactFlash card To eject a CompactFlash card: 1. To eject the card, push the eject button at the right side. NOTE: Use only high-speed CompactFlash cards and ensure the cards are fast enough for the chosen recording compression profile. Recording a clip Before you record a clip, you need to configure the DMR 1000. -
Page 33: Loading A Clip
Loading a clip You can also use the jog/shuttle knob to select a clip. (Press the knob to load the clip.) The selected clip is loaded into the playback BACK monitor and paused on the first frame. Digital Media recorder Tap once twice... -
Page 34: Using The Clips Menu
Using the Clips menu Select the Clips button from the main touchscreen menu. The thumbnail overview displays any recorded clips or playlists. The last recorded clip is selected. Scrolling up shows older clips. The selected clip has an orange background, while the unselected clips have a white background. -
Page 35: Playing A Clip
The thumbnail view also shows playlists. There are two types of playlist: • Tape View — contains a list of all compatible clips on the current media, in chronological order. • Story — contains a list of all clips in the particular story, in chronological order. NOTE: When a story is selected in the Setup | Metadata | Storyfile menu, all subsequent recorded clips are stored under that story’s playlist. -
Page 36: Finding Detailed Clip Information
Finding detailed clip information If you press the Menu button on the Clip Thumbnail screen, you can look up detailed information about a selected clip: •properties — shows detailed information about the selected clip •load — loads the selected clip into the playback monitor •delete —... -
Page 37: Using Playlists
Using Playlists A playlist is an ordered list of clips that can be loaded and played out as if it were a singular recording. The Infinity DMR’s playlist feature lets you assemble clip sequences on your Rev or Compact Flash media. A playlist references clips that remain unaltered on the medium. -
Page 38: Deleting A Clip From A Playlist
5. Press Edit. 6. Use the Play button to play the clip, then use the IN and OUT buttons to trim the clip. 7. To accept the trimmed clip, press the Accept button in the touch screen. The playlist displays with the edited in and out points displayed. To cancel the edit, press the Back button from the touch screen. -
Page 39: Configuring Audio Input Settings
Configuring audio input settings Configuring Path Notes the... Audio input Audio | Microphone Make sure that Mic is selected on the rear panel Audio channels Audio | channels | channel <1 - 4> | ch< #> level control If Fixed is selected, the level control recording level can be set. -
Page 40: Configuring Audio Output Settings
Configuring audio output settings Analog Configuring the... Path Notes Audio output to Audio | outputs | analog | analog <1/2 - 3/4> | analog < #> If you select analog mode analog mode source mode | source | analog <#> source Source on a channel, the Channel mode settings for that channel are grayed out. -
Page 41: Configuring Video Settings
Configuring video settings Video Configuring the... Path Notes Video standard Setup | formats | video standard Make sure to eject any loaded clip before setting the video standard. If the DMR is playing, recording, or has a clip loaded, the video standard setting is unavailable. -
Page 42: Configuring Timecode Settings
Configuring timecode settings Configuring the... Path Notes Runmode Setup | timecode | runmode Free-run = timecode generator runs continuously Record-run = timecode generator only runs when recording Userbit mode Setup | timecode | userbits | userbit mode Userbit type Setup | timecode | userbits | userbit type Userbits (1) Setup | timecode | userbits | userbits 1 | <UB1-4>... -
Page 43: Configuring Dmr Display Settings
Configuring DMR display settings Configuring the... Path Notes Upper display System | hardware | upper display | UD monitoring monitoring Safe area System | hardware | upper display | Safe area Audio bars System | hardware | upper display | Audio bars Displays or hides the audio bars Digital out System | hardware | digital out... -
Page 44: Using The Front Panel Buttons
Using the front panel buttons DMR Icon Description DMR Icon Description DMR Icon Description The Home button The Monitor button toggles In Clip trimming or Editing takes you back to the between the clip monitor mode, the IN button sets main display.
Need help?
Do you have a question about the Infinity DMR 1000 and is the answer not in the manual?
Questions and answers