Advertisement
Quick Links
K110
FOLDING ADIRONDACK CHAIR
1 STEP
ARMS
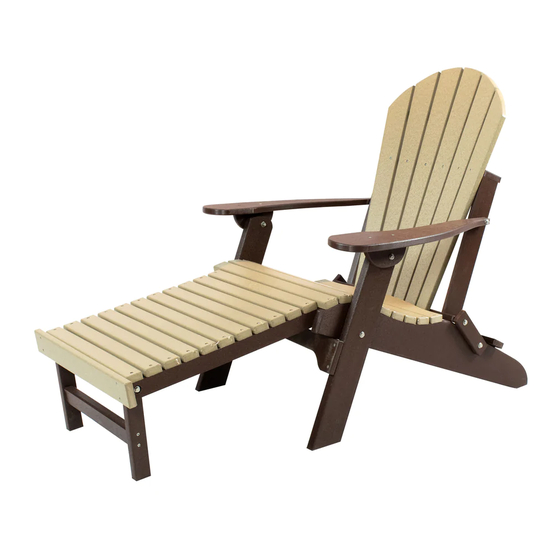
FOLDING ADIRONDACK CHAIR W/PULLOUT
K111
OTTOMAN
1 STEP
ARMS
K120
ADIRONDACK ROCKING CHAIR
3 STEPS
ARMS & ROCKING LEGS
K140
2' ADIRONDACK GLIDER
5 STEPS
BACK TO SEAT, ARMS, TOP TO BASE
K141
2' SWIVEL ADIRONDACK GLIDER
6 STEPS
BACK TO SEAT, ARMS, TOP TO BASE
K150
4' ADIRONDACK GLIDER
ASSEMBLED
K160
5' ADIRONDACK GLIDER
ASSEMBLED
K171
GLIDING OTTOMAN
ASSEMBLED
Dining Tables and Chairs
K210
DINING HEIGHT CHAIR
4 STEPS
BACK TO SEAT, ARMS
K211
DINING HEIGHT SWIVEL CHAIR
1 STEP
TOP TO BASE
K220
DINING HEIGHT 42" SQUARE TABLE
ASSEMBLED
K221
DINING HEIGHT 6' RECTANGLE TABLE
ASSEMBLED
K222
DINING HEIGHT 6' OVAL TABLE
ASSEMBLED
K310
COUNTER HEIGHT CHAIR
5 STEPS
BACK TO SEAT, ARMS, FOOTREST
K311
COUNTER HEIGHT SWIVEL CHAIR
1 STEP
TOP TO BASE
K320
BAR HEIGHT CHAIR
5 STEPS
BACK TO SEAT, ARMS, FOOTREST
K321
BAR HEIGHT SWIVEL CHAIR
1 STEP
TOP TO BASE
K324
BAR HEIGHT SADDLE STOOL
ASSEMBLED
ASSEMBLY REQUIREMENTS
Advertisement

Related Manuals for KANYON K110

Summary of Contents for KANYON K110
- Page 1 ASSEMBLY REQUIREMENTS K110 FOLDING ADIRONDACK CHAIR 1 STEP ARMS FOLDING ADIRONDACK CHAIR W/PULLOUT K111 OTTOMAN 1 STEP ARMS K120 ADIRONDACK ROCKING CHAIR 3 STEPS ARMS & ROCKING LEGS K140 2' ADIRONDACK GLIDER 5 STEPS BACK TO SEAT, ARMS, TOP TO BASE...
- Page 2 ASSEMBLY REQUIREMENTS K330 COUNTER HEIGHT 42" SQUARE TABLE ASSEMBLED K331 COUNTER HEIGHT 6' RECTANGLE TABLE ASSEMBLED K332 COUNTER HEIGHT 6' OVAL TABLE ASSEMBLED K340 BAR HEIGHT 42" SQUARE TABLE ASSEMBLED K341 BAR HEIGHT 6' RECTANGLE TABLE ASSEMBLED K342 BAR HEIGHT 6' OVAL TABLE ASSEMBLED K343 BAR HEIGHT 72"X28"...
- Page 3 POLY ADIRONDACK FOLDING CHAIR EASY ASSEMBLY INSTRUCTIONS Step 1 (Open legs and attach arms) Lay the chair flat and open the front legs. Align the hole on the front side of the arm with the front leg. Insert a short bolt into the washer, arm and front leg. Slide on another washer and tighten a nut onto the bolt.
- Page 4 FOLDING CHAIR CONT. Step 2 (Fold and open chair) Fold the chair closed and reopen while applying upward pressure on the back of the chair. Step 3 Tighten bolts Step 4 ENJOY! Customer Service: Call 1-866-872-3437. Ask for Darren.
- Page 5 FOLDING ADIRONDACK CHAIR W/ PULL OUT OTTOMAN EASY ASSEMBLY INSTRUCTIONS Step 1 (Attach the arms to seat) Unfold the back by standing it up. Align the arm holes with the holes in the back and use a bolt and washer to connect. Repeat on other side. Then place the half circle of the arm on the outside of the legs and align the holes.
- Page 6 FOLDING ADIRONDACK CHAIR W/ PULL OUT OTTOMAN CONT. EASY ASSEMBLY INSTRUCTIONS Step 2 (Extend) Extend the ottoman by pulling it forward from the chair until it’s in the fully extended position, making sure the legs are in a stable position to support it. Step 3 ENJOY! Customer Service: Call 1-866-872-3437.
- Page 7 POLY ADIRONDACK ROCKING CHAIR EASY ASSEMBLY INSTRUCTIONS Step 1 (Open legs and attach arms) Lay the chair flat and open the front legs. Align the hole on the front side of the arm with the front leg. Insert a short bolt into the washer, arm and front leg. Slide on another washer and tighten a nut onto the bolt.
- Page 8 ROCKING CHAIR CONT. Step 3 (Attach runners) Place the front of the runner on the inside of the front leg. Insert a long bolt into the washer, front leg and runner. Slide on another washer and tighten a nut onto the bolt. Place the back of the runner on the outside of the back legs.
- Page 9 ROCKING CHAIR CONT. Step 4 ENJOY! Customer Service: Call 1-866-872-3437. Ask for Darren.
- Page 10 POLY ADIRONDACK GLIDER EASY ASSEMBLY INSTRUCTIONS Step 1 (Attach arms to seat) Set the seat on its side then set the arms on the side of the side ensuring the bolt holes align. Insert a short bolt into the washer, top hole of the front arm brace and seat. Slide on another washer and tighten nut onto bolt.
- Page 11 GLIDER CONT. Step 2 (Attach back to chair) Align the holes midway up the back with the holes on the back of the arms. For both sides, insert a medium bolt into the washer, arms and back then slide on another washer to each and tighten nuts onto the bolts.
- Page 12 GLIDER CONT. Step 5 (Attach gliding braces) Horizontally align the front sliding brace with the screws in the bottom arm brace. Ensure the sliding brace is flush with the bottom arm brace and drive screws in. (Repeat this process for the opposite side) Vertically align the back gliding brace with the screws in the bottom arm brace and drive screws in.
- Page 13 SWIVEL GLIDER EASY ASSEMBLY INSTRUCTIONS Step 1 (Attach front side arms to seat) Slide a washer onto a short bolt and insert into the top hole of the arm base. Align with the top hole towards the front of the seat and push the bolt through. Slide on another washer and tighten a nut onto the bolt.
- Page 14 SWIVEL GLIDER CONT. Step 2 (Set bolts in front of arms) Place the medium bolt and washer in the front of the arms, but don’t push it all the way through. This will be where the arm and back connect. When the back is added, then the bolts will be pushed through and tightened.
- Page 15 SWIVEL GLIDER CONT. Step 4 (Attach the back) Once the back is in place and aligned with the upper arm holes, the bolts that have already been placed can be pushed through and tightened. Align the bottom of the back with the arm and seat holes and push the bolts through and tighten.
- Page 16 SWIVEL GLIDER CONT. Line up the holes in the base with the holes in the brackets and use a bolt and a washer to connect and tighten. (Repeat process for opposite side.) Step 6 (Tighten all bolts) Step 7 ENJOY! Customer Service: Call 1-866-872-3437.
- Page 17 POLY ADIRONDACK COUNTER CHAIR EASY ASSEMBLY INSTRUCTIONS Step 1 (Attach arms and legs to base) Align the right legs to the right side of the base and insert a short bolt through the washer, leg, and base for the front and back. Slide on another washer and tighten a nut onto the bolt. (Repeat process for left side) Step 2 (Attach seat) Align the holes on the front of the seat to the holes just under the armrests.
- Page 18 COUNTER CHAIR CONT. Step 3 (Attach back) For right and left sides, insert a medium bolt through the washer and partially through the arms. Align the top holes of the seat back with the holes towards the back of the arms. Push the bolt through the arms and back.
- Page 19 DINING, COUNTER, BAR HEIGHT SWIVEL CHAIR EASY ASSEMBLY INSTRUCTIONS Step 1 (Attach chair to base) Place the chair upside down. Angle the plate so you can see the holes in the corners and place the base on the chair. Place and tighten the bolts on the four corners.
- Page 20 DINING, COUNTER, BAR HEIGHT SWIVEL CHAIR EASY ASSEMBLY INSTRUCTIONS Step 2 ENJOY! Customer Service: Call 1-866-872-3437. Ask for Darren.
- Page 21 S t e p 5 S t e p 1 S t e p 4 S t e p 3 S t e p 2...
- Page 22 TETE-A-TETE SET EASY ASSEMBLY INSTRUCTIONS Step 1 (Attach arms and legs to base) Align the right legs to the right side of the base and insert a short bolt through the washer, leg, and base for the front and back. Slide on another washer and tighten a nut onto the bolt. (Repeat process for left side) Step 2 (Attach seat) Align the holes on the front of the seat to the holes just under the armrests.
- Page 23 TETE-A-TETE SET CONT. Step 3 (Attach back) For right and left sides, insert a medium bolt through the washer and partially through the arms. Align the top holes of the seat back with the holes towards the back of the arms. Push the bolt through the arms and back.
- Page 24 TETE-A-TETE SET CONT. Step 7 ENJOY! Customer Service: Call 1-866-872-3437. Ask for Darren.
- Page 25 POLY ADIRONDACK 4’, 5’ SWING EASY ASSEMBLY INSTRUCTIONS Step 1 (Attach arms to seat) Slide a washer onto a short bolt and insert into the top hole of the arm base. Align with the top hole towards the front of the seat and push the bolt through. Slide on another washer and tighten a nut onto the bolt.
- Page 26 4’, 5’ SWING CONT. Step 2 (Attach chain) Run the chain through the hole on top of the arm and attach to the eye bolt. Insert eye bolt into the middle hole of the arm base and seat. Slide on a washer and tighten a nut onto the bolt. (Repeat steps 1 &...
- Page 27 4’, 5’ SWING CONT. Insert a short bolt into the washer, top hole of the bottom brace and backrest. Slide another washer and tighten a nut onto the bolt. Using another short bolt, repeat this process for the lowest hole on the bottom brace. Attach open end of chain to eye bolt and insert into the remaining open hole on the back.
- Page 28 4’, 5’ SWING CONT. Step 5 Insert lag screw into washer then the hole in the center of the swing back on the bottom. Tighten with a 7/16 wrench or socket. Step 6 ENJOY! Customer Service: Call 1-866-872-3437. Ask for Darren.
Need help?
Do you have a question about the K110 and is the answer not in the manual?
Questions and answers