
Summary of Contents for DPS Telecom NetGuardian E16 DX G2
- Page 1 NetGuardian E16 DX G2 USER MANUAL Visit our website at www.dpstelecom.com for the latest PDF manual and FAQs. March 26, 2019 D-UM-X2E16 Firmware Version 1.0A...
- Page 2 Notice The material in this manual is for information purposes and is subject to change without notice. DPS Telecom shall not be liable for errors contained herein or consequential damages in connection with the furnishing, performance, or use of this...
-
Page 3: Table Of Contents
Contents Overview Shipping List Specifications Front Panel Connections Rear Panel Connections LAN Connection Hardware Installation Tools Needed Mounting Power Connection Communication Lines Alarm and Control Relay Connections Connecting via the USB port Bypass Password Setting the DCP Address Updating Firmware with dsPICLoader Updating Firmware via the web Operations 13.1... -
Page 4: Overview
Fig. 2. An expanded RTU. The NetGuardian 864A G5 (top) has been supplemented by 2 NetGuardian 864DX units (middle) and a NetGuardian E16 DX G2 (bottom). This configuration has a total of 208 alarm inputs and 40 control relays. Both of the 864DX units are optional expansions. -
Page 5: Shipping List
While unpacking the NetGuardian E16, please make sure that all of the following items are included. If some parts are missing, or if you ever need to order new parts, please refer to the part numbers listed and call DPS Telecom at (800) 622-3314. -
Page 6: Specifications
Specifications Dimensions: 1.7" H x 17.0" W x 6.6" D Weight: 2.25 lbs. Mounting: 19" rack, 23" rack, or wall mounting Power Input: –48VDC (–18 to –72 VDC) Current Draw: 250 mA Fuse: (2) 3/4 Amp GMT Operating Temperature: 32° – 140° F (0° – 60° C) Operating Humidity: 0%–95% non-condensing Interfaces:... -
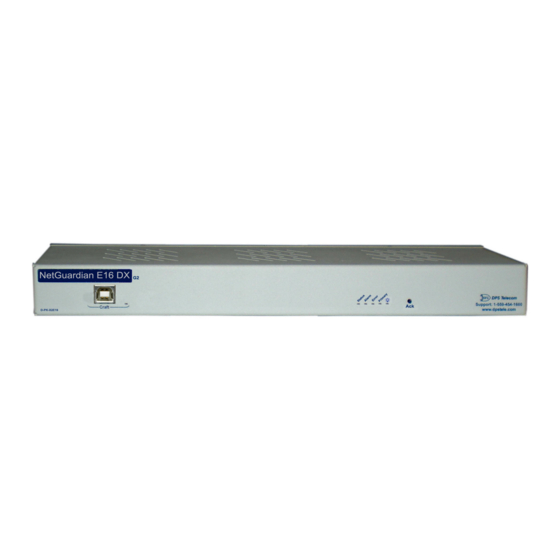
Page 7: Front Panel Connections
Front Panel Connections Fig. 3. The NetGuardian E16 DX G2 Front Panel Controls The craft port, Ack, and LED displays are accessed via the front panel, as seen in Figure 3. Rear Panel Connections Fig. 4. NetGuardian E16 DX G2 rear panel connections Connectors for power feeds, alarm inputs, control outputs, and communication lines are on the back panel of the NetGuardian E16, as shown in Figure 4. -
Page 8: Hardware Installation
6. Connect control outputs. 7. Connect to the NetGuardian 832 or 864 G5. You can connect to the NetGuardian E16 DX G2 through the front panel craft port. Please note that the NetGuardian E16 DXG2 must be the last unit in the chain. -
Page 9: Mounting
Fig. 5. The NetGuardian E16 DX G2 can be flush or rear-mounted. The NetGuardian E16 DX G2 can be mounted in a 19" rack or a 23" rack by using the provided rack ears for each size. Two rack ear locations are provided. Attach the appropriate rack ears in the flush-mount or rear-mount locations shown in Figure 5. -
Page 10: Communication Lines
Communication Lines Fig. 7 Serial Port is in the lower right corner of the NetGuardian E16 DX G2's back panel, as shown in Figure 7. Fig. 8. Serial Port Pinouts... -
Page 11: Alarm And Control Relay Connections
Fig. 9. Alarm and control relay connectors. Discrete alarms and control relays are connected to the NetGuardian E16 DX G2 using the two 50-pin connectors on the back panel, shown in Figure 9. Pinouts for all connections are shown in Figure 10, and alternately in Table A. - Page 12 Alarms 1-16 Controls 1 -16 Pin # Pin # Pin # Pin # CT 1 NC CT 9 NC CT 1 NO CT 9 NO CT 1 CO CT 9 CO CT 2 CO CT 10 CO CT 2 NC CT 10 NC CT 2 NO CT 10 NO...
-
Page 13: Connecting Via The Usb Port
Connecting via the USB port The NetGuardian E16's front panel USB craft port. 1. The simplest way to connect to the NetGuardian is over a physical cable connection between your PC's USB port and the unit's USB craft port. Note: You must be connected via craft port or Telnet to use the TTY interface. - Page 14 2. Select "Install from a list or specific location (Advanced)" 3. Click "Next >" 4. Select "Search for the best driver in these locations." 5. Insert NetGuardian Resource Disc (CD) into your PC. 6. Click "Browse"...
- Page 15 7. Select the "Driver" folder of your NetGuardian Resource Disc (CD) and click "OK" The following message will confirm installation of a new "USB Communications Port" 8. Click "Finish" to close the Wizard. Now that the driver has been installed, a new COM port is being emulated on your PC. Before using hyperterminal, you must confirm the identity of that new COM port (COM1, COM2, COM3...) in the Windows Device Manager.
- Page 16 9. Right-click the "My Computer" icon on your desktop, then click "Manage" 10.Click "Device Manager" in the left pane.
- Page 17 11.Expand the "Ports (COM & LPT)" section in the right pane. Look for "USB Communications Port (COMx)". Note the number of the COM port ("COM3" in the example above). Now that you know which COM port to use, it's time to launch HyperTerminal (or other terminal software): 12.Click on the Start menu >...
- Page 18 • Flow control: None are using the cable provided. Additional cables Once connected, you will see a blank, white can be ordered from DPS Telecom. HyperTerminal screen. Press Enter to activate the configuration menu. 17. The NetGuardian 's main menu will appear.
-
Page 19: Bypass Password
To connect to the TTY interface, connect a serial port on your PC to the front craft port on the E16 DX G2 using the included USB cable. Use terminal software such as Hyperterminal or PuTTY to establish a connection (9600 baud). Fig. 13 - The procedure for setting the DCP address on the NetGuardian E16 DX G2 via the TTY interface. -
Page 20: Updating Firmware With Dspicloader
2. Select a task file by clicking the browser button next to the Select File: box. 3. Click the Start button. The firmware upgrade will be automatically uploaded to the NetGuardian E16 DX G2. While uploading, the dsPICLoader screen will display the elapsed time and throughput of the upload to the NetGuardian E16 DX G2. -
Page 21: Updating Firmware Via The Web
Updating Firmware via the web To access the Firmware Load screen, click on the Provisioning > System menu. At the bottom of this screen, click the Restore Configuration link located in the System Controls section. To upload firmware, click on Upload on the top right corner of the web interface At the Firmware Load screen, simply browse for the firmware update you've downloaded from www.dpstele.com click Upoad. -
Page 22: Operations
Operations 13.1 Front and Rear Panel LEDs The bicolor LEDs on the front panel of the NetGuardian E16 DX G2 provide visual feedback of communication, configuration, and alarm status. Refer to Table F for front panel LED status display explanations. -
Page 23: Provisioning Menu
The following pages provide a brief description of the options available in each menu. Saving Configuration Changes to the NetGuardian E16 DX G2: At the bottom of each screen you access from the Provisioning Menu, you will see a Save button. Clicking Save will cache your changes locally. -
Page 24: System
A name for this NetGuardian E16 DX G2 unit. (Optional field) Location The location of this NetGuardian E16 DX G2 unit. (Optional field) Contact telephone number for the person responsible for this NetGuardian E16 DX G2 Contact unit. (Optional field) -
Page 25: Ethernet
Unit IP IP address of the NetGuardian E16 DX G2. A road sign to the NetGuardian E16 DX G2, telling it whether your packets should stay on Subnet Mask your local network or be forwarded somewhere else on a wide-area network. -
Page 26: Monitoring Via Web Browser
Monitoring via Web Browser 15.1 Alarms This selection provides the status of the base alarms by indicating if an alarm has been triggered. Under the State column, the status will appear in red if an alarm has been activated. The status will be displayed in green when the alarm condition is not present. -
Page 27: Controls
3. To issue the control, click on a command (OPR - operate, RLS - release, or MOM - momentary) View and operate control relays from the Monitor > Controls menu Control Relay Operation ID number for the control relay. Description for the NetGuardian E16 DX G2's control relay defined in the Provisioning Description > Controls menu. State Status of the control relay. -
Page 28: Device Access Descriptions
The Device Access options, listed in pink on the left side of the web interface, provide options for generating reports, updating the NetGuardian E16 DX G2's firmware, and rebooting the unit. Click any of the options under Device Access to perform the desired action. -
Page 29: Technical Support
• User Manual • Hardware Serial Number 3. Have access to troubled equipment. Please be at or near your equipment when you call DPS Telecom Technical Support. This will help us solve your problem more efficiently. 4. Call during Customer Support hours. - Page 30 covenant or obligation of End User in connection with this Agreement. This Agreement shall be construed and enforced in accordance with the laws of the State of California, without regard to choice of law principles and excluding the provisions of the UN Convention on Contracts for the International Sale of Goods.
- Page 31 Warranty DPS Telecom warrants, to the original purchaser only, that its products a) substantially conform to DPS' published specifications and b) are substantially free from defects in material and workmanship. This warranty expires two years from the date of product delivery with respect to hardware and ninety days from the date of product delivery with respect to software.
- Page 32 "We protect your network like your business depends on it." "Your Par tner s in Networ k Reliability M anagem ent" www.dpstelecom.com 4955 E. Yale • Fresno, CA 93727 (559) 454-1600 • (800) 622-3314 • (559) 454-1688 fax...
Need help?
Do you have a question about the NetGuardian E16 DX G2 and is the answer not in the manual?
Questions and answers