Table of Contents
Advertisement
Quick Links
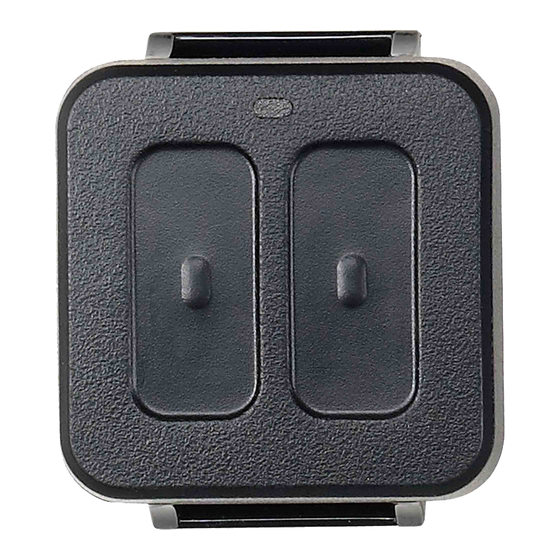
This bi-directional wireless panic sensor is intended for
use with Honeywell Home controls that support
PROSiX™ series devices.
To activate, press and hold both buttons briefly until the
LED flashes. To clear the alarm at the control, enter a
user code. To clear memory of alarm, select Disarm
and enter a user code.
Enroll and Program the PROSiXPANIC
Follow instructions in the Controller's programming guide.
1. Set the controller in Programming Mode and when prompted:
2. Press and hold both buttons briefly until the LED flashes to activate the enrollment
process.
3. The LED flashes green during enrollment (up to about 20 seconds). The device sends
its unique MAC ID (Serial Number) and Services information to the controller.
NOTE: Enrollment time varies depending on the signal strength between the device
and the controller.
4. When done, the LED lights solid green for 3 seconds to confirm enrollment.
If enrollment is not confirmed, press and hold both buttons briefly again to restart the
enrollment process.
IMPORTANT: Once enrolled in a system, the PROSiXPANIC cannot be used with
another controller until it is removed from the current controller. When removed from a
system, the sensor will revert to factory default settings.
After Enrolling: Verify adequate signal strength by conducting a sensor test (see
controller's instructions).
24-Hour Enrollment Deletion and Default
If the device is enrolled in a panel different than the intended panel, and you are unable
to delete it from the unintended panel, reset the device to factory default setting:
Press and hold both buttons for 15 seconds. When successful, the LED comes back on
flashing.
The device self-deletes from the panel it was enrolled in.
This procedure is available for 24 hours after enrollment with a panel and the device
remains powered (battery installed).
Battery Replacement
When the battery is low, the LED flashes red during transmission. To
replace the battery:
1.
Remove the screws from the back housing and use a screwdriver
to gently separate the front and back housings.
2.
Use a screwdriver to carefully remove the battery.
3.
Wait 10 seconds or press a button for 2 seconds to ensure full
power discharge.
4.
Insert a new 3V Coin Cell battery as shown. Recommended
replacement battery:
Recommended Batteries: 3V Coin Cell
Duracell DL2450; Panasonic CR2450; Energizer CR2450
5.
Replace the front housing and secure the housings with the cover
screw.
Installation Instructions
BATTERY CAUTION: Risk of fire, explosion and burns. Do not recharge,
disassemble, heat above 212°F (100°C) or incinerate. Dispose of used
batteries properly. Keep away from children.
NOTE: Constant exposure to high or low temperature or high humidity
2-Button Wireless Panic Sensor
The device can be used with a belt clip, lanyard, or
wristband.
LED Indications
Green flashing:
lights when unit is transmitting
Red Flashing:
indicates low battery (lights during
button press)
Press and hold both buttons for 15 seconds.
may reduce battery life.
PROSiXPANIC
Advertisement
Table of Contents

Subscribe to Our Youtube Channel
Related Manuals for Honeywell Home PROSiXPANIC


Summary of Contents for Honeywell Home PROSiXPANIC
- Page 1 If enrollment is not confirmed, press and hold both buttons briefly again to restart the enrollment process. IMPORTANT: Once enrolled in a system, the PROSiXPANIC cannot be used with another controller until it is removed from the current controller. When removed from a system, the sensor will revert to factory default settings.
- Page 2 Any attempt to reverse-engineer this device by decoding proprietary protocols, de-compiling firmware, or any similar actions is strictly prohibited. The Honeywell Home Trademark is used under license from Honeywell International Inc. This product is manufactured by Resideo and its affiliates.
Need help?
Do you have a question about the PROSiXPANIC and is the answer not in the manual?
Questions and answers