Table of Contents
Advertisement
Quick Links
VIP-T300H-U
4K HDMI and USB over IP System
USER MANUAL
PureLink
220-10 State Route 208
Fair Lawn, NJ 07410 USA
Tel: +1.201.488.3232
Fax: +1.201.621.6118
E-mail:
sales@purelinkav.com
For order support, please contact your local dealer.
For technical support, please contact us at
support@purelinkav.com.
VIP-T300H-U USER MANUAL
VERSION 1.1
Advertisement
Table of Contents

Summary of Contents for PureLink VIP-T300H-U
- Page 1 4K HDMI and USB over IP System USER MANUAL PureLink 220-10 State Route 208 Fair Lawn, NJ 07410 USA Tel: +1.201.488.3232 Fax: +1.201.621.6118 E-mail: sales@purelinkav.com For order support, please contact your local dealer. For technical support, please contact us at support@purelinkav.com. VIP-T300H-U USER MANUAL VERSION 1.1...
-
Page 2: Table Of Contents
TV Wall Quick Switch: ......................... 12 Add Favorite List: ..........................12 Remove Favorite List: .......................... 12 Transmitter RS232 Mode: ........................12 Connecting to the VIP-T300H-U over the Network ..................12 Built in web server ..........................12 API ................................12 Point to Point ............................12 Distribution (One TX to more than one RX) .................... - Page 3 Front Panel Button Functionality ........................ 22 To change ‘Channels’ ..........................22 Lock/unlock buttons ..........................22 Reset to Factory defaults ........................22 Engineering mode ........................... 22 On Screen Display OSD ..........................23 Notes on Menus ..........................25 Warranty ..............................27 VIP-T300H-U USER MANUAL VERSION 1.1...
-
Page 4: What's In The Box
What’s in the box The VIP-T300H-U Transmitter and Receiver are sold separately. VIP-T300H-U TX VIP-T300H-U TX Transmitter/Encoder 12 VDC Power Adapter set of mounting brackets IR receiver USB cable VIP-T300H-U RX VIP-T300H-U TX Transmitter/Encoder 12 VDC Power Adapter... -
Page 5: Product Description
The VIP-T300H-U is four in one IP transport solution system for applications of extension, distribution, switching, and matrixing. The VIP-T300H-U accepts up to 4K30 4:4:4 HDMI signals, and USB 2.0, RS232, and Infrared. The VIP-T300H-U supports layered switching, up to 8x8 videowalls, image rotation, and provides either copper (CAT) or fiber (SFP) transport. -
Page 6: Front Panel - Tx (Encoder) (Transmitter)
2. Network Link LED 3. IR receiver 4. IR activity LED 5. CAT/RJ45 Activity LED 6. Fiber/SFP Activity LED 7. Info/fault message LED 8. Broadcast channel display 9. Minus/multifunction button 10. Plus/multifunction button 11. Menu/multifunction button VIP-T300H-U USER MANUAL VERSION 1.1... -
Page 7: Rear Panel - Tx (Encoder) (Transmitter)
3. HDMI Input 4. HDMI Loop Out 5. Stereo input (unbalanced) 6. Stereo output (unbalanced) (unicast mode only) 7. IR receiver input 8. IR transmitter output 9. USB 2.0 10. RS232 11. 12V DC input VIP-T300H-U USER MANUAL VERSION 1.1... -
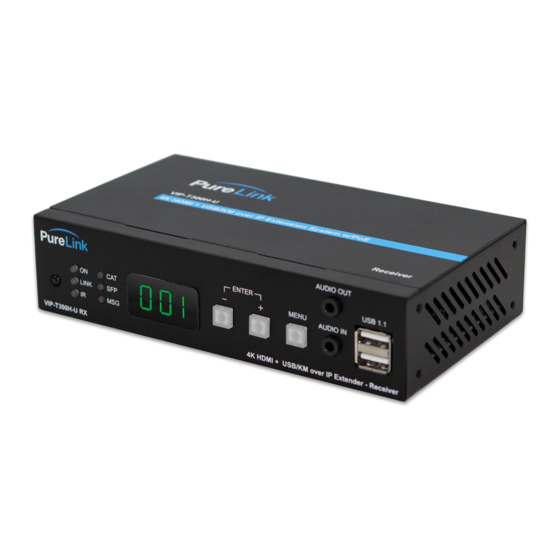
Page 8: Front Panel - Rx, (Decoder) (Receiver)
IR receiver LED 6. IR activity LED 7. USB 1.1 8. SFP Activity LED 9. Mic in (unicast only) 10. Info Message LED 11. Broadcast channel display 12. Minus/multifunction button 13. Plus/multifunction button 14. Menu/multifunction button VIP-T300H-U USER MANUAL VERSION 1.1... -
Page 9: Rear Panel - Rx (Decoder) (Receiver)
Rear Panel – RX (decoder) (receiver) 1. 1G LAN Port 2. 1G SFP Slot 3. HDMI Out 4. IR receiver input 5. IR transmitter output 6. USB 2.0 7. RS232 8. 12V DC input VIP-T300H-U USER MANUAL VERSION 1.1... -
Page 10: Remote
Carry LEFT RIGHT Decomposition Enter / Show Channel Information Enter ENTER (When no other Menu operation) Cancel ASTERISK Recall Previous Value NUMBER Favorite Channel Switching Not Available Back to Previous Channel Number 1 Number 2 VIP-T300H-U USER MANUAL VERSION 1.1... -
Page 11: Remote Control Operation
Press POWER of IR remote or panel button CH- and CH+ together to turn on video output IR Quick Block: # # #: IR block mode, ignore IR control signal until press any panel button or IR remote * three times * * *: Quit IR block mode VIP-T300H-U USER MANUAL VERSION 1.1... -
Page 12: Tv Wall Quick Switch
Firmware version Settings Point to Point To use the VIP-T300H-U as a point to point system, there is no need for a network, you can directly connect the TX and RX by CAT or Fiber. VIP-T300H-U USER MANUAL VERSION 1.1... -
Page 13: Distribution (One Tx To More Than One Rx)
Distribution (One TX to more than one RX) Connecting a VIP-T300H-U TX to multiple RX, you need a compatible network switch, however it is not necessary to access the devices through the network, although you may. Switching (More than one TX to one RX) The VIP-T300H-U offers IR remote control, and front panel switching on the RX, however you may want to use a control system, such as our VPX Video Over IP Management Software. - Page 14 When you are in the Change Adapter Settings page as shown below, select the LAN adapter that you will use to communicate with the VIP-T300H-Usystem. For this example, we will select the middle listing, Qualcomm Atheros LAN Adapter. Double click on the listing. The properties page will open as shown below. VIP-T300H-U USER MANUAL VERSION 1.1...
- Page 15 Note: Do not deselect the checkbox or change the selections of any other properties in the menu. When the window changes to the Properties page for the Internet Protocol Version 4, enter the same IP subnet as the VIP-T300H-Usystem. (VIP-T300H-Udefault address is 192.168.1.180) VIP-T300H-U USER MANUAL VERSION 1.1...
-
Page 16: Setting Up Your Mac Computer To Communicate On The Same Subnet
Setting up your Mac computer to communicate on the same subnet Opening Network Page From the top menu bar, you can either click on the network symbol Or click on the Apple icon in the upper left, and the select system preferences: Then select Network: VIP-T300H-U USER MANUAL VERSION 1.1... -
Page 17: Network Switch Requirements
Network switch requirements The VIP-T300H-U is compatible with all Media Hub network switches from PureLink. We recommend the Media Hub line as they are video over ip purpose built and ready for use out of the box in closed systems. -
Page 18: Network Switch Recommendations
Connections Power Each VIP-T300H-U can be powered by PoE 802.3af via the RJ45 port, or from the included AC to 12Vdc power adapter. When multiple VIP-T300H-Us are present in a rack system, and are connected by fiber, or PoE is not an option, we recommend our RPS-1218, eighteen channel 12VDC UL listed power supply. -
Page 19: Network
IR and route it separately from the audio, video, USB, and RS232 layers, to other receivers. You may also control the VIP-T300H-U RX with the optional IR remote control, and IR receiver built in to the front panel. -
Page 20: Diagnostic Leds
IR control, RS232 control, system setting Transmitters channel conflict DHCP server not found Rest to factory default Engineering mode Manufacture setting mode Aux system stopped Aux system firmware boot sector error Aux system firmware type error VIP-T300H-U USER MANUAL VERSION 1.1... -
Page 21: Rj45 Led
5. Blue-white Data 3 - 2. Orange Data 1 - 6. Green Data 2 - 3. Green-white Data 2 + 7. Brown-white Data 4 + 4. Blue Data 3 + 8. Brown Data 4 – VIP-T300H-U USER MANUAL VERSION 1.1... -
Page 22: Front Panel Button Functionality
There is a mode called ‘Engineering mode’ that temporarily defaults the device to a specific static IP address of 192.168.0.88, in the event you are not able to access the device. Prior to applying power, press and hold the plus button, then apply power. VIP-T300H-U USER MANUAL VERSION 1.1... -
Page 23: On Screen Display Osd
0 ~ 9 = IR Control ID IR Control ID IR Control ID setting 10 = User Define Controller 0 = Disable RS232 Control RS232 Control setting 1 = Enable (Case Sensitive) 2 = Case Insensitive VIP-T300H-U USER MANUAL VERSION 1.1... - Page 24 0 = Disable Menu Item “Advanced Menu” Display/Hide “Advanced Menu” 1 = Enable Screensaver Screen Saver setting 0 = No Option Screen Off Option Behavior After Screen Off 1 = Mute Analog Audio 2 = Stop Connection VIP-T300H-U USER MANUAL VERSION 1.1...
-
Page 25: Notes On Menus
Menu 44 Use default EDID at TX side, copy monitor EDID at RX side. Menu 47~48 Monitor HDCP version setting, with incorrect HDCP version setting it will show black screen. HDCP 2.2 Always HDCP Always On Description Disable Disable HDCP version follow source and Stream Type of VIP-T300H-U USER MANUAL VERSION 1.1... - Page 26 Menu 76 Command Redirect run RS232 command from Web or telnet port (Auxiliary mode). Menu 80~85 Fix selected function not follow the channel, only available when free routing enabled. Menu 90~103 Only available when video wall function enabled.. VIP-T300H-U USER MANUAL VERSION 1.1...
-
Page 27: Warranty
TERMS & CONDITIONS PureLink shall repair or replace the Product if it develops a material fault during the period of warranty, on condition that i) the Product has only been subject to normal use in a domestic or commercial environment in a manner consistent with its... - Page 28 Most problems can be corrected over the phone through close cooperation between Customer and a PureLink technician. To better enable PureLink to address a warranty claim, please have the Product’s serial and model numbers. If PureLink, in its sole discretion, determines that an on-site visit or other remedial action is necessary, PureLink may send a representative to Customer’s site.
Need help?
Do you have a question about the VIP-T300H-U and is the answer not in the manual?
Questions and answers