Advertisement
Quick Links
Advertisement

Subscribe to Our Youtube Channel
Related Manuals for Grainfather Conical Fermenter


Summary of Contents for Grainfather Conical Fermenter
- Page 1 Conical Fermenter Instructions...
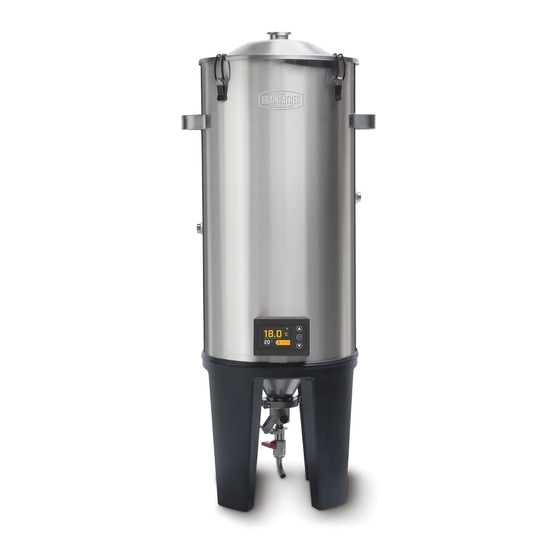
- Page 2 WHAT’S IN THE BOX ..........................P.1 ANATOMY/SCHEMATICS .........................P.2 FERMENTING WITH THE STANDARD FERMENTER ...............P.5 COLLECTING AND TRANSFERRING......................P.8 CONTROLLED HEATING AND COOLING ....................P.11 PRODUCT NAME : CONICAL FERMENTER Rated 12V 2.75A max Power Adapter 100 - 240V ~ 50/60Hz Made in China...
- Page 3 What’s in the Box?: AIRLOCK Rubber Bung Fermenter lid Fermenter Body 5 cm (2”) Tri Clamp Cone Plug seal LIQUID INLET DUAL VALVE TAP Silicon Transfer Hose (10 mm (0.4”) inner diameter) Digital Temperature CONTROLLER ALSO: Power Adapter and Wall Plug 2 m (6.5 ft) M12-3pin power cord...
- Page 4 14. Cooling connection coupler 15. Fermenter power cord 16. Glycol chiller handle 17. Glycol chiller cap 18. Glycol chiller controls 19. Glycol chiller controller/display 20. Air cooling vents 21. 303 stainless steel casing 22. Castor steering wheels 23. Inline wheels conical fermenter...
- Page 5 fig. glycol chiller...
- Page 6 A good fermentation environment has a consistent controlled temperature base, exposure to oxygen is minimised, and the fermenter is clean and sterile. The Grainfather Conical Fermenter provides you with a PROFESSIONAL QUALITY system for all of this and more.
- Page 7 Fermenting with the CONICAL FERMENTER SAFETY INFORMATION 1. Read all instructions before use. 2. Do not touch hot surfaces. Use handles or knobs. 3. To protect against fire, electric shock and injury to persons, do not immerse cord or plugs in water or other liquid.
- Page 8 SETUP & CLEANING • Unpack the fermenter and all parts, remove the protective packaging. • Assemble the valve and beer inlet and attach the valve to the bottom of the fermenter by inserting the ferrule seal, then using the tri clamp to tighten it. See page 9 for more information. •...
- Page 9 Then use the Mangrove Jack’s No Rinse Sanitiser. USAGE • Fill your fermenter as normal by syphon or counter flow wort chiller if using the Grainfather All in One Brewing System. • Secure lid and ensure airlock is in place in the lid.
- Page 10 Collecting & Transferring ATTACHING AND USING THE DUAL VALVE TAP Includes: - Bottom Valve - Beer inlet - SILICON TRANSFER HOSE [10 mm (0.4”) inner diameter] Beer inlet Lever Yeast/sediment (yeast dump) valve Ball valve HOW DOES IT WORK? The dual valve tap on the bottom of the fermenter uses a new innovative ‘valve within a valve’ design to allow you to both dump sediment from the beer, and take samples/transfer the beer.
- Page 11 take the beer from above the sediment sediment CLOSED OPEN SETUP & CLEANING • Assemble the valve and beer inlet and attach the valve to the bottom of the fermenter by inserting the ferrule seal, then using the tri clamp to tighten it. •...
- Page 13 Controlled Heating & Cooling In the cavity of the fermenter between the outer body and cone sits a 30W, 12V heating element. Unlike standard heating elements/sources that directly heat liquid, this is designed to heat the environment in between the double walls of the fermenter surrounding the liquid, which in turn heats the liquid. It is similar to controlling the temperature in a temperature controlled room.
- Page 14 ATTACHING AND USING THE DIGITAL TEMPERATURE CONTROLLER Easily snaps in place using magnets and pogo pins and allows you to accurately dial in a temperature, and even set a temperature schedule. Pogo pins are used as connections as well as a magnet. The controller is loaded with software that makes fermenting incredibly easy.
- Page 15 MENU SCREEN This screen shows the main menu options: • Profiles (or Profile Options if a profile is running). • Settings. Here you can use the up/down buttons to move the cursor, and press the Set button to select an option. SETTINGS SCREEN This is where you can adjust the settings parameter.
- Page 16 PROFILES SCREEN The profile screen shows the 4 built-in profiles: 1. Ale - 2 step profile, set up with default ale profile values, and allows you to edit the time/temperature of each step and auto proceed for step 1. 2. Lager - 4 step profile, set up with default lager profile values, and allows you to edit the time and temperature of each step and has auto proceed option for steps 1-3.
- Page 17 • If you select Brew, the controller will set the profile step 1 temperature and start the timer. If auto proceed is set to YES, once the timer is finished the controller will change the temperature to the next step and start the timer for the next step until all steps are complete. If the global auto proceed is set to NO, the controller will display the interaction screen when timer finishes and wait for user to manually proceed to the next step.
- Page 18 CONICAL FERMENTER - HEATING TIME GUIDE The Grainfather Conical Fermenter comes standard with a 30W, 12V heating element that gently heats the environment between the walls of the fermenter allowing for an even and controlled temperature increase which is best for the yeast.
- Page 19 GLYCOL CHILLER (SOLD SEPARATELY) The Conical Fermenter Glycol Chiller fully integrates into the Conical Fermenter and Digital Temperature Controller, and gives you the ability to cold crash and lager. The glycol chiller connects to the hidden stainless steel sleeve inside the double walled fermenter and runs glycol through it to cool the stainless steel and therefore your wort down to your dialed in temperature on your controller.
- Page 20 www.grainfather.com...
Need help?
Do you have a question about the Conical Fermenter and is the answer not in the manual?
Questions and answers