Table of Contents
Advertisement
Advertisement
Table of Contents

Subscribe to Our Youtube Channel
Related Manuals for TMI Products TQC Sheen 32-76e Series

Summary of Contents for TMI Products TQC Sheen 32-76e Series
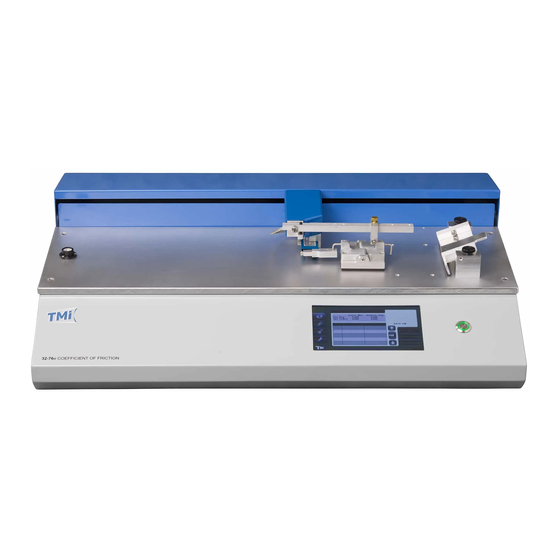
- Page 1 TESTING MACHINES, INC. Measuring up to your standards 32-76e SERIES FRICTION/PEEL TESTER 32-76-00-0002 Rev. 6/06/18 Coefficient of Friction - Peel Tester-10262018-ab5700-m44.pdf 1 Coefficient of Friction - Peel Tester-10262018-ab5700-m44.pdf 1 15-6-2020 13:40:37 15-6-2020 13:40:37...
- Page 2 TESTING MACHINES, INC. Measuring up to your standards Worldwide Headquarters Sales and Service 40 McCullough Drive New Castle, DE 19720 USA Phone: 302-613-5600 Toll Free: 800-678-3221 Fax: 302-613-5619 www.testingmachines.com Dear Valued Customer: You are now the proud new owner of quality physical testing equipment manufactured by Testing Machines Inc., the industry’s leader for over 80 years.
-
Page 3: Table Of Contents
ABLE ONTENTS TABLE OF CONTENTS ……………………………………………………….…………………………… 3 IMPORTANT SAFETY INSTRUCTIONS ……………………………………………………………….. 4 INTRODUCTION …………………………………………………………………………………………… 6 SPECIFICATIONS …………………………………………………………………...…………………….. 7 ACCESSORIES …………………………………………….……………………………………………….. 7 UNPACKING THE INSTRUMENT ………………………………………………………………………. 8 LIST OF EQUIPMENT …………………………..………………………………………….……………... 8 FEATURES ………………………………………………………………………………………………….. 8 GETTING TO KNOW THE INSTRUMENT …………………………………………………………….. 8 10 SET-UP ………………………………………………………………………………………………………. -
Page 4: Important Safety Instructions
IMPORTANT SAFETY INSTRUCTIONS Read all of these instructions carefully before operating the instrument. Save these instructions for future reference. Follow all warnings and instructions that are marked on the instrument. Unplug the instrument from the wall outlet before cleaning. Wipe the outside surfaces with a dry soft cloth only. - Page 5 16. Back-up Battery: Inside the Instrument tester a CR2032 type coin battery is used on the microcontroller PCB to provide the necessary power to the timekeeping memory chip of the instrument during the power off period. This to maintain the clock, calendar and setup information. When the battery is worn out it may only be replaced by a trained service engineer! When the battery is worn out dispose it under the ordinance of each local government or the law issued by relating government.
-
Page 6: Introduction
NTRODUCTION The 32-76 Series Friction/Peel Tester is a state-of-the-art precision laboratory instrument for measuring the static and kinetic friction between two specimens or between a specimen and a substrate. The instructions in this manual will guide the operator, step by step, through the first test. -
Page 7: Specifications
4 SPECIFICATIONS Power: 120/240VAC 50/60 Hz (24VDC wall adapter) Output: USB flash drive, USB ESC/POS printer, RS232 over a USB COM port, GraphMaster™ software (optional) Dimensions: 515 mm x 495 mm x 508 mm (20.3 in x 19.5 in x 20 in) Weight (approx.): 25 kg. -
Page 8: Unpacking The Instrument
6 UNPACKING THE INSTRUMENT SAVE THE BOX Please save all the original packing material in the event that the tester must be returned. Prior to returning any item, the customer MUST obtain a Return Material Authorization Number (RA #) from the TMI Customer Service Department. -
Page 9: Set-Up
Level – located on the top of the upright of the unit, the level is used to ensure the front and rear feet of the machine are aligned properly on the table or benchtop. Leveling Pads – four feet located on the bottom of the unit, used in conjunction with the level to align the tester on the table or benchtop. -
Page 10: Operation
OPERATION STARTUP Upon initial power-up, you will be in the Run Tests menu. The following is a detailed look at each menu and their functions. INSTRUMENT CONTROLS The Instrument controls are broken down into four main menus: 1 Run Tests Menu 2 Test Settings Menu 3 Machine Options Menu 4 Maintenance Menu... -
Page 11: Run Tests Menu
11.1 RUN TESTS MENU This is the menu where the user will initiate tests and view all test results data. STATISTICS Statistics are calculated for the current group of samples and displayed in the table. TEST # An automatically incremented identifier for each test. TEST RESULTS This can be set up for coefficient of friction or force (see Test Settings). - Page 12 USER ID A user-defined user identifier. Clicking on this button will open a full keyboard (shown right) where the user can enter a User ID. USB COMMUNICATION The USB-A port on the right-hand side of the instrument may be used to save data to either a FAT formatted USB thumb drive or printed to a Point of Sale printer.
-
Page 13: Test Settings Menu
11.2 TEST SETTINGS MENU This is the menu where all of the test-specific settings are selected. LOAD Load the currently selected test so it may be run as indicated by “Active”. The “->” means the indicated test is temporarily selected for other functions, i.e. Load, New, Edit, and Delete. - Page 14 EDIT Edit the currently selected test. This menu allows you to edit a current test or setup new test parameters. Units, sled weight, static and kinetic test parameters, and the name can be edited from this menu. This menu is also part of the new test setup. DELETE Delete the currently selected test.
-
Page 15: Machine Options Menu
1, 2 SET TIME AND SET DATE Select the current date and time for the instrument. LOAD CELL This allows the user to view, add, delete, or edit load cell information. The user can also select between stored load cell options. CALIBRATE SPEED Allows the user, with the aid of a tachometer (not included with unit), calibrate the speed of the sled. -
Page 16: Maintenance Menu
11.4 MAINTENANCE MENU MACHINE INFO displays the following: MODEL NUMBER SERIAL NUMBER DATE OF MANUFACTURE SOFTWARE VERSION DATE OF LAST CALIBRATION TESTS RAN- the total number of tests run on the instrument since its date of manufacture. FACTORY RESET will reset all parameters to factory defaults, delete all results, and delete all saved test methods except the “D 1894”... -
Page 17: Running Cof Tests
ADMIN The Admin screen is intended to be used by the service engineers of the TMI Group Companies. It shows the following data: Bootload FW- This unit’s firmware is field upgradable by service technicians Reset Cal Date- resets the date of the most recent calibration date to the current date Note: All these routines are key/password protected and are intended for use by a qualified service engineer. - Page 18 RUNNING TESTS Select and load the test to be used for testing the material from the TEST SETTINGS menu. The user is able to create, view and modify the test in the TEST SETTINGS menu as described in the previous section if needed. Go to the RUN TESTS menu and enter the Sample ID and User ID.
- Page 19 Press the GREEN button to the right of the display to start the test. The ring on the button should be while the test is running. The user may interrupt the test by pressing the button while the test is running. When the test has completed the message below will appear on the display.
- Page 20 13. After all the desired tests have been completed, the data can be exported to a point of sale type printer, or a thumb drive through the USB-A port on the right hand side of the instrument. The thumb drive must be formatted with an FAT partition. The thumb drive data will be in a .txt file.
-
Page 21: Heated Test Platen
HEATED PLATEN OPTION During the manufacture and converting process of plastic films, the material is subjected to elevated temperatures when traveling over packaging machine surfaces like forming collars, forming plows or other metal surfaces. To simulate this process the film is mounted on the test sled or block and measured against a temperature-controlled platen on the instrument or a stainless-steel plate. -
Page 22: Peel Testing
PEEL TESTING The 32-76e can be used to perform T peel and 180 degree peel tests using the option peel test fixtures. The instrument meets ASTM D 3330 Peel Adhesion-180-degree. PSTC-101 International Standard for Peel Adhesion of Pressure Sensitive Tape, FINAT1- Peel adhesion 180°, ASTM D1876 T-Peel Test, ASTM F 88 Seal Strength of Flexible Materials, ASTM D 1876 Standard test method for peel resistance (T-Peel test). - Page 23 Type in test name, i.e. “T peel D1876”. Select test type, i.e. T-peel Select force units, i.e. N, gf, kgf, ozf, or lbf and distance units, i.e. mm, cm, or in. 32-76-00-0002 Rev. 6/06/18 Coefficient of Friction - Peel Tester-10262018-ab5700-m44.pdf 23 Coefficient of Friction - Peel Tester-10262018-ab5700-m44.pdf 23 15-6-2020 13:40:57 15-6-2020 13:40:57...
- Page 24 Select carriage speed (4-20 in/min or 100 – 500 mm/min) Select distance or duration (These choices are mutually exclusive) Select sample width. 32-76-00-0002 Rev. 6/06/18 Coefficient of Friction - Peel Tester-10262018-ab5700-m44.pdf 24 Coefficient of Friction - Peel Tester-10262018-ab5700-m44.pdf 24 15-6-2020 13:40:57 15-6-2020 13:40:57...
- Page 25 Press Next to access the Pretest, Posttest, and Statistics setup menus. 10. Pretest menu. Distance – This sets the distance that the carriage moves before data collection begins. Read Delay – This sets the time delay between when the carriage starts moving and data collection begins.
- Page 26 Force – This sets the minimum force the instrument needs to see before data collection begins. Also known as preload force. Test Delay – This sets the delay between when the Start/Stop button is pushed and the test actually begins. Pre-Test speed setting –...
- Page 27 11. Posttest menu Distance – The distance the carriage moves after data stops recording. Stop Delay – The amount of time that the carriage moves after data stops recording. Return speed setting - Sets carriage speed for carriage return after test completion. Three speed options: Maximum motor speed.
- Page 28 Post-Test speed setting – Sets post- test carriage speed % Drop % Drop – % of the maximum measured force seen during the test that, when reached, the test will stop. See the diagram below. The user must set a preload force or the test will not run correctly.
-
Page 29: Statistics
Data set statistics 12. Statistics setup The Average of all test Maximums Test run statistics Test Statistics are values calculated from the collection of all data points during a single test. After a test is run and these values are calculated, the machine discards the bulk data points collected and saves the target Test Statistics. - Page 30 First column for Test run statistics. Second column for Test run statistics. First column for Data set statistics. 32-76-00-0002 Rev. 6/06/18 Coefficient of Friction - Peel Tester-10262018-ab5700-m44.pdf 30 Coefficient of Friction - Peel Tester-10262018-ab5700-m44.pdf 30 15-6-2020 13:41:00 15-6-2020 13:41:00...
-
Page 31: Run Tests Menu
Second column for Data set statistics. 14.2 RUNNING A TEST From Test Settings menu select the test type to run. From The Run Tests menu, select Sample ID and enter the sample ID (see Section 11 OPERATION of this manual for details) 32-76-00-0002 Rev. - Page 32 NOTE: Special characters (@#$%*&^, etc.) and spaces cannot be used in the Sample ID field. Select User ID and enter a user ID. Prepare the sample and mount it to the clamps. Press the Start/Stop button to start the test. 32-76-00-0002 Rev.
-
Page 33: Calibrating The Load Cell
CALIBRATING THE LOAD CELL The following is the procedure for performing the load cell calibration. Tools required for calibration include a set of certified calibration weights corresponding to the load cell in use and the TMI supplied calibration fixture TMI# 32-06-05-006. The force calibration is performed in grams force only. MAKE CERTAIN THAT THE INSTRUMENT IS LEVEL BEFORE PERFORMING THE CALIBRATION Installing the Calibration Fixture... - Page 34 Lay the string over the clamp and the pulley so that the hook for the weight is hanging freely. The factory supplied load cell (10 Newton) is the default load cell for this system. • The “Factory” load cell profile is not intended to be calibrated regularly, but to give the calibrator and user a known good reference for verification and...
- Page 35 • Enter the load cell’s capacity in Newtons. • Press the checkmark to confirm. • Enter the Load Cell’s sensitivity in millivolts per Volt. • This number is a characteristic of the load cell from its original manufacturer. TMI ships the OEM certificate and prints the sensitivity on the connector inside the load cell arm case.
- Page 36 • You will need a calibrated weight set (shown below) for the next part. • The machine will inform you what weight you will need in the recommended calibration weight series. If you are calibrating with a custom weight set you can change the “Target Force” by pressing the box on the screen that contains the desired value.
- Page 37 • When moving on to the next weight REMOVE ALL WEIGHT AND RE-ZERO before adding more weight. • Example: for this screen after you press the check mark it will ask for 20 grams. Remove the 10 grams and re-zero, then add the 20 grams. •...
- Page 38 SAMPLE CALIBRATION CERTIFICATE 32-76-00-0002 Rev. 6/06/18 Coefficient of Friction - Peel Tester-10262018-ab5700-m44.pdf 38 Coefficient of Friction - Peel Tester-10262018-ab5700-m44.pdf 38 15-6-2020 13:41:04 15-6-2020 13:41:04...
-
Page 39: Instrument Maintenance
INSTRUMENT MAINTENANCE CLEANING The Coefficient of Friction/Peel Tester should be kept clean and dry under normal operating conditions. Following a few suggestions should add years to the life of the machine. Keep the platen clean and free of foreign materials (glue, dirt, etc.) DO NOT clean the instrument’s painted surfaces with any chemicals or abrasive cleaners. -
Page 40: Annex - Heated Platen Temperature Units
18 ANNEX - Setting the temperature units for the Heated Test Platen. 1. Press and hold the up and down arrows on the controller simultaneously until the Operations menu appears (see below). 2. Press and hold the up and down arrows again until the setup menu appears (see below).
Need help?
Do you have a question about the TQC Sheen 32-76e Series and is the answer not in the manual?
Questions and answers