Advertisement
Quick Links
Regency
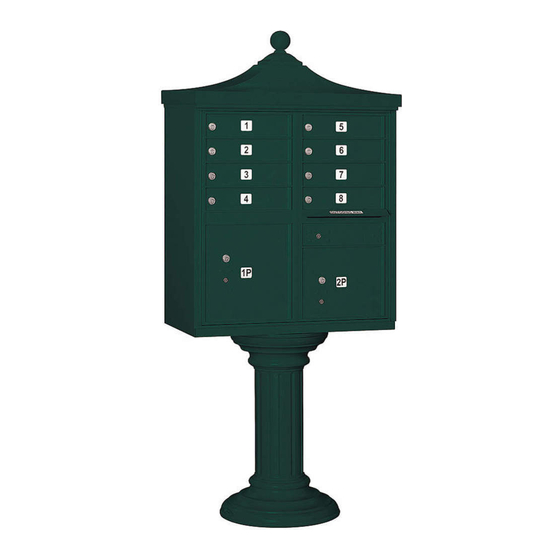
Models 3308R, 3312R, 3316R, 3313R, 3305R, 3306R & 3304R
Thank you for your purchase of Salsbury's Regency
will find them to be an attractive addition to commercial and residential developments. Regency
cluster box unit or outdoor parcel locker, a pedestal, a decorative top and a decorative pedestal cover. This first page instructs how to attach the
decorative top to the CBU or OPL and the pedestal cover to the pedestal.
Installation of Decorative Top
1.
Fasten the ball finial to the decorative top from the underside of
the decorative top using two (2) M4x8 allen bolts.
2.
Before placing the decorative top on to the CBU or OPL
top, apply thread lock to the four (4) M6x8 allen cone point set
screws and insert into the two (2) threaded holes on each
side of the decorative top.
3.
Only turn the set screws until they are flush with the inside
surface of the decorative top so that the decorative top can be
placed on the CBU or OPL top.
4.
Place the decorative top on to the CBU or OPL top. Be sure the
logo on the decorative top is positioned at the rear of the unit.
Tighten the four (4) allen set screws evenly to secure the
decorative top to the unit.
Decorative Top
Installation instructions are provided as general guidelines. It is advised that a professional installer be consulted. Salsbury Industries assumes no product assembly or installation liability.
Decorative CBU's and OPL's
®
Installation Instructions
Decorative CBU's and OPL's manufactured by Salsbury Industries. We are confident that you
®
SALSBURY INDUSTRIES
18300 Central Avenue, Carson, CA 90746-4008
Ph: 1-800-624-5269
Fx: 1-800-624-5299
www.mailboxes.com
Copyright © 2020 Salsbury Industries. All rights reserved. (Rev. 06, 11/13/2015)
Decorative CBU's and OPL's include a
®
Installation of Decorative Pedestal Covers
Note: The following instructions apply to both the short decorative
pedestal cover (# 3386) and the tall decorative pedestal cover (#
3396).
1.
Place the pedestal gasket on the floor and wrap it around the
base of the unit's pedestal.
2.
Slide one half of the black plastic insect guard into the top of
either one of the decorative pedestal cover halves. Make sure
the locator tabs on the pedestal cover align with the slots on the
insect guard. Repeat on the other half of the pedestal cover.
3.
Place one of the pedestal covers with guard installed into
position underneath the rear of the unit and around the rear of
the pedestal.
4.
Place the other pedestal cover with guard installed underneath
the front of the unit and around the front of the pedestal.
5.
Use four (4) M4x16 allen bolts, two (2) at the top and two (2) at
the bottom, to bolt the two (2) halves of the pedestal covers
together.
6.
Thread four (4) M6x20 allen set screws, one at the top and one
at the bottom, on both the front and rear halves, into the
threaded holes to prevent the pedestal covers from moving.
Decorative Pedestal Covers
Int'l Ph: 323-846-6700
Int'l Fx: 323-846-6800
engineering@mailboxes.com
U.S.P.S. APPROVED
Advertisement

Related Manuals for Salsbury Industries Regency 3308R

Summary of Contents for Salsbury Industries Regency 3308R
- Page 1 Int’l Fx: 323-846-6800 www.mailboxes.com engineering@mailboxes.com Installation instructions are provided as general guidelines. It is advised that a professional installer be consulted. Salsbury Industries assumes no product assembly or installation liability. Copyright © 2020 Salsbury Industries. All rights reserved. (Rev. 06, 11/13/2015)
- Page 2 Installation instructions are provided as general guidelines. It is advised that a professional installer be consulted. Salsbury Industries assumes no product assembly or installation liability. Copyright © 2020 Salsbury Industries --- All rights reserved --- Part No. 1055282, Rev. 06, 11/06/2015 --- Page 1 of 10...
- Page 3 Installation instructions are provided as general guidelines. It is advised that a professional installer be consulted. Salsbury Industries assumes no product assembly or installation liability. Copyright © 2020 Salsbury Industries --- All rights reserved --- Part No. 1055282, Rev. 06, 11/06/2015 --- Page 2 of 10...
- Page 4 Installation instructions are provided as general guidelines. It is advised that a professional installer be consulted. Salsbury Industries assumes no product assembly or installation liability. Copyright © 2020 Salsbury Industries --- All rights reserved --- Part No. 1055282, Rev. 06, 11/06/2015 --- Page 3 of 10...
- Page 5 Installation instructions are provided as general guidelines. It is advised that a professional installer be consulted. Salsbury Industries assumes no product assembly or installation liability. Copyright © 2020 Salsbury Industries --- All rights reserved --- Part No. 1055282, Rev. 06, 11/06/2015 --- Page 4 of 10...
- Page 6 Installation instructions are provided as general guidelines. It is advised that a professional installer be consulted. Salsbury Industries assumes no product assembly or installation liability. Copyright © 2020 Salsbury Industries --- All rights reserved --- Part No. 1055282, Rev. 06, 11/06/2015 --- Page 5 of 10...
- Page 7 Installation instructions are provided as general guidelines. It is advised that a professional installer be consulted. Salsbury Industries assumes no product assembly or installation liability. Copyright © 2020 Salsbury Industries --- All rights reserved --- Part No. 1055282, Rev. 06, 11/06/2015 --- Page 6 of 10...
- Page 8 Installation instructions are provided as general guidelines. It is advised that a professional installer be consulted. Salsbury Industries assumes no product assembly or installation liability. Copyright © 2020 Salsbury Industries --- All rights reserved --- Part No. 1055282, Rev. 06, 11/06/2015 --- Page 7 of 10...
- Page 9 Installation instructions are provided as general guidelines. It is advised that a professional installer be consulted. Salsbury Industries assumes no product assembly or installation liability. Copyright © 2020 Salsbury Industries --- All rights reserved --- Part No. 1055282, Rev. 06, 11/06/2015 --- Page 8 of 10...
- Page 10 Installation instructions are provided as general guidelines. It is advised that a professional installer be consulted. Salsbury Industries assumes no product assembly or installation liability. Copyright © 2020 Salsbury Industries --- All rights reserved --- Part No. 1055282, Rev. 06, 11/06/2015 --- Page 9 of 10...
- Page 11 Installation instructions are provided as general guidelines. It is advised that a professional installer be consulted. Salsbury Industries assumes no product assembly or installation liability. Copyright © 2020 Salsbury Industries --- All rights reserved --- Part No. 1055282, Rev. 06, 11/06/2015 --- Page 10 of 10...
Need help?
Do you have a question about the Regency 3308R and is the answer not in the manual?
Questions and answers