
Summary of Contents for EK-Team VE 600
- Page 1 EK Vario Engraver VE 600 full size (A3) / half size (A4) Operating Instructions Release: June 13, 2013 © Page 1 of 25...
-
Page 2: Table Of Contents
4. Taking into Operation..................7 5. Operation ....................11 6. Cleaning and Care ..................16 7. Accessories ....................17 8. Fault Rectification ..................19 9. Technical Data ...................20 10. Packing Instructions for the VE 600 ............21 11. Safety Instructions ...................22 12. Contact Information ..................25 Page 2 of 25... -
Page 3: Introduction
1. Introduction: By buying the VE 600 you have acquired a flexible engraving device which will enable you to engrave materials made from plastics, aluminum, brass and special steel, easily and rapidly. ● Tough device structure made of aluminum profiles ●... -
Page 4: Scope Of Supply
2. Scope of Supply for the VE 600 Engraver When you take delivery of the engraver, please check that the consignment is complete. Please keep the outer packing, so that the device can be transported safely when it comes to servicing. - Page 5 Scope of Supply for the VE 600 engraver 6. Connection cable for engraving spindle 7. Suction hose for engraving unit 8. Connection cable for vacuum cleaner 9. Stand tube 10. Clamp for hose and engraving spindle cable Page 5 of 25...
-
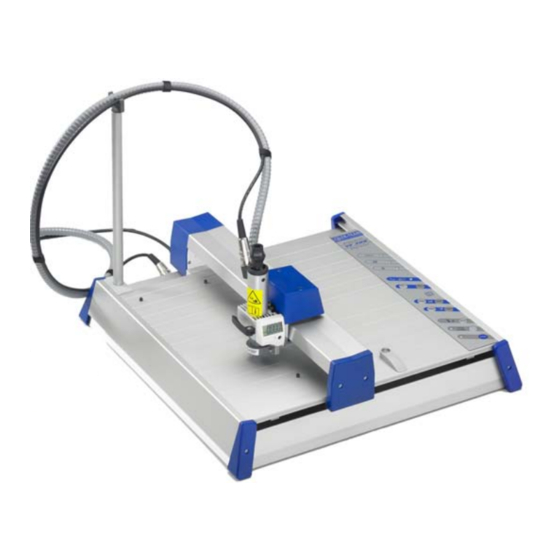
Page 6: Product Overview
3. Product Overview 4 5 6 Segment 1 Segment 2 1) Engraving surface 2) Connection for engraving spindle 3) Connection for vacuum cleaner 4) On/Off switch 5) Fuse 6) Mains connection 7) USB connection 8) Operating panel/keypad 9) Engraving arm 10) Contact surface for zero setting of the engraving needle 11) Retaining pins for support plates 12) Engraving head... -
Page 7: Taking Into Operation
The engraver is best set up a dry area, as free of dust as possible. Do not expose the device to direct sunlight. Make sure that the connections are accessible at all times. Set the VE 600 up in such a way that it stands securely and firmly on the surface used. - Page 8 Connect the other end of the cable to the VE 600 and likewise tighten the screw connection to hand tightness. Now plug the suction hose onto the engraving head and lay the hose, like the cable, in a loose loop, then clamp the hose into the clamping element of the stand.
- Page 9 The EK-TEAM VC 500 vacuum cleaner is characterized by its low noise development, and can be used in sustained operation. Note: If you use a conventional commercial vacuum cleaner, take care to ensure that it is not overloaded by excessively long operation.
- Page 10 Now connect the vacuum cleaner connection cable supplied with the engraver to the switch box and to the VE 600 and tighten the screw connections to hand tightness. Connect the suction hose fitted to the VE 600 to the adapter...
-
Page 11: Operation
5. Operation Once you have set up the VE 600, and the power supply and the data cable are connected, you can switch the device on. Caution: Before the device is switched on, please make sure that there are no obstructive objects on the working surface of the engraver which could interfere with the free movement of the engraving arm. - Page 12 5.3 Delete data memory with Clear Buffer button If there are data present in the VE 600, this will be indicated by the yellow display lighting up. You can delete these data by using the Clear buffer button. To do this, the device must be in Stop mode (red display illuminated).
- Page 13 5.7 HIGH / LOW penetration speed When engraving data are transferred from the PC to the engraver, the penetration speed will also be automatically transferred. If you want to change these data during the engraving process, you can change the speed by means of the appropriate buttons.
- Page 14 5.9 Adjusting the engraving depth The engraving depth is determined by means of the depth adjuster on the engraving spindle. Different script widths for the engraving are attained as a function of the width and grinding angle of the engraving needle used, as well as the penetration depth into the material.
- Page 15 In order to ensure the correct length of the engraving needle, only use engraving needles supplied exclusively by EK-TEAM with the identification ring. We cannot undertake any guarantee for script quality or damage to the units if other makes are used.
-
Page 16: Cleaning And Care
Wipe the device with a duster occasionally after use, either dry or moistened with a mild cleaning agent. Caution: Never use aggressive cleaning agents to clean the Vario Engraver VE 600. Never oil the mechanical parts of your engraver. 6.1 Handling the engraving spindle The engraving spindle is a sensitive unit and should be treated extremely carefully. -
Page 17: Accessories
7. Accessories Description Part no. Illustration Engraving needle 15° - .2 mm 3501 0003 Engraving needle 15° - .3 mm 3501 0002 Engraving needle 15° - .4 mm 3501 0001 Engraving needle 15° - .5 mm 3501 0000 Engraving needle 15° - .7 mm 3501 0004 Engraving needle 15°... - Page 18 Converter compressed air to vacuum 3491 0012 Vacuum pump for vacuum support plates 3491 0011 Optical measurement tool 3400 0058 Engraving for VE 600 VC 500 Vacuum cleaner 3400 0056 Vacuum cleaner bags (5 bags) 3502 0000 Universal support plate...
-
Page 19: Fault Rectification
Check whether the socket being used is in good order. green “Power” LED Check whether the mains infeed fuse on the VE 600 is in good order. is not lighting To do this, pull out the mains cable at the infeed module and the fuse element next to the mains switch. -
Page 20: Technical Data
9. Technical Data Vario Engraver VE 600 x-y unit: Flatbed engraver Maximum engraving surface: A3: 440 mm x 305 mm/17.32 inch x 12.01 inch, A4: 220 mm x 305 mm/8.66 inch x 12.01 inch Engraving speed: max. 20 mm/s / .79 inch/s Interfaces: USB Level 2.0... -
Page 21: Packing Instructions For The Ve 600
10. Packing Instructions for the VE 600 Two corner pieces Middle piece to Two corner protect the y-arm pieces Engraver inside the Complete inside the box Box with accessories Page 21 of 25... -
Page 22: Safety Instructions
11. Safety Instructions Basic safety instructions. Caution: Read these before using the device When using the engraving unit, referred to hereinafter as the “electrical device”, the following basic safety measures are to be respected to provide protection against electric shock, injury, and the risk of fire. - Page 23 The use of other tools and other accessories may incur the risk of injury for you. Only allow the electrical devices to be repaired by an authorized EK-TEAM Service Centre. This electrical device meets the relevant safety regulations.
- Page 24 Sicherheitshinweise ● Bewahren Sie die Gebrauchsanweisung sorgfältig auf. ● Dieses Gerät entspricht den anerkannten Regeln der Technik und den einschlägigen Sicherheitsbestimmungen für Gerätesicherheit. ● Elektrische Anschlussbedingungen und Angaben auf dem Typenschild müssen übereinstimmen ● Gerätenutzung nur in trockenen Räumen ● Netzstecker nicht am Kabel aus der Steckdose ziehen ●...
-
Page 25: Contact Information
12. Contact information Technical Support and Service: ++49 40 853749-00 www.ek-team.de info@ek-team.de EK-Team GmbH Schnackenburgallee 43-45 22525 HAMBURG / Germany Page 25 of 25...
Need help?
Do you have a question about the VE 600 and is the answer not in the manual?
Questions and answers