Advertisement
Quick Links
Advertisement

Related Manuals for NI Climbing Frames Everglades

Summary of Contents for NI Climbing Frames Everglades
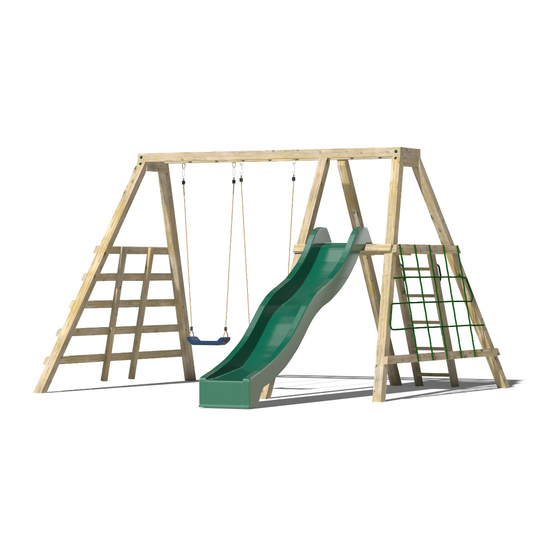
- Page 1 Everglades Swing Set Instruction Manual...
- Page 2 Parts List Item Description Image Quantity Number 10ft post 4 (with cut at a 60° pre- angle (with drilled the top 32mm already holes) prepared for the monkey bar) 10ft set of 1 (holes monkey pre- bars drilled swing hooks) 420mm x 4”...
- Page 3 3m x 3” x 1.5” timber 10ft post with top prepared for middle A-frame M10 Swing Hooks Screw Covers...
- Page 4 200mm index screws Decking screws 120mm screws Swing (varies depending customers choice)
- Page 5 9ft Slide U-Nails Rope for Cargo Net...
- Page 6 Set of Steps 6” x 1” board Other components included: Grab Handles Tools needed: • Cordless drill • Handsaw • Spirit Level • Hammer • Shovel • Stepladder • Pencil • Measuring tape • 10mm Hex bit • PZ 2 Drill Bit...
- Page 7 Assembly Instructions All components needed during the assembly are numbered with reference to the parts list, please refer back to the parts list to ensure you are assembling the correct components for each step. Step 1: Monkey Bar A-Frame Assembly •...
- Page 8 Step 2: • Attach the 1755mm 3” x 1.5” timber piece across the middle of the A-frame to hold it in its place when lifted. To position this, mark 900mm down from the top of each post and line up the top of the 1755mm timber to each of these lines...
- Page 9 Step 3: • Cut the 3” x 1.5” flush with the 10ft posts...
- Page 10 Step 4: • Repeat steps 1-3 for the other A-frame • On the other A-frame add a second 1755mm 3” x 1.5” on the other side of the A-frame, this will be where the platform will be built onto...
- Page 11 Step 5: Monkey Bar Module Assembly • Place the monkey bars on top of one of the A-frames. Make sure to assembly the monkey bars the correct way around. The monkey bars need to be secured in such a way so as the 32mm pre-drilled holes are on the top face and are closest to the A-frame with 2 x 1755mm x 3”...
- Page 12 Step 6: • Repeat step 5 to secure the other side of the monkey bars to the other A-frame...
- Page 13 Step 7: Securing the middle A-frame • These remaining two 10ft posts don’t need a 420mm horizontal piece of post to connect them, so they can be fixed directly to the underside of the Monkey Bar, measuring from 810mm- 900mm from the end of the Monkey Bar •...
- Page 14 Step 8: • Add a piece of 1755mm x 3” x 1.5” to the middle A-frame, ensure it is on the correct side because this is where the platform will be built onto...
- Page 15 Step 9: • When all six A-frame posts are secured, use the 3m x 3” x 1.5” to act as temporary braces across all the A-frames at each side, using decking screws to tack them on about 800mm from the ground. It will take two 3m lengths for each side (4 in total). Measure the distances between all the A-frame posts to ensure both sides are equal and the middle legs are plumb...
- Page 16 Step 10: • Screw in the support braces with decking screws and cut flush to the A-frame posts...
- Page 17 Step 11: • Once you’re happy with the position of the set, you’re ready to dig the holes for the legs and concrete the legs into the ground • We recommend a hole approximately 12” in diameter and 12” deep. The depth might vary if your garden is on a slope, or you may need to cut a bit of the bottom of some of the A-frames •...
- Page 18 Step 12: Platform Assembly • Your platform should measure 1.5m (5ft) from the ground to the top of the platform. If your garden is on a slope you may need to adjust this height to suit your slope. If the horizontal supports of your A-frames aren’t at 1.5m, then they can be lowered or raised as required.
- Page 19 Step 13: Securing 6” x 1” Boards • Using the decking screws, secure the 6” x 1” boards into the three 3” x 1.5” supports. You will have to cut these boards to fit them flush against the inside of the A-frame supports. It should take 8 boards to cover the platform...
- Page 21 Step 14: • Remove the temporary braces that were added in step 9 • Secure two of these to the exterior A-frames. Both of these should be placed roughly 200mm from the ground to the bottom of the timber • Cut these flush timbers to the posts once they are secured in place...
- Page 22 Step 15: Timber Steps Assembly • The 3m x 3” x 1.5” timber provided will be used to form your wooden ladder. Using the decking screws, attach the horizontal timers. The distance between your timbers will depend on the slope of your garden. Ensure that the gaps between each timber are at least 230mm, to prevent head entrapments •...
- Page 23 Step 16: • Use two more 3m x 3” x 1.5” timber for the vertical uprights, again these are screwed in using the decking screws provided...
- Page 24 Step 17: Cargo Net Assembly • he height and width of the squares should be approximately 300mm apart. These should now be marked on the two posts and the 3” x 1.5”. The best way to do this is to measure the distance between the 3”...
- Page 25 Step 18: Steps Assembly • Once the platform is complete, it’s time to attach the steps • The steps might have to be cut or dug into place (depending on the slope of your surface) • They are secured at the top using decking screws, make sure to pre-drill the holes •...
- Page 26 Step 19: Slide Assembly • Secure the slide using decking screws through the pre-drilled holes...
- Page 27 Step 20: Swing Hook Assembly • Attach the swing hooks to the monkey bars through the pre-drilled holes Step 21: Swing Assembly • Attach the swings to the monkey bars via the swing hooks...
- Page 28 Step 22: Screw Cover Assembly • Press the screw covers into the 32mm holes on the A-frames Step 23: Concreting the Structure • Using postcrete and following the manufacturers instruction concrete all 6 posts into the ground • The frame should be left overnight before it is used to ensure the postcrete has dried...
- Page 29 Maintaining Your Climbing Frame My climbing frame has been installed, what do I do next? A: If your climbing frame was installed in a grassed area the installers have concreted the frame into the ground. They have left a small exposed hole, where the posts have been sunk into the ground.
Need help?
Do you have a question about the Everglades and is the answer not in the manual?
Questions and answers