FS SG-5110 Quick Start Manual
Multi-service security gateway
Hide thumbs
Also See for SG-5110:
- System configuration manual (7 pages) ,
- Quick start manual (16 pages)
Table of Contents
Advertisement
Quick Links
Advertisement
Table of Contents

Related Manuals for FS SG-5110


Summary of Contents for FS SG-5110
- Page 1 SG-5110 MULTI SERVICE SECURITY GATEWAY Quick Start Guide V1.0...
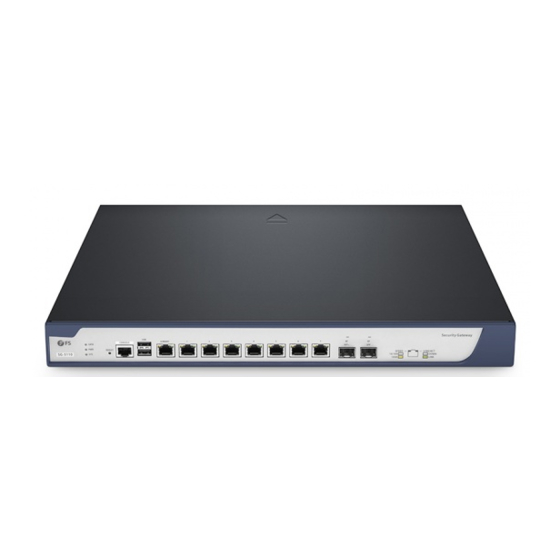
- Page 2 Introduction Thank you for choosing SG-5110 security gateway. This guide is designed to familiarize you with the layout of the gateway and describes how to deploy the gateway in your network. Security Gateway 0/MGMT CONSOLE SATA SFP+ RESET SPEED LINK/ACT...
-
Page 3: Hardware Overview
Hardware Overview Front Panel Ports MGMT Security Gateway 0/MGMT CONSOLE SATA SFP+ RESET SPEED LINK/ACT 10/100 DOWN 1000 LINK CONSOLE RJ45 SFP+ SFP Ports Description RJ45 10/100/1000BASE-T ports for Ethernet connection SFP port for 1G connection SFP+ SFP+ port for 10G connection CONSOLE An RJ45 console port for serial management An Ethernet management port... -
Page 4: Installation Requirements
Back Panel Button Button Description Power ON/OFF Control the gateway power supply. Front Panel LEDs SFP+ SFP SPEED SATA Security Gateway 0/MGMT CONSOLE SATA SFP+ RESET SPEED LINK/ACT 10/100 DOWN 1000 LINK LINK/ACT LEDs Status Description Off The power module is not in the position or fails. Solid Green The power module is working properly. -
Page 5: Site Environment
Standard-sized, 19" wide rack with a minimum of 1U height available. Category 5e or higher RJ-45 Ethernet cables and fiber optical cables for connecting network devices. Site Environment: Do not place the device in a damp or wet location. Do not let any liquid enter the chassis. Do not install the equipment in a dusty environment. -
Page 6: Rack Mounting
Rack Mounting 1. Secure the mounting brackets to the two sides of the gateway with six M4 screws. 2. Attach the gateway to the rack using four M6 screws and cage nuts. -
Page 7: Grounding The Gateway
Grounding the Gateway 1. Connect one end of the grounding cable to a proper earth ground, such as the rack in which the gateway is mounted. 2. Secure the grounding lug to the grounding point on the gateway back panel with the washers and screws. - Page 8 Connecting the RJ45 Ports P S O P S O ~ 1 0 0 -2 4 0 V /1 ~ 1 0 0 -2 4 0 V /1 O F F O F F 1. Connect an Ethernet cable to the RJ45 port of a computer or other network devices. 2.
-
Page 9: Connecting The Console Port
Connecting the Console Port 1. Insert the RJ45 connector into the RJ45 console port on the front of the gateway. 2. Connect the DB9 female connector of the console cable to RS-232 serial port on the computer. Connecting the MGMT Port 1. -
Page 10: Configuring The Gateway
Configuring the Gateway Configuring the Gateway Using the Web-based Interface Step 1: Connect the computer to the Management port of the gateway using the network cable. Step 2: Set the IP address of the computer to 192.168.1.x. (“x” is any number from 2 to 254.) I nter net Pro tocol Ve r sion 4 ( TCP / IP v4 ) Prop e r tie s General Yo u c a n g e t I P s e t t i n g s a s s i g n e d a u t o m a t i c a l l y i f y o u r n e t w o r k... -
Page 11: Troubleshooting
Configuring the Gateway Using the Console Port Step 1: Connect a computer to the gateway's console port using the supplied console cable. Step 2: Start the terminal simulation software such as HyperTerminal on the computer. Step 3: Set the parameters of the HyperTerminal: 9600 bits per second, 8 data bits, no parity, 1 stop bit and no flow control. -
Page 12: Support And Other Resources
Product Warranty FS ensures our customers that any damage or faulty items due to our workmanship, we will offer a free return within 30 Days from the day you receive your goods. This excludes any custom made items or tailored solutions.
Need help?
Do you have a question about the SG-5110 and is the answer not in the manual?
Questions and answers