Table of Contents
Advertisement
Quick Links
Advertisement
Table of Contents

Summary of Contents for BÜHLMANN ZHL-16C GF
- Page 1 DIVECOMPUTER.EU USER MANUAL V4.0...
-
Page 2: Table Of Contents
1 Introduction _______________________________________________________________________ 5 2 Getting the computer ready to work. ___________________________________________________ 7 Bungee cord. __________________________________________________________________________ 7 Changing the battery. __________________________________________________________________ 7 Turning on. ___________________________________________________________________________ 8 2.3.1 Auto turn-on. ___________________________________________________________________________ 8 Turning off. ___________________________________________________________________________ 9 Dive computer operation. _______________________________________________________________ 9 Compass calibration. - Page 3 5.1.1 Main surface screen. ____________________________________________________________________ 36 5.1.2 Surface configuration screen. _____________________________________________________________ 37 5.1.2.1 Device information - UNIT SETUP. _______________________________________________________ 38 5.1.2.2 Gas mix table configuration – GAS SETUP._________________________________________________ 39 5.1.2.3 Dive parameters configuration – DIVE SETUP.______________________________________________ 40 5.1.2.4 Dive Planner – NTX DIVE PLAN. _________________________________________________________ 41 5.1.2.5 Logbook.
- Page 4 7.1.3.6 System settings – SYSTEM SETUP. _______________________________________________________ 89 7.1.4 “Surface” compass. _____________________________________________________________________ 90 Dive computer screens when working underwater. _________________________________________ 91 7.2.1 Main underwater screen. ________________________________________________________________ 91 7.2.1.1 Switching between gas mixes – GAS SWITCH. ______________________________________________ 93 7.2.1.2 Change the Gradient Factor values ______________________________________________________ 94 7.2.2 Setpoint configuration screen.
-
Page 5: Introduction
1 Introduction DIVECOMPUTER.EU product is a dive computer dedicated for open circuit (OC) and closed circuit (CC) diving. When designing this computer, we aimed at making its usage straightforward even without reading the manual. However, we ask you to spend some time on getting to know its content to make sure you are able to operate the dive computer comfortably. - Page 6 DANGER! This computer is capable of calculating required decompression stops. These calculations are only an assumption of the real physiological decompression requirements. Dives that require staged decompression are considerably more risky than dives within “no-stop” restrictions. Rebreather diving, diving with gas mixes, diving with required decompression stops or overhead environment diving significantly increases the risk of death.
-
Page 7: Getting The Computer Ready To Work
2 Getting the computer ready to work. 2.1 Bungee cord. Bungee cord can be installed in many ways based on the user’s preferences. The holes are seized for bungee cord of max 5mm diameter. One example is shown below. Put the bungee cord through the holes and tie knots at the ends stopping the bungee from getting pulled. -
Page 8: Turning On
After inserting a new battery, tighten the battery cap clockwise until the resistance is felt. It is advised to grease the sealing o-ring with an appropriate grease dedicated for scuba use. If the battery port cap is not tightened properly the battery chamber may get flooded and the metal contacts corroded, which may influence the work of the computer and make it impossible to use it. -
Page 9: Turning Off
2.4 Turning off. Switching off the device is only possible when in surface mode. To turn the device off, press the SELECT and CONFIRM buttons simultaneously, then confirm with “CONFIRM” button. Each time the device is turned off, a screen will be displayed informing about the operating time of the device with the currently inserted battery. - Page 10 The default active function (marked in white colour) is to switch to the next screen . Pressing SELECT button causes repeated switch to the next available option. To increase the clarity, the following pointer is also present: To increase the clarity, the following pointer is also present: Options selected by consecutive pressing SELECT: Pressing SELECT again will switch to the first option (move to the next screen):...
-
Page 11: Compass Calibration
CONFIRM button is used to validate the current option. For function options (eg MODE, COMPASS CALIBRATION, FIRMWARE UPGRADE from this example), you will be taken to the screen that serves the function. If you change the value of the parameter (eg BRIGHTNESS from this example), the value is changed to another available (eg LOW->... -
Page 12: Apnea Mode
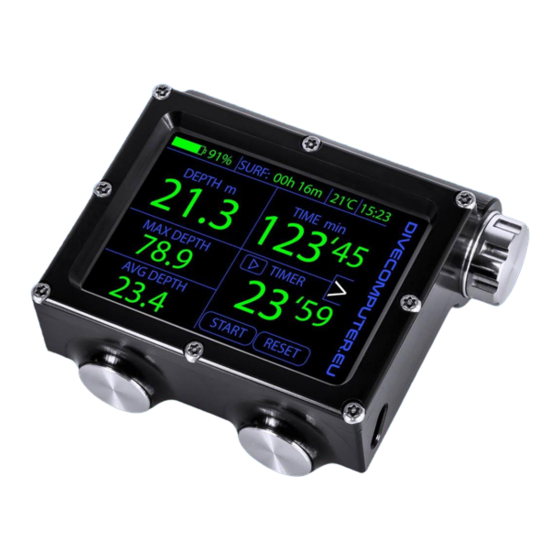
3 APNEA mode. 3.1 Computer screens at surface work 3.1.1 Main surface screen. The top part of the screen (informative row) is common to all operating modes and contains the following information: Battery charge icon Current level of battery charge, given in percentage, colour coding: >=60%, <60%, <30%. -
Page 13: Configuration Screen
TIMER – current counter value (stopwatch). In the initial state, it is stopped (indicator ) and indicates value “0’00”. To run the stopwatch, select and press CONFIRM button. The status indicator changes to and the timer will start counting the time. To stop counting select . -
Page 14: System Setup
3.1.2.1 SYSTEM SETUP. Screen for configuration of basic device settings. Includes both main system parameter settings parameters connected with diving directly. UNITS – choice of units: IMPERIAL or METRIC BRIGHTNESS – screen brightness: LOW / MEDIUM / HIGH / AUTO. Selecting AUTO mode controls the brightness of the screen, depends on the outside lighting –... -
Page 15: Logbook
3.1.2.2 Logbook. The controller is equipped with memory to record the last 500 dives. The user has the ability to view logs, view detailed information about dives, view dive charts and delete selected logs. Omitting a decompression stop is marked in the dive log. - Page 16 The detail screen contains the following information: Dive Time – dive time Max Depth – maximum depth of current dive Average Depth – average depth of current dive Surface Interval – surface interval from the previous dive. If this is the first dive and the time interval can not be determined, this parameter is set to "---".
- Page 17 Dive graphs: Depth graph Oxygen partial pressure graph Temperature graph Summary graph...
-
Page 18: Compass Calibration
3.1.2.3 Compass calibration. The device has a built-in digital compass. For this item to work properly, it requires periodic calibration. The calibration process should be carried out in an environment free from magnetic interference, such as power lines, proximity to magnetic fields (most electrically powered),... -
Page 19: Device Information
3.1.2.4 Device information. The screen provides information about the hardware and firmware and the user's name (user name). Hardware information is useful when contacting the service and for a personalized software version. USER NAME – user name of the device RESET TO DEFAULTS –... -
Page 20: Select Operating Mode Of The Device
3.1.2.5 Select operating mode of the device Device mode selection screen. There are 5 modes available: APNEA – timer, depth gauge + stopwatch EXT GAUGE – extended GAUGE mode OC REC – recreational mode in open circuit. In this mode, there are 3 configurable gas mixes without helium content OC TECH –... -
Page 21: Firmware Update
3.1.2.6 Firmware update. The steps for updating the firmware are described in point: 10. Firmware update 3.1.3 “Surface” compass. On the compass screen, in addition to the current direction (COURSE), there are basic information about diving: DEPTH and DIVE TIME. In surface mode these values are "0". The compass allows you to "lock"... -
Page 22: Device Screens When Working Underwater
3.2 Device screens when working underwater. 3.2.1 Main underwater screen. The main screen layout, when in underwater mode, is similar to surface mode. The only difference is the replacement of the surface interval information with the information about the possible alarms (the field marked in red) that occurred during the dive. -
Page 23: Underwater Configuration Screen
3.2.2 Underwater configuration screen. The ability to change device configuration in underwater mode has been limited to basic system settings. UNITS – choice of units: IMPERIAL or METRIC BRIGHTNESS – screen brightness: LOW / MEDIUM / HIGH / AUTO. Selecting AUTO mode controls the brightness of the screen, depends on the outside lighting –... -
Page 24: Underwater" Compass
END OF DIVE – time (in minutes) from the ascent, after which the device stops the dive mode and goes to surface mode: 0 - 10 minutes 3.2.3 “Underwater” compass. On the compass screen, in addition to the current direction (COURSE), there are basic information about diving: DEPTH and DIVE TIME. -
Page 25: Menu Layout
3.3 Menu layout. Surface work Underwater work... -
Page 26: Extended Gauge Mode
4 Extended GAUGE mode. 4.1 Device screens when working on the surface. 4.1.1 Main surface screen. The upper part of the screen (information bar) is common to all operating modes and contains the information described below. Battery charge icon Current battery charge level, given by percentage. Colour coding: >=60%, <60%, <30%. -
Page 27: Detailed Surface Screen
diver spends with the administered oxygen. To start the oxygen timer, use the SELECT button to select O2 TIMER then press CONFIRM. To stop the countdown, press CONFIRM again DECO TIME – the time that elapsed since the start of the decompression procedure - the first start of any stopwatch: Timer1 ... -
Page 28: Graphs Preview
Select the SHOW GRAPHS / RESCUE SCREEN / RESET TIMERS / SYSTEM CONFIG option by marking it with the SELECT button and then pressing the CONFIRM button. 4.1.2.1 Graphs preview. Diagrams showing the course of the dive: DEPTH – depth graph as a function of time (blue) TEMPERATURE –... -
Page 29: System Settings - System Config
4.1.2.3 System settings - SYSTEM CONFIG. Screen for setting basic device settings and changing computer mode. COMPUTER MODE – goes to the device mode change screen. UNITS – Choice of units: IMPERIAL or METRIC. BRIGHTNESS – screen brightness: LOW / MEDIUM / HIGH / AUTO. -
Page 30: Surface" Compass
PIEZO TIME – minimum pressing time of PIEZO button on the device: from 10ms to 150ms. Setting a higher value reduces the "sensitivity" of the buttons 4.1.3 “Surface” compass. On the compass screen, in addition to the current direction (COURSE), there are basic information about diving: DEPTH and DIVE TIME. -
Page 31: Device Screens When Working Underwater
4.2 Device screens when working underwater. 4.2.1 Main underwater screen. Battery charge icon Current battery charge level, given by percentage. Colour coding: >=60%, <60%, <30%. Temperature Current air / water temperature, indicated in oC, measured by pressure sensor Current time The main part of the screen contains information about the just completed dive (before turning off the device) or the initial value (zero) - before diving. -
Page 32: Stopwatch Choice Screen
MOMENT OF TIMER ON – information about the currently used stopwatch: depth and dive time recorded at the moment of starting the stopwatch 4.2.2 Stopwatch choice screen. The screen contains basic information about a dive, stopwatches status, and information about when the currently used stopwatch got switched on. -
Page 33: Underwater Configuration Screen
The first start of any stopwatch will begin counting the decompression time, visible after the end of the dive, in the DECO TIME section of the main screen. 4.2.3 Underwater configuration screen. Screen for setting basic device settings. underwater mode, option COMPUTER MODE is not available. -
Page 34: Underwater" Compass
calculated as the average pressure value before the start of the dive. The SEA value assumes a constant surface pressure of 1013 mbar. During the active SEA option, depth indications may differ from other devices due to the assumed surface pressure of 1013mBar, which may differ from the actual atmospheric pressure. -
Page 35: Menu Layout
4.3 Menu layout. Surface work Underwater work... -
Page 36: Recreational Mode With Open Circuit - Oc Rec
5 Recreational mode with open circuit - OC REC. 5.1 Device screens when working on the surface. 5.1.1 Main surface screen. Górna część ekranu (pasek informacyjny) jest wspólna dla wszystkich trybów pracy i zawiera informacje opisane poniżej. Battery charge icon Current battery charge level, given by percentage. -
Page 37: Surface Configuration Screen
SOFT – the firmware version installed on the device – name of currently used gas mix. When settings in the gas table are not configured, the gas name is replaced by: When the minimum operating depth "MIN" (calculated for PPO2 = 0.18Bar) is exceeded, the gas name is displayed in red. -
Page 38: Device Information - Unit Setup
5.1.2.1 Device information - UNIT SETUP. The screen provides information about the hardware and firmware and the user's name (user name). Hardware information is useful when contacting the service and for a personalized firmware version. USER NAME – user name of the device RESET TO DEFAULTS –... -
Page 39: Gas Mix Table Configuration - Gas Setup
5.1.2.2 Gas mix table configuration – GAS SETUP. In OC REC mode, the device supports 4 gas mixes, not containing helium gas. configuration screen provides information on their setup and allows you to configure the gas mixes as needed. Below will find necessary... -
Page 40: Dive Parameters Configuration - Dive Setup
The gas list is saved when you exit the current screen (button Switching the device off while in edit mode will discard the current settings. Sample gas mix table view after entering the parameters: After each edit of the gas mix table, the dive computer will automatically switch to the option , requiring the current gas to be re-set. -
Page 41: Dive Planner - Ntx Dive Plan
ALTITUDE – selection of surface pressure values: SURFACE / SEA. The SURFACE value assumes the limit pressure, considered to be the surface value, calculated as the average pressure value before the start of the dive. The SEA value assumes a constant surface pressure of 1013 mbar. During the active SEA option, depth indications may differ from other devices due to the assumed surface pressure of 1013mBar, which may differ from the actual atmospheric pressure. - Page 42 Last stop – depth of the last decompression stop Low GF – value of the "low" gradient factor (at maximum depth) High GF – value of the "high" gradient factor (near the surface). The gradient factor values for the intermediate depths are calculated on an ongoing basis by the controller –...
-
Page 43: Logbook
In this case, change the dive information (depth and time), or change the gas mix settings (gas configuration table) to appropriate for this particular dive. 5.1.2.5 Logbook. The controller is equipped with memory to record the last 500 dives. The user has the ability to view logs, view detailed information about dives, view dive charts and delete selected logs. - Page 44 To view details of the dive, select the log and confirm with the CONFIRM button. The information about omitted decompression stop is also indicated in detailed dive log, with red message Lost deco shown in the log’s header. The detail screen contains the following information: Dive Time –...
- Page 45 Dive graphs: Depth graph Oxygen partial pressure graph Temperature graph Summary graph...
-
Page 46: System Settings - System Setup
5.1.2.6 System settings – SYSTEM SETUP. Go to changing the device mode Go to compass calibration Go to firmware upgrade UNITS – choice of units: IMPERIAL or METRIC BRIGHTNESS – screen brightness: LOW / MEDIUM / HIGH / AUTO. Selecting AUTO mode controls the brightness of the screen, depends on the outside lighting –... -
Page 47: Surface" Compass
5.1.3 “Surface” compass. On the compass screen, in addition to the current direction (COURSE), there are basic information about diving: DEPTH and DIVE TIME. In surface mode these values are "0". The compass allows you to "lock" the desired course (so-called LOCK) by pressing the SELECT button. -
Page 48: Dive Computer Screens When Working Underwater
5.2 Dive computer screens when working underwater. 5.2.1 Main underwater screen. After crossing the maximum dive depth for the currently used gas mix, the MOD parameter value is shown in red colour. Battery charge icon Current battery charge level, given by percentage. Colour coding: >=60%, <60%, <30%. - Page 49 minimum operating depth "MIN" (calculated for PPO2 = 0.18Bar) is exceeded, the gas name is displayed in red. – maximum depth of a dive with selected gas, calculated for 1.6Bar Oxygen partial pressure, in meters [m] or ft [ft]. When settings in the gas mix table are not configured, the gas name is replaced by: –...
-
Page 50: Switching Between Gas Mixes - Gas Switch
Safety Stop After crossing a maximum depth of 10m during a dive, then during the ascent the device informs you that a safety stop is required at a depth of 5m (16ft). The safety stop lasts 5 minutes and the remaining time is displayed in minutes (5 minutes to 1 minute) or seconds (less than 1 minute) - SAFETY STOP section. -
Page 51: Change The Gradient Factor Values
– maximum depth of dive on a given gas, calculated for a partial pressure of 1.6Bar, given in meters [m] or feet [ft] – minimum depth of dive on a given gas mix, calculated for a partial pressure of 0.18 Bar Gas mix marked with red colour is a mix that is... -
Page 52: Underwater Configuration Screen
5.2.2 Underwater configuration screen. In underwater mode, the configuration screen differs in the information bar (at the top of the screen): – current depth, given in meters [m] or feet [ft] Time – current dive time, given in minutes Options MODE, COMPASS CALIBRATION and FIRMWARE UPGRADE are unavailable. -
Page 53: Gas Mix Table Configuration - Underwater Mode
5.2.3 Gas mix table configuration - underwater mode. In underwater mode, the configuration screen differs in the information bar (at the top of the screen): – current depth, given in meters [m] or feet [ft]. Time – current dive time, given in minutes. In OC REC mode, the device supports 4 gas mixes, without helium content. - Page 54 mixes can be selected by the user while diving and planning a dive (by Dive Planner). Repeat steps 2) for all gases. The gas list is saved when you exit the current screen (button Switching the device off while in edit mode will discard the current settings. Sample gas mix table view after entering the parameters: After each edit of the gas mix table, the dive computer will automatically switch to the...
-
Page 55: Underwater" Compass
5.2.4 „Underwater” compass. On the compass screen, in addition to the current direction (COURSE), there are basic information about diving: DEPTH and DIVE TIME. In surface mode these values are "0". The compass allows you to "lock" the desired course (so-called LOCK) by pressing the SELECT button. -
Page 56: Menu Layout
5.3 Menu layout Surface work Underwater work... -
Page 57: Technical Mode With Open Circuit - Oc Tech
6 Technical mode with open circuit – OC TECH. 6.1 Device screens when working on the surface. 6.1.1 Main surface screen. The upper part of the screen (information bar) is common to all operating modes and contains the information described below. Battery charge icon Current battery charge level, given by percentage. -
Page 58: Surface Configuration Screen
SOFT – the firmware version installed on the device – name of currently used gas mix. When settings in the gas table are not configured, the gas name is replaced by: . When the minimum operating depth "MIN" (calculated for PPO2 = 0.18Bar) is exceeded, the gas name is displayed in red. -
Page 59: Device Information - Unit Setup
6.1.2.1 Device information - UNIT SETUP. The screen provides information about the hardware and firmware and the user's name (user name). Hardware information is useful when contacting the service and for a personalized firmware version. USER NAME – user name of the device RESET TO DEFAULTS –... -
Page 60: Gas Mix Table Configuration - Gas Setup
6.1.2.2 Gas mix table configuration – GAS SETUP. In OC TECH mode, the device supports 7 Trimix gas mixes. configuration screen provides information on their setup and allows you to configure the gas mixes as needed. Below you will find the necessary configuration information. -
Page 61: Dive Parameters Configuration - Dive Setup
After setting the required helium content, the device will go to ACTIVE option. 5) Mark the edited gas mix as active or inactive . Only active gas mixes can be selected by the user while diving and planning a dive (by Dive Planner). - Page 62 NTX DIVE PLAN – going to the dive planner SALINITY – selection of dives in saltwater (SALT) or fresh water (FRESH). This option affects the depth calculation by taking into account the various density of saltwater and fresh water LAST STOP –...
-
Page 63: Dive Planner - Ntx Dive Plan
6.1.2.4 Dive Planner – NTX DIVE PLAN. Planner is a module that calculates decompression stops, based on a decompression algorithm, using data from the gas mix table. Before using the planner, it is necessary to correctly configure the gas table as it is used by the algorithm to select the optimum gas mix at the given depth, at the particular moment of the decompression process. - Page 64 After setting the dive parameters, start the planner by selecting the option and confirming with the CONFIRM button. After a few seconds, the main frame will display information about the decompression stops and the current ascent time and used gas mix, and the planner screen will look similar to the illustration: Stop –...
-
Page 65: Logbook
6.1.2.5 Logbook. The controller is equipped with memory to record the last 500 dives. The user has the ability to view logs, view detailed information about dives, view dive charts and delete selected logs. Omitting a decompression stop is marked in the dive log. - Page 66 To view details of the dive, select the log and confirm with the CONFIRM button. The information about omitted decompression stop is also indicated in detailed dive log, with red message Lost deco shown in the log’s header. The detail screen contains the following information: Dive Time –...
- Page 67 Dive graphs: Depth graph Oxygen partial pressure graph Summary graph Temperature graph...
-
Page 68: System Settings - System Setup
6.1.2.6 System settings – SYSTEM SETUP. Go to changing the device mode. Go to compass calibration. Go to firmware upgrade. UNITS – choice of units: IMPERIAL or METRIC BRIGHTNESS – screen brightness: LOW / MEDIUM / HIGH / AUTO. Selecting AUTO mode controls the brightness of the screen, depends on the outside lighting –... -
Page 69: Surface" Compass
6.1.3 “Surface” compass.. On the compass screen, in addition to the current direction (COURSE), there are basic information about diving: DEPTH and DIVE TIME. In surface mode these values are "0". The compass allows you to "lock" the desired course (so-called LOCK) by pressing the SELECT button. -
Page 70: Dive Computer Screens When Working Underwater
6.2 Dive computer screens when working underwater. 6.2.1 Main underwater screen. After crossing the maximum dive depth for the currently used gas mix, the MOD parameter value is shown in red colour. Battery charge icon Current battery charge level, given by percentage. Colour coding: >=60%, <60%, <30%. - Page 71 minimum operating depth "MIN" (calculated for PPO2 = 0.18Bar) is exceeded, the gas name is displayed in red. – maximum depth of a dive with selected gas, calculated for 1.6Bar Oxygen partial pressure, in meters [m] or ft [ft]. When settings in the gas mix table are not configured, the gas name is replaced by: –...
-
Page 72: Switching Between Gas Mixes - Gas Switch
6.2.1.1 Switching between gas mixes – GAS SWITCH. In addition to the basic information about the dive: depth and time, a scrollable list of available gas mixes is displayed (Active option in the gas mix table set to "act"). The list also includes information about the currently used gas mix (GAS CHANGE FROM). -
Page 73: Change The Gradient Factor Values
6.2.1.2 Change the Gradient Factor values During the dive, the Gradient Factor values can be changed on the main screen. To do this, press the SELECT and CONFIRM buttons simultaneously. The default values on the GF change screen were set to: 99/99. In order to confirm them, simply select the "SET GF. -
Page 74: Gas Mix Table Configuration - Underwater Mode
UW MODE – underwater mode detection: SENSOR / PERMANENT. Selecting the SENSOR option detects the underwater / surface mode using the depth sensor. Selecting PERMANENT option keeps the device underwater permanently. This feature is applied when the depth sensor is damaged (so it does not go into surface mode and stops the dive) and when testing on the surface features of the unit specific for underwater mode TTS MODE... - Page 75 first gas on the list - OC GAS1). 2) Select gas mix for editing: GAS1 ... GAS4 (using the SELECT button) and confirm with the CONFIRM button. The first digit (hundreds) of oxygen percentage content in the gas mix is highlighted. 3) Set the desired oxygen content: Use the CONFIRM button to set the value of the selected digit, Use the SELECT button to move to the next digit.
-
Page 76: Underwater" Compass
SELECTED – name of the currently selected gas mix – maximum depth of a dive with selected gas, calculated for 1.6Bar Oxygen partial pressure, in meters [m] or ft [ft] 6.2.4 “Underwater” compass.. On the compass screen, in addition to the current direction (COURSE), there are basic information about diving: DEPTH and DIVE TIME. -
Page 77: Menu Layout
6.3 Menu layout. Surface work Underwater work... -
Page 78: Closed Circuit And Fixed Ppo2 (Setpoint) Work Mode - Ccr Fixed Sp
7 Closed circuit and fixed PPO2 (setpoint) work mode - CCR FIXED SP. 7.1 Device screens when working on the surface. 7.1.1 Main surface screen. The upper part of the screen (information bar) is common to all operating modes and contains the information described below: Battery charge icon Current battery charge level, given by percentage. -
Page 79: Setpoint Configuration Screen
– GAS section – information about currently used gas mix: when in closed circuit mode, when in open circuit mode . name of currently used gas mix. When settings in the gas table are not configured, the gas name is replaced by: SETPOINT –... -
Page 80: Surface Configuration Screen
In order to change the value of one of the setpoints, select the appropriate field with the SELECT button and then press the CONFIRM button 3 times - the device will start editing the selected value. The next press of the CONFIRM button cycles from 0.5 to 1.5 cycles, with step of 0.1: End editing by pressing the SELECT button. -
Page 81: Gas Mix Table Configuration - Gas Setup
USER NAME – user name of the device RESET TO DEFAULTS – restoring factory settings of the device PIEZO TIME – minimum pressing time of PIEZO button on the device: from 10ms to 150ms. Setting a higher value reduces the "sensitivity" of the buttons RUN TIME –... - Page 82 Before entering the settings for the first time and after changing the operating mode, the gas table is reset (set to "0") and the gas names are "plotted". Before using the dive computer, make sure that the used gas mixes are entered correctly. To do this: 1) Mark the option (using the SELECT button) and confirm with...
-
Page 83: Dive Parameters Configuration - Dive Setup
Sample gas table view after entering parameters: To change currently used gas mix, select the option with the SELECT button and confirm with the CONFIRM button. The GAS SWITCH screen will be displayed. Please proceed as described in: 7.2.1.1 Switching between gas mixes – GAS SWITCH. -
Page 84: Dive Planner - Tmx Dive Plan
devices due to the assumed surface pressure of 1013mBar, which may differ from the actual atmospheric pressure. GF. HI/LO – percentage values of Gradient Factors (distance from the "M" limit value) END OF DIVE – time (in minutes) from the ascent, after which the device stops the dive mode and goes to surface mode: 0 - 10 minutes The screen also provides information (not editable) of the currently selected gas mix: MOD OF DIVE... - Page 85 Last stop – depth of the last decompression stop Low GF – value of the "low" gradient factor (at maximum depth) High GF – value of the "high" gradient factor (near the surface). The gradient factor values for the intermediate depths are calculated on an ongoing basis by the controller –...
-
Page 86: Logbook
– information about the gas selected by the planner algorithm, which should be switched to at the given stop. In case of closed circuit, for each gas stop the diluent is used, and the Gas column contains the "DIL" information If there are a lot of decompression stops required and they do not fit in the table, only part of them is displayed. - Page 87 The course of diving is recorded after a depth of 1m is reached and a dive time of 5 seconds. The maximum registration time for one dive is 8 hours. The main screen contains information on the numbers and dates of recent dives. To read details of a particular dive, select the appropriate entry from the list and then confirm the selection (confirm button).
- Page 88 - delete log - display the dive charts To delete a log, select , then select YES: and press CONFIRM. Dive graphs: Depth graph Oxygen partial pressure graph Temperature graph Summary graph...
-
Page 89: System Settings - System Setup
7.1.3.6 System settings – SYSTEM SETUP. Go to changing the device mode. Go to compass calibration. Go to firmware upgrade. UNITS – choice of units: IMPERIAL or METRIC BRIGHTNESS – screen brightness: LOW / MEDIUM / HIGH / AUTO. Selecting AUTO mode controls the brightness of the screen, depends on the outside lighting –... -
Page 90: Surface" Compass
7.1.4 “Surface” compass. On the compass screen, in addition to the current direction (COURSE), there are basic information about diving: DEPTH and DIVE TIME. In surface mode these values are "0". The compass allows you to "lock" the desired course (so-called LOCK) by pressing the SELECT button. -
Page 91: Dive Computer Screens When Working Underwater
7.2 Dive computer screens when working underwater. 7.2.1 Main underwater screen. main screen layout, when working underwater, is similar to the surface mode. The only difference is the replacement of surface interval information with information about possible alarms (the field marked in red) that occurred during the dive. - Page 92 Decompression section: – time (in minutes) that you can stay on the selected gas mix at the current depth without the need for a decompression procedure. It is counted from 99 to 0. In the case of decompression dives, this section is replaced with the current decompression stop.
-
Page 93: Switching Between Gas Mixes - Gas Switch
7.2.1.1 Switching between gas mixes – GAS SWITCH. When in the underwater main screen, it is possible to quickly switch to another gas without having to go to the gas configuration table. To do this, press the SELECT button (this function works only on the underwater main screen). -
Page 94: Change The Gradient Factor Values
As an example, Tmx30/20 gas mix was chosen, which is listed as OC gas: Upon returning to the main underwater screen, the section on information about used gas mix shows the name of "new" gas and about the work in open circuit mode: 7.2.1.2 Change the Gradient Factor values During the dive, the Gradient Factor values can be changed on the main screen. -
Page 95: Underwater Configuration Screen
The three fields at the bottom of the screen contain setpoint values: When the depth is less than 1m or the dive computer is in surface mode, you can only select a setpoint of value less than or equal to 1.0. To select another setpoint, select the appropriate field using the SELECT button: then confirm with the CONFIRM button. -
Page 96: Gas Mix Table Configuration - Underwater Mode
UNITS – choice of units: IMPERIAL or METRIC BRIGHTNESS – screen brightness: LOW / MEDIUM / HIGH / AUTO. Selecting AUTO mode controls the brightness of the screen, depends on the outside lighting – the stronger the light, the higher the screen brightness DATE –... - Page 97 CONFIRM. The unit will go to editing the gas mix table (first diluent is highlighted in the list - DIL1). 2) Select the gas to edit: DIL1 ... GAS7 (using the SELECT button) and confirm with the CONFIRM button. The first digit (hundreds) of oxygen percentage content in the mix is highlighted.
-
Page 98: Underwater" Compass
7.2.5 “Underwater” compass. On the compass screen, in addition to the current direction (COURSE), there are basic information about diving: DEPTH and DIVE TIME. In surface mode these values are "0". The compass allows you to "lock" the desired course (so-called LOCK) by pressing the SELECT button. -
Page 99: Menu Layout
7.3 Menu layout. Surface work Underwater work... -
Page 100: Pure Bühlmann Mode
8 Pure Bühlmann mode 8.1 Device screens when working on the surface. 8.1.1 Main surface screen. The upper part of the screen (information bar) is common to all operating modes and contains the information described below. Battery charge icon Current battery charge level, given by percentage. Colour coding: >=60%, <60%, <30%. -
Page 101: Surface Configuration Screen
– name of currently used gas mix. When settings in the gas table are not configured, the gas name is replaced by: . When the minimum operating depth "MIN" (calculated for PPO2 = 0.18Bar) is exceeded, the gas name is displayed in red PPO2 –... -
Page 102: Device Information - Unit Setup
8.1.2.1 Device information - UNIT SETUP. The screen provides information about the hardware and firmware and the user's name (user name). Hardware information is useful when contacting the service and for a personalized firmware version. USER NAME – user name of the device RESET TO DEFAULTS –... -
Page 103: Gas Mix Table Configuration - Gas Setup
8.1.2.2 Gas mix table configuration – GAS SETUP. In Pure Bühlmann mode, the device supports 7 Trimix gas mixes. configuration screen provides information on their setup and allows you to configure the gas mixes as needed. Below you will find the necessary configuration information. -
Page 104: Dive Parameters Configuration - Dive Setup
Planner). Repeat steps 2) for all gases. The gas list is saved when you exit the current screen (button Switching the device off while in edit mode will discard the current settings. Sample gas mix table view after entering the parameters: After each edit of the gas mix table, the dive computer will automatically switch to the option , requiring the current gas to be re-set. - Page 105 NTX DIVE PLAN – going to the dive planner ppO2 SETUP – ???. SALINITY – selection of dives in saltwater (SALT) or fresh water (FRESH). This option affects the depth calculation by taking into account the various density of saltwater and fresh water LAST STOP –...
-
Page 106: Dive Planner - Ntx Dive Plan
8.1.2.4 Dive Planner – NTX DIVE PLAN. Planner is a module that calculates decompression stops, based on a decompression algorithm, using data from the gas mix table. Before using the planner, it is necessary to correctly configure the gas table as it is used by the algorithm to select the optimum gas mix at the given depth, at the particular moment of the decompression process. - Page 107 After setting the dive parameters, start the planner by selecting the option and confirming with the CONFIRM button. After a few seconds, the main frame will display information about the decompression stops and the current ascent time and used gas mix, and the planner screen will look similar to the illustration: Stop –...
-
Page 108: Ppo2 Setup
8.1.2.5 ??? – PPO2 SETUP. SHOW VALUE – ???. MIN PPO2 – a???. MAXPPO2 – ???. 8.1.2.6 Logbook. The controller is equipped with memory to record the last 500 dives. The user has the ability to view logs, view detailed information about dives, view dive charts and delete selected logs. - Page 109 The main screen contains information on the numbers and dates of recent dives. To read details of a particular dive, select the appropriate entry from the list and then confirm the selection (confirm button). Use the navigation buttons to select the desired log Scrolling the list every 30 logs (every 3 screens) Scrolling the list every 10 logs (every 1 screen) Go to the list and scroll through every log...
- Page 110 To delete a log, select , then select YES: and press CONFIRM. Wykresy nurkowania: Dive graphs: Depth graph Oxygen partial pressure graph Temperature graph Summary graph...
-
Page 111: System Settings - System Setup
8.1.2.7 System settings – SYSTEM SETUP. Go to changing the device mode. Go to compass calibration. Go to firmware upgrade. UNITS – choice of units: IMPERIAL or METRIC BRIGHTNESS – screen brightness: LOW / MEDIUM / HIGH / AUTO. Selecting AUTO mode controls the brightness of the screen, depends on the outside lighting –... -
Page 112: Surface" Compass
8.1.3 Surface” compass.. On the compass screen, in addition to the current direction (COURSE), there are basic information about diving: DEPTH and DIVE TIME. In surface mode these values are "0". The compass allows you to "lock" the desired course (so-called LOCK) by pressing the SELECT button. -
Page 113: Dive Computer Screens When Working Underwater
8.2 Dive computer screens when working underwater. 8.2.1 Main underwater screen. DEPTH – current depth, given in meters [m] or feet [ft] TIME – dive time, given in format minutes: seconds – name of currently used gas mix. When settings in the gas mix table are not configured, the gas name is replaced by: . -
Page 114: Gas Mix Table Configuration - Underwater Mode
UNITS – choice of units: IMPERIAL or METRIC BRIGHTNESS – screen brightness: CAVE / LOW / MEDIUM / HIGH / AUTO. Selecting AUTO mode controls the brightness of the screen, depends on the outside lighting – the stronger the light, the higher the screen brightness DATE –... - Page 115 GAS SETUP – change of gas table parameters. Before entering the settings for the first time and after changing the operating mode, the gas table is reset (set to "0") and the gas names are "plotted". Before using the dive computer, make sure that the used gas mixes are entered correctly. To do this:: 4) Mark the option (using the SELECT button) and confirm with...
-
Page 116: Underwater" Compass
After each edit of the gas mix table, the dive computer will automatically switch to the option , requiring the current gas to be re-set. Use the CONFIRM button to select the right mix of gases marked active (cyclically switched). The current selection is presented at section: SELECTED –... -
Page 117: Technical Aspects
9 Technical aspects 9.1 Pressure sensor The depth measurement is carried out using a pressure sensor with a measuring range of 0 ... 30 Bar. This sensor is calibrated by the manufacturer to reduce nonlinearity and maximize precision. The accuracy of the measurement process is determined by the accuracy of the sensor. -
Page 118: Device Operating Time
The last of the above conditions allows the user to manually force the device to work in underwater mode when the depth sensor is found to be working improperly. This prevents the device from going into Surface mode and automatically turning off after 15 minutes of inactivity. - Page 119 After each battery replacement, check the current date and time settings. After replacing the battery (after removing it from the device for more than 2 seconds), the dive computer automatically switches on and displays the information screen with the current date and time.
-
Page 120: Technical Parameters
APNEA Ext Gauge OC REC Operating modes OC TECH CCR Fixed SP Pure Bühlmann Decompression model Bühlmann ZHL-16C GF 65k colours 2,4’’ QVGA TFT with LED Display backlit Pressure sensor Piezo-resistive Work range 0Bar to 30Bar Measurement accuracy at 0°C to + 40°C,... -
Page 121: Decompression Calculation
Decompression calculation The function calculating the decompression process uses the Buhlman method, taking into account the safety factor of gradient factors (ZHL16 + GF). When the device is turned on, the decompressed data is loaded (from the non-volatile memory). In case of damage or lack of decompression data, they are replaced by default values - total saturation of tissues up to 1 bar in the air atmosphere. -
Page 122: Firmware Update
11 Firmware update It is recommended that you change the firmware to a newer version only. Operation of the device is controlled by the so called firmware. This firmware, provided by the device manufacturer, can be updated to a newer version directly by the user. A selected block of the device’s code, the so-called bootloader, is responsible for the update process (replacing the current version with the newer version). - Page 123 After each startup, the device checks the installed software (CRC checksum) to ensure fault-free operation. In the event of a software error (non-compliant CRC checksum), it is deleted to prevent loading the damaged firmware and the device goes into UPGRADE mode.
- Page 124 After clicking, you will be prompted enter device password. Type "1234". The device information will be displayed in the application window: Device name – name of the device Firmware version – the firmware version currently installed on your device Device ID –...
- Page 125 File name – name of uploaded file Device name – name of the device for which the firmware is intended Software version – firmware version loaded from the file Target device ID – ID / serial number of the device for which the firmware file is loaded.
- Page 126 4) Click button. The update process will start and its progress will appear in the progress bar: a. Deleting the current version of the firmware b. Saving the new firmware version The process is terminated by the message "Upgrade finished" in the Status field: If an error occurs while updating the firmware, the entire process must be repeated from the beginning.
-
Page 127: Cumulative Update - Bootloader And Main Firmware
11.1 Cumulative update – bootloader and main firmware 1. Load new battery with a large amount of energy into the divecomputer.eu device. 2. Turn on the dive computer in the “upgrade software” mode. 3. Run the RDT application downloaded from our website on a PC. 4.
Need help?
Do you have a question about the ZHL-16C GF and is the answer not in the manual?
Questions and answers