Table of Contents
Advertisement
Available languages
Available languages
Quick Links
Advertisement
Chapters
Table of Contents

Related Manuals for Salora CDC3300FD

Summary of Contents for Salora CDC3300FD
- Page 1 HD VIDEO CAMCORDER CDC3300FD Gebruikershandleiding...
-
Page 3: Table Of Contents
Inhoud Product kenmerken................................2 Overzicht van het product..............................2 Functie toetsen................................3 Status indicator................................3 Bediening en instructies..............................4 Voorbereiding.................................4 Aan- Uitzetten.................................4 Batterij opladen................................4 Plaatsen van de geheugenkaart............................4 Basis bediening................................4 Opname modus................................5 Druk op M om het menu te openen..........................6 Foto modus ..................................7 Druk op de M toets om het Foto menu te openen......................8 Afspeel Modus................................9 Afspeel menu................................10 Systeem instellinen...............................10... -
Page 4: Product Kenmerken
Product kenmerken Dit apparaat is een multifunctioneel high-tech product, waarbij HDV fotografie, nachtzicht, opname en een externe TF kaartlezer zijn geïntegreerd. Door middel van de High Performance Video Coding Technologie, compressieverhouding en HDMI, kan het niet-gecomprimeerde data en data met multikanaal geluid zenden. Dit apparaat wordt voornamelijk gebruikt om bewijs te leveren bij auto ongelukken. -
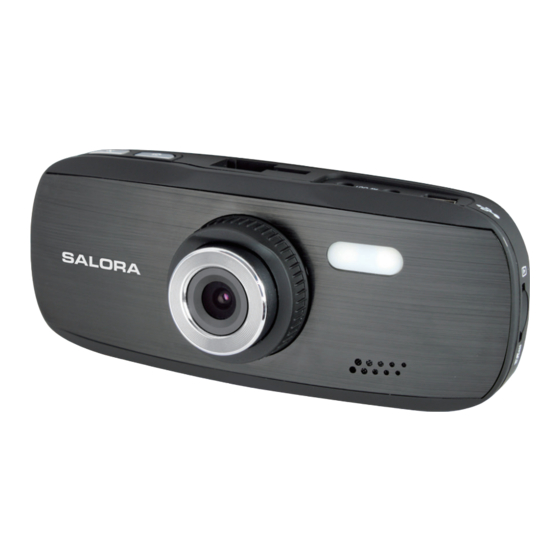
Page 5: Functie Toetsen
Mini USB Interface AV-OUT Interface GPS Interface Aan/Uit indicator Modus MENU Aan/Uit Camera 10. TF kaartlezer 11. Omlaag 12. Omhoog 13. LCD scherm 14. HDMI aansluiting 15. Reset 16. Sleuf voor bevestiging 17. Luidspreker Functie toetsen Naam Functie Aan/Uit Druk kort op deze toets om het apparaat aan te zetten, druk wat langer om het apparaat daarna weer uit te zetten Bevestigen van uw selectie MENU... -
Page 6: Bediening En Instructies
Bediening en instructies Voorbereiding Aan- Uitzetten Druk één keer op de Aan/Uit toets om het apparaat aan te zetten, druk nogmaals wat langer om het apparaat weer uit zetten. N.B.: indien de recorder nog weinig vermogen heeft zal deze automatisch adviseren om het apparaat uit te zetten. -
Page 7: Opname Modus
Foto modus: voor het maken van foto’s Afspeel modus: om de video of foto te bekijken Nadat u het apparaat heeft opgestart, zal deze automatisch openen in de opname modus. Opname modus 00:15:30 Opname modus Opname tijd Lusopname 1080FHD Resolutie Belichtingscompensatie Geheugenkaart toegang... -
Page 8: Druk Op M Om Het Menu Te Openen
Druk op M om het menu te openen Resolutie: Er zijn zes opties: 1080HFD 1920x1080/1080P 1440x1080/720P 1280x720/WVGA 848x480/VGA 640x480/QVGA 320x240 Lusopname: U kunt de lusopname instellen voor 2 minuten, 3 minuten of 5 minuten per segment. U kunt de optie ook uitschakelen. WDR: Breed Dynamisch Bereik, voor een betere beeldkwaliteit. -
Page 9: Foto Modus
Foto modus Druk op de Modus toets om over te schakelen naar de Foto modus, druk daarna op REC om te opname te starten. anti-tril functie 00346 Foto modus Bestandsnaam Belichtingscompensatie foto formaat witbalans kwaliteit afbeelding Geheugenkaart lichtgevoeligheid toegang AUTO lichtgevoeligheid... -
Page 10: Druk Op De M Toets Om Het Foto Menu Te Openen
Druk op de M toets om het Foto menu te openen. Foto opname: Single foto. 1 seconde, 5 seconden, 10 seconden Resolutie: 12M 4032 x 3024, 10M 3648 x 2736, 8M 3264 x 2448, 5M 2592, 1944, 3M 2048 x 1536, 2M HD 1920 x 1080, VGA 640 x 480, 1.3M 1280 x 960 (optioneel). -
Page 11: Afspeel Modus
Afspeel Modus Druk op de modus toets om over te schakelen naar de Afspeel modus. Door op de omlaag of omhoog toetsen te drukken kunt u het gezocht bestand selecteren. Druk op OK om het bestand af te spelen, druk nogmaals op OK om het afspelen te stoppen. -
Page 12: Afspeel Menu
Afspeel menu Druk op de M toets om het Afspeel menu te openen. Delete: verwijder alle of de huidige video of foto’s. Protect: vergrendel de huidige status, ontgrendel de huidige status, alles vergrendelen of alles ontgrendelen. Dia projectie: u kunt een foto tonen na elke 2 seconden, 5 seconden of 8 seconden. Systeem instellingen In het Instellingen menu van de Opname modus, Foto modus of Afspeel modus, kunt u d.m.v. -
Page 13: Externe Aansluitingen
Externe aansluitingen Mini USB Interface TV modus De car recorder kan automatisch overschakelen naar TV door middel van een AV interface, die is verbonden met de TV in de video- en audio uitgang. De weergave van het TV systeem kan worden ingesteld op NTSC/ PAL in het Instellingen menu. -
Page 14: Product Specificaties
Product Specificaties Chipset Nt96650 Platform DV Turnkey DDR3 1GB Anti-trilfunctie Ondersteund Digitale Zoom 1080HFD 1920x1080/1080P 1440x1080/720P 1280x720/WVGA 848x480/VGA 640x480/ Video Resolutie QVGA 320x240 Foto:JPG Bestandsformaat Video:MOV Witbalans Automatisch Kleureffect Standaard/zwart-wit/retro Naadloos opname Ondersteund Opslag bestand na Ondersteund uitschakeling Bewegingsdetectie Ondersteund Datum&Tijd Ondersteund Media ondersteuning... - Page 16 Index Caractéristiques Produit...............................15 Diagramme...................................15 Introduction fonctions..............................15 Opération et instructions..............................17 Préparation...................................17 On/Off...................................17 Chargement de batterie..............................17 Insertion carte mémoire...............................17 Opérations de base..............................17 Mode enregistrement..............................18 Mode photo...................................20 Mode lecture.................................22 Réglage système................................23 Interface périphérique ..............................24 Mini USB interface...............................24 HDMI interface................................24 Spécifications Produit..............................25...
- Page 17 Caractérisques produit Cet appareil est un produit multifonctionnel à haute définition, avec HDV Photographie, vision de nuit, enregistrement et un lecteur carte TF externe, intégrée. Au moyen de la Technologie Codage Vidéo à haute performance et de taux de compression des données et HDMI, l’appareil peut transférer les données des vidéos HD pas compressés et le son multi canal.
- Page 18 Interface mini USB Interface AV sortie Interface GPS Indicateur Power MODE POWER Caméra 10. Lecteur Carte TF 11. Bas 12. Haut 13. LCD 14. HDMI 15. Réinitialiser 16. Fente de montage 17. Haut-parleur Fonctions touches Fonction POWER Appuyez brièvement pour mettre en marche, appuyez depuis longtemps pour arrêter après le démarrage.
- Page 19 Opérations et instructions Préparation On/Off : Appuyez sur le bouton Power pour mettre en marche, appuyez un autre fois plus longtemps pour arrêter. Notes : Pendant le situation d’une batterie faible, l’appareil s’éteindra automatiquement. Quand on connecte le chargeur de batterie, l’appareil se met en marche automatiquement et commence l’enregistrement. Après déconnexion du chargeur, si l’appareil ha puissance suffisante, il sauvegardera les fichiers vidéo automatiquement et puis s’éteindra.
- Page 20 Nadat u het apparaat heeft opgestart, zal deze automatisch openen in de opname modus. Après démarrage, le mode par défaut est enregistrement. Mode Enregistrement Mode Temps Enregistrement 00:15:30 d’enregistrement Enregistrement 1080FHD Résolution en boucle Compensation d’exposition fente carte mémoire 2014/01/06 00:04:01 Mettre en marche/Arrêter...
- Page 21 Appuyez sur le bouton M pour entrer le menu Réglages Résolution : Il y a six options de résolutions : 1080HFD 1920x1080/1080P 1440x1080/720P 1280x720/WVGA 848x480/VGA 640x480/QVGA 320x240. Enregistrement en boucle : Les intervalles d’enregistrement en boucle sont : 2 min./3min./5 min.
- Page 22 Mode Photo Appuyez sur le bouton Mode pour sélectionner le Mode Photo, puis appuyez sur le bouton REC pur commencer l’enregistrement. Fonction Anti-Tremblement 00346 Mode Photo Nom de Fichier Compensation de Format d’Image lumière Balance des Qualité d’Image Blancs Fente Carte Sensibilité...
- Page 23 Appuyez sur le bouton M pour entrer le menu réglages en Mode Photo : Prise d’une Photo: Une seule Photo. Une série de photos à des intervalles de 1 se conde, 5 secondes, 10 secondes. Résolution: 12M 4032 x 3024, 10M 3648 x 2736, 8M 3264 x 2448, 5M 2592, 1944, 3M 2048 x 1536, 2M HD 1920 x 1080, VGA 640 x 480, 1.3M 1280 x 960 (optionnel).
- Page 24 Mode Lecture Appuyez sur le bouton MODE pour entrer le mode Lecture. En appuyant les boutons Bas et Haut vous pouvez sélectionner le fichier de votre choix. Appuyez sur le bouton OK pour lire le fichier, appuyez une autre fois pour arrêter la lecture.
- Page 25 Menu mode Lecture Appuyez sur la touché M pour entrer le menu Lecture en mode Lecture. Effacer : Effacer le fichier actuel ou tous les vidéos ou photos. Sauvegarder : Verrouillage ou déverrouillage de l’état actuel, verrouillage ou déverrouillage tous (optionnel). Diaporama : Les diapositives seront présentées chaque 2s, 5s ou 8s.
- Page 26 Interface Périphérique Interface mini USB Mode TV L’appareil bascule automatiquement en mode TV quand il est connecté avec un interface AV à un TV, Vidéo ou voiture caméra enregistreur et sortie audio. La sortie TV système peut être réglé en NTSC/PAL en mode réglage menu système.
- Page 27 Spécifications de Produit Chipset Nt96650 Platform DV Turnkey DDR3 1GB Anti-tremblement compatible Zoom Digitale 1080HFD 1920x1080/1080P 1440x1080/720P 1280x720/WVGA 848x480/VGA 640x480/ Résolution Vidéo QVGA 320x240 Photo:JPG Format de fichier Vidéo:MOV Balance des blancs Automatique Effets de couleurs Standard/noir-blanc/retro Enregistrement continu Compatible Récuperation après Compatible éteindre...
- Page 29 Table of contents Presentation of the device............................28 Diagram..................................28 Introduction to functions..............................29 Operation and instructions............................30 Preparation..................................30 On/Off...................................30 Battery charging................................30 Installation Memory Card............................30 Basic operation................................30 Record Mode................................30 Photo Mode..................................33 Playback Mode................................36 System Setting................................36 Peripheral Interface..............................37 Mini USB Interface...............................37 HDMI Interface................................37 Specifications Product..............................38...
-
Page 30: Presentation Of The Device
Presentation of the device This product is multi-functional a High-tech Product, which is provided with HD Photography, night vision, record mode and an external TF card reader. With the high performance video coding it delivers a high ratio compression and HDMI. It can transmit the uncompressed HD video and multi-channel data. This product in general is mainly used to serve as evidence in case of a car accident. -
Page 31: Introduction To Functions
Mini USB Interface AV-OUT Interface GPS Interface Power LED MODE MENU POWER CAMERA 10. TF Card Reader 11. Down 12. Up 13. LCD 14. HDMI 15. Reset 16. Rack Mounting Slot 17. Speaker Key functions Name Function Power Afters start-up, press shortly to power on, press longer to power off. To confirm your selection MENU To enter the menu... -
Page 32: Operation And Instructions
Operation and InstructionsVoorbereiding Preparation On/Off Press Power key once shortly to power on, to power off press longer. Notes: in a low power state the car recorder will automatically power off. After connecting the car charger, the car recorder will automatically power on and start recording. When you disconnect the car charger and there will be enough power, the device will automatically save the record file and power off. - Page 33 After Start-up, the default system is in Record Mode. 00:15:30 Record mode Record Time Loop recording 1080FHD Resolution Card slot 2014/01/06 00:04:01 Power Date Time...
- Page 34 Press the M key to enter the menu setting Resolution: six resolutions are optional: 1080HFD 1920x1080/1080P 1440x1080/720P 1280x720/ W VGA 848x480/ VGA 640x480/ QVGA 320x240 Loop recording: The device can record cycles of 2min/3min/5min or you can unable the loop recording function. WDR: Wide Dynamic Range, to provide clear images.
-
Page 35: Photo Mode
Photo mode Press the MODE to switch to the Photo mode, then press REC for shooting a picture. Anti-shake 00346 Photo Mode File name Picture size Image quality Card slot AUTO Battery power... - Page 36 Press the M key to enter the Photo setting in the Photo Mode: Capture Mode: single shot, 2seconds/5seconds/10seconds timing. Resolution: 12M 4032 x 3024, 10M 3648 x 2736, 8M 3264 x 2448, 5M 2592, 1944, 3M 2048 x 1536, 2M HD 1920 x 1080, VGA 640 x 480, 1.3M 1280 x 960 (optional).
- Page 37 Playback mode Press the MODE key to switch to the Playback mode. Press the UP or DOWN key to browse through the video and photo files. Press OK to play the selected file, press again on the OK key to pause the playback. During Playback you can go fast-forward or rewind by pressing the UP or DOWN key.
-
Page 38: Playback Mode
Palyback mode Menu Press the M key to enter the Playback mode menu in Playback mode Delete: Delete the current or all video and photo files. Protect: Lock the current file or unlock the current file, lock or unlock all files (optional). -
Page 39: Peripheral Interface
Peripheral Interface Mini USB Interface TV mode The car will automatically switch to TV via the AV interface when the device is connected to TV, and it will output video and audio from the car recorder. The output TV system can be set to NTSC/PAL through the system settings. -
Page 40: Specifications Product
Product specifications Chipset Nt96650 Platform DV Turnkey DDR3 1GB Anti-handshake Supported technology Digital magnification 1080HFD 1920x1080/1080P 1440x1080/720P 1280x720/WVGA 848x480/VGA Video resolution 640x480/QVGA 320x240 Photo: JPG File format Video: MOV White balance Auto Colour effect Standard/Black&White/Sepia Seamless Video Supported Power-off file recovery Supported Motion detection Supported...