Advertisement
Available languages
Available languages
Quick Links
Dual Link Cardbus:
Upgrade to Firewire or USB 2.0
User's Guide: First Edition
If you have any problems or questions on this product, please call :
Technical Support
North America Support Hours:
M-F : 8 am - 5 pm, PST
Email : support@adstech.com
website : www.adstech.com
European Technical Support: +353.61.702042
Multilingual Manual
562.926.4338
Advertisement
Chapters

Subscribe to Our Youtube Channel
Summary of Contents for ADS Technologies DLX-181
-
Page 1: Technical Support
Dual Link Cardbus: Upgrade to Firewire or USB 2.0 User’s Guide: First Edition If you have any problems or questions on this product, please call : Technical Support North America Support Hours: M-F : 8 am - 5 pm, PST Email : support@adstech.com website : www.adstech.com European Technical Support: +353.61.702042... -
Page 3: Table Of Contents
Ta ble of Co ntent A letter from the President of ADS ...4 Introduction ...5 System Requirements ...5 DLX-181 ...6 Installation Guide ...6 Step 1 Driver Installation ... 7 Step 2 Hardware Installation ...8 Dual-Link Cardbus card Hardware install Step 3 Connecting Devices ...9 Step 4 Install VideoStudio 7 SE ...10... -
Page 4: A Letter From The President Of Ads
More over they are winners with our customers. I wish to thank you for choosing ADS Technologies and I hope you enjoy your new multimedia experience. Sincerely,... -
Page 5: Introduction
I nt ro duct ion Add 2 FireWire Ports and 2 USB 2.0 Ports to your Notebook! Use the Dual-Link Cardbus card and Video Studio 7 SE (inlcuded) to transfer video from your digital camcorder to your PC, edit the video, add titles, effects, background music and more. -
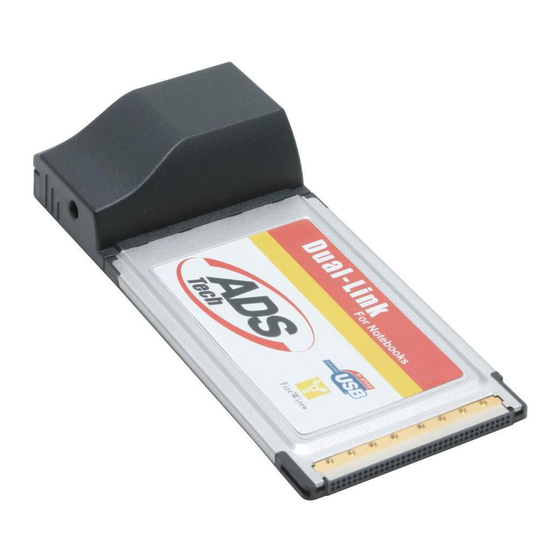
Page 6: Package Contents
Ins ta l la ti o n G u i de Package Contents 1. Dual-Link Cardbus Card 2. CD with Drivers and Video Studio 7 SE 3. Power Adapter 4. User’s Manual Note: If you did not receive one or more of the contents listed above inside the Dual-Link Cardbus package, please contact the vendor you purchased it from or contact ADS directly. - Page 7 D rive r In s t a lla t i on A. Install Drivers B. Install VideoStudio 7 SE for Video Editing Dual-Link 7...
- Page 8 Ha rdw a re I n st a lla t ion Step 1 Locate your Notebook’s open Cardbus port and place the card into the slot as you see in Fig. A. Fig. A Step 2 Push the card all the way into the slot until it is secure.
-
Page 9: Connecting Devices
Con ne ct in g D e v ic es FireWire Once you have installed the camcorder drivers you are ready to connect your camcorder to the Dual-Link Cardbus. Follow these steps to ensure that the operating system recognizes your camcorder and you are familiar with the camcorder driver your system is using. -
Page 10: Step 4 Install Videostudio 7 Se
INSTALL Vide o S t u dio 7 SE 1. Connect your camcorder. Turn on to VTR/VCR PLAY Mode. note: Your Camcorder must be connected and “On” 2. INSTALL Video Studio from Dual-Link CD. Follow the installation instructions. 3. Re-Boot when the Installation is complete. 4. - Page 11 Ta ble of Co ntent Einleitung ...12 Systemanforderungen ...12 DLX-181 ...13 Installationsanleitung ... 13 Schritt 1 Treiber Installation ...14 Schritt 2 Hardware Installation ...15 Schritt 3 Anschluss der Komponenten ...16 Schritt 4 VideoStudio 7 SE Installation ...17 Dual-Link 11...
-
Page 12: Einleitung
EI NLEI T U NG Fügen Sie 2 FireWire Anschlüsse und 2 USB 2.0 Anschlüsse an Ihren Notebook hinzu. Benutzen Sie die Dual Link Cardbus Karte und Video Studio 7 SE ( enthalten) zur Videoübertragung von Ihrem digitalen Camcorder zu Ihrem PC, berarbeiten Sie das Video, fügen Sie Titel hinzu, Effekte, Background Musik und vieles mehr. -
Page 13: Installationsanleitung
INSTAL L ATI ONSA NL EIT U NG Packungsinhalt: 1. Dual Link Cardbus Karte 2. CD mit Treiber und Video Studio 7 SE 3. Power Adapter 4. Bedienungsanleitung Anmerkung: Falls Sie eines oder mehr des Inhaltes nicht bekommen haben, bitte wenden Sie sich and den Verkäufer oder direct an ADS. Was Sie zur Installation des Dual-Link Cardbus benötigen: •... - Page 14 Tr eibe r Ins t a lla t i on A. Installieren Sie die Treiber B. Installieren Sie VideoStudio 7 SE für die Videobearbeitung Dual-Link 14...
-
Page 15: Hardware Installation
Hardware Installation Abbildung Abbildung Dual-Link 15 Schritt 1 Finden Sie den Cardbus Steckplatz an Ihrem Notebook und schieben Sie die Karte in den Steckplatz wie in Abbildung A angegeben. Schritt 2 Schieben Sie die Karte in den Steckplatz ein bis sie festsitzt. (siehe Abbildung B) -
Page 16: A Nschlus S De R K Om P O Nent En
A nschlus s de r K om p o nent en FireWire Sobald Sie die Camcorder Treiber installiert haben, sind Sie bereit, Ihr Camcorder an den Dual-Link Cardbus anzuschließen. Folgen Sie diesen Schritten, um sicherzugehen, daß das Betriebssystem Ihr Cam- corder erkennt und Sie mit dem Camcorder Treiber vertraut sind, den Ihr System benutzt. - Page 17 VideoS tu dio 7 S E I ns ta l l a t i on 1. Schliessen Sie Ihren Camcorder an. Schalten Sie auf VTR/VCR Play Modus ein. Bemerkung: Ihr Camcorder muss angeschlossen und eingeschaltet sein. 2. Installieren Sie VideoStudio von der Dual-Link CD. Folgen Sie den Installations-anweisungen.
- Page 18 Ta ble of Co ntent Introduction ...19 Nécessite ...19 DLX-181 ...20 Guide d’installation ... 20 étape 1 Installation des pilotes ...21 étape 2 Installation du matériel ...22 étape 3 Branchement des dispositifs ...23 étape 4 Installez VideoStudio 7 SE ...24...
-
Page 19: Introduction
I nt ro duct ion Ajoutez 2 ports FireWire et 2 ports USB 2.0 à votre portable. Utilisez la carte Dual-Link Cardbus et VideoStudio 7 SE (inclus) pour transférer la vidéo de votre caméscope numérique à votre PC pour éditer la vidéo, pour ajouter des titres, effets, musique de fond et puis pour envoyer votre vidéo éditée de nouveau à... -
Page 20: Guide D'installation
Gu ide d’i ns t al la t i on Contenu: 1. Carte Dual-Link Cardbus 2. CD contenant des pilotes et VideoStudio 7 SE 3. Power Adapter 4. Guide d’utilisateur Note : Si vous n’avez pas reçu un ou plusieurs des contenus énumérés ci-dessus à... - Page 21 Instal la t io n des p il ot es A. Installez les pilotes B. Installez VideoStudio 7 SE pour éditez la vidéo Dual-Link 21...
-
Page 22: Installation Du Matériel
Ins ta ll at io n du m a t ér i el image A image B Dual-Link 22 étape 1 Localisez le port Cardbus disponible de votre portable et placez la carte dans la fente comme vous voyez sur l’image A. étape 2 Poussez la carte complètement dans la fente jusqu’à... -
Page 23: Dispositifs Usb
Bra nch e m e nt de s dis p osi t i f s FireWire Une fois que vous avez installé les conducteurs de caméscope vous êtes prêt à relier votre caméscope au Dual-Link Cardbus. Suivez ces étapes pour assurer que le logiciel d’exploitation identifie votre caméscope et vous êtes familier avec le conducteur de caméscope que votre système emploie. - Page 24 Insta lle z V id e o St ud i o 7 SE 1. Branchez votre caméscope. Allumez sur mode VTR/VCR PLAY. Note :Votre caméscope doit être branchez et allumez « ON ». 2. Installez VideoStudio de votre CD Dual-Link. Suivez les instructions d’installation.
- Page 25 Ta ble of Co ntent Introducción ...26 Requisitos ...26 DLX-181 ...27 Guía de Instalación ...27 1º. Paso Instalación del Driver ...28 2º. Paso Instalación del Hardware ...29 3º. Paso Conectando los Dispositivos ...30 4º. Paso INSTALACIÓN de VideoStudio 7 SE ...31...
- Page 26 In tr o duc c ión ! Agregue 2 puertos del FireWire y 2 puertos del USB 2.0 a su portátil! Utilice la tarjeta Dual-Link Cardbus y Video Studio 7 SE (incluido) para transferir el video de su videocámara digital para su PC, edite el video, agregue títulos, efectos especiales, música del fondo y más.
-
Page 27: Guía De Instalación
Guía d e I ns t al a ci ón Contenidos de Paquete 1. Dual-Link Cardbus Card 2. CD con Drivers y VideoStudio 7 SE 3. Fuente de Alimentación 4. Manual del Usuario Nota: Si usted no recibió uno o más de los contenidos enumerados ar- riba en el paquete de Dual-Link CardBus, entre en contacto con vend- edor con que compró... - Page 28 Ins ta la c ió n del D ri ver A. Instalar el Driver B. Instalar VideoStudio 7 SE para Edición de Video Dual-Link 28...
- Page 29 Instal ac ió n del H a rdwa r e 1º. Paso Localice en su Portátil la puerta Cardbus disponible y enchufe la tarjeta en la puerta como mostró la figura A. Fig. A 2º. Paso Empuje la tarjeta firmemente en la ranura como mostró...
-
Page 30: Dispositivos Usb
Conecta n do l o s D is p os i t i vos FireWire Una vez que haya instalado los drivers de la videocámara digital usted esta listo para conectar la videocámara a tarjeta Dual-Link Cardbus. Siga estos pasos para asegurarse de que el sistema operativo reconoce su videocámara y para que usted es familiar con el driver de su videocámara digital. - Page 31 INSTAL ACI Ó N d e Vid eo St u di o 7 SE 1. Conecte su videocámara digital. Ligue en modo VTR/VCR. nota: Su Videocámara debe estar conectado con Dual-Link Cardbus. 2. INSTALE el programa VideoStudio 7 SE del CD Dual-Link Cardbus. Siga las instrucciones de instalación.
- Page 32 Return/Replacement: If you need to return your ADS Technologies product you should return the product directly to the dealer or store where you purchased the product. Each individual computer store or dealer sets product returns policies for their customers. ADS Technologies, Inc.
- Page 33 ADS Technologies, Inc. product or inability to use the product, even if the dealer or ADS Technologies, Inc. has been advised of such liability or other claims. This includes damage to property and, to the extent permitted by law, damages for per- sonal injury.
- Page 34 * Connect the equipment into an outlet on a circuit different from that to which the receiver is connected. * Consult the dealer or an experienced radio TV technician for help. Notice: (1) The changes or modifications not expressly approved by the party responsible for compliance could void the user’s authority to operate the equipment.
- Page 36 Technical Support 562.926.4338 North America Support Hours: M-F : 8 am - 5 pm, PST Email : support@adstech.com website : www.adstech.com European Technical Support: +353.61.702042 ADS Technologies North America Office 12627 Hidden Creek Way Cerritos, CA, 90703 Phone: 562.926.1928 Technical Support: 562.926.4338 Technical Support Hours: M-F 8am-5pm PST Fax: 562.926.0518...
Need help?
Do you have a question about the DLX-181 and is the answer not in the manual?
Questions and answers