
Summary of Contents for Camfil FB Series
- Page 1 Camfil FB-Series Fluid Seal Bag-in/Bag-out Filter Housing Installation, Operation and Maintenance Manual Installation, Operation Camfil & Maintenance Manual FB Housing 3401i-0404 Camfil —clean air solutions...
- Page 2 Camfil describes the “twist and tape” method and banding method of sealing the bag in the manual, but any method approved by your safety personnel is acceptable, including, but not limited to, thermal sealing of the bag.
-
Page 3: Table Of Contents
Table Of Contents Page No. Introduction to Bag-In/Bag-Out Housings………...……..…….4 Installation of Filtration Housing…………………………..…….6 Installation of New Filter(s) or Adsorber(s) Prior to New System Startup……………………………..………6 Filter Change-Out (Replacing Contaminated Filter(s) or Adsorber(s)…………..10 Filter Change-Out Overview……………………………………..13 Maintenance …………………...…………………………………..14 Locking Mechanism Adjustment..…………………….………..17 Spare Parts and Accessories……………………………..……..18... -
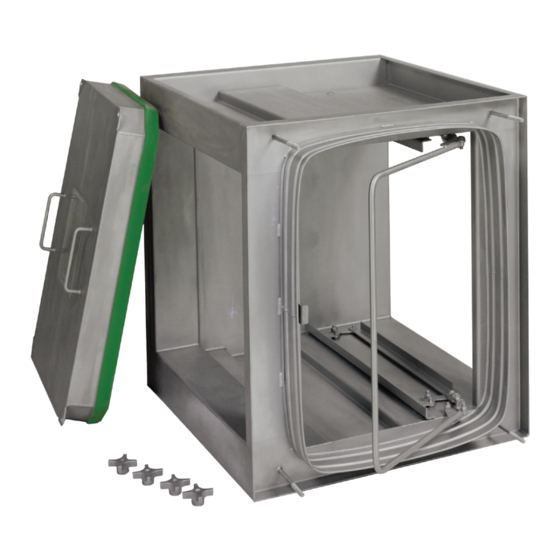
Page 4: Introduction To Bag-In/Bag-Out Housings
Introduction To Bag-In/Bag-Out Housings Camfil’s line of Bag-In/Bag-Out housings are “containment” design, side loading filter housing used for critical applications. These filter housings have been designed to meet the air filtration needs of industries and research facilities that handle dangerous or toxic, biological, radiological or carcinogenic materials. To minimize exposure to these harmful contaminates, while replacing and handling contaminated filters, the housing incorporates a heavy duty plastic bag covered access port. - Page 5 -Place Testing of filters or adsorbers. These test sections have proven to perform as good or better than the conventional method of in-place testing. Camfil has designed and qualified four (4) types of test sections (upstream, combination, downstream and accurate scan) for any need. The upstream test section housing design allows you to disperse a challenge agent uniformly across the filter/adsorber face so that the complete filter/adsorber is challenged.
-
Page 6: Installation Of Filtration Housing
1. Check for correct model number, quantity, type, and size of media. 2. Unpack the filter/adsorber in accordance with Camfil’s recommended instructions. Rest filter on floor and cut open taped seam with utility blade (set blade to 1/8” max.). Open box and bag(s) protecting filter/adsorber. - Page 7 5. To gain access to the inside of the filtration housing, remove the housing access doorknobs by turning counter-clockwise (for housings equipped with swivel latches: do not remove doorknobs; loosen and swivel door bolt out from door corner retainer). Pull the access door straight towards you to remove. 6.
- Page 8 8. Once the filter(s)/adsorber(s) is loaded inside the housing, slowly close the locking mechanism handle by pushing the locking mechanism handle towards the locking handle latch (see illustrations and pictures on this page and pictures on next page). This allows the fluid seal channel on the filter/ adsorber to seal with the knife-edge sealing surface.
- Page 9 Locking handle should close fairly easily, until approximately 1” before the locking handle latch. Then moderate pressure should be ap- plied to lock handle. Warning: Do not force the locking handle to close. See page 17 if locking handle needs adjustment.
-
Page 10: Filter Change-Out
FILTER CHANGE-OUT (Replacing Contaminated Filters Or Adsorbers) Bag-In/Bag-Out Concept Consult your safety officer before beginning filter change-out, to assure all proper procedures are followed for your application. Note: Filtration housings that contain more than one filter/adsorber are equipped with filter removal rods. Filtration housings containing multiple prefilters also are equipped with removal rods. - Page 11 A Camfil change-out shelf can assist in making the change-out easier (as shown in picture, see Spare Parts...
- Page 12 7. Place a new change-out bag over a new filter/ adsorber to be installed (see Installation of New Filter for proper unpackaging and preparations). Make sure the new filter/ adsorber is orientated so that when placing inside of the filtration housing the filter clips will be on the top and bottom of the filter (see pictures, page 7).
-
Page 13: Filter Change-Out Overview
To order from CAMFIL FARR MODEL NO.: PREFILTER MODEL NO.: FINAL FILTER MODEL NO.: CHANGE−OUT BAG SIZE: Camfil see Spare Parts and CAUTION: STOP AIRFLOW THROUGH HOUSING BY SHUTTING DOWN THE SYSTEM OR CLOSING UPSTREAM AND DOWNSTREAM ISOLATION DAMPERS BEFORE REMOVING DOOR. CONSULT... -
Page 14: Maintenance
The in-place leak test shows an unacceptable penetration of challenge agent. 2. Filtration System The filtration system is the containment structure built by Camfil. This structure may be a single housing, or a complete filter train (consisting of multiple, adjoining housings), depending on the scope of the contract. - Page 15 If the gasket on the access door becomes damaged, it can be replaced with new gasket by the user. You may purchase replacement gasket from Camfil (see Spare Parts and Accessories, page 18). The following steps should be taken to replace a door gasket: 1.
- Page 16 No. 1 and No. 2 (next page) before replacing locking mechanism. 1. Consult your company’s safety personnel before replacing any part which has been in service. Camfil is not responsible for any personnel or procedures which include accessing a filtration housing that has been put into service.
-
Page 17: Locking Mechanism Adjustment
5. Install replacement locking mechanisms and secure with 3/8” locknuts which were removed from replaced locking mechanism. Note: Before replacing new locking mechanism, be sure the nylon washers are around studs. Tighten 3/8” locknuts securing locking trays to housing, then loosen the locknuts 1/4 turn (This step is critical to allow free movement of the locking tray). -
Page 18: Spare Parts And Accessories
Spare Parts and Accessories When placing an order for replacement parts, please provide Camfil with the original job order number and housing model number. This information can be found on the access door label, like the one pictured below. Camfil Job Number →... - Page 19 Notes _______________________________________________________________ _______________________________________________________________ _______________________________________________________________ _______________________________________________________________ _______________________________________________________________ _______________________________________________________________ _______________________________________________________________ _______________________________________________________________ _______________________________________________________________ _______________________________________________________________ _______________________________________________________________ _______________________________________________________________ _______________________________________________________________ _______________________________________________________________ _______________________________________________________________ _______________________________________________________________ _______________________________________________________________ _______________________________________________________________ _______________________________________________________________ _______________________________________________________________ _______________________________________________________________ _______________________________________________________________ _______________________________________________________________ _______________________________________________________________ _______________________________________________________________ _______________________________________________________________...
- Page 20 Belgium • France • Germany • Ireland • Malaysia • Sweden • Switzerland • United Kingdom Camfil, Inc. United States Tel: (973) 616-7300 Fax: (973) 616-7771 Camfil has a policy of continuous research, development and Canada Tel: (450) 629-3030 Fax: (450) 662-6035 product improvement. We reserve the right to change designs and specifications without notice.
Need help?
Do you have a question about the FB Series and is the answer not in the manual?
Questions and answers