Table of Contents
Advertisement
Available languages
Available languages
Quick Links
Advertisement
Chapters
Table of Contents

Related Manuals for AAT KaDe KDH-KZ6000FR-IP

Summary of Contents for AAT KaDe KDH-KZ6000FR-IP
- Page 1 U s e r ’ s m a n u a l ( s h o r t f o r m ) KDH-KZ6000FR-IP...
- Page 2 DIRECTIVE 2011/65/EU OF THE EUROPEAN PARLIAMENT AND OF THE COUNCIL of 8 June 2011 on the restriction of the use of certain hazardous substances in electrical and electronic equipment (OJ L 174, 1.7.2011, p. 88–110, with changes) All rights reserved © AAT SYSTEMY BEZPIECZEŃSTWA Sp. z o.o.
- Page 3 Due to the product being constantly enhanced and optimized, certain parameters and functions described in the manual in question may change without further notice. We strongly suggest visiting the www.aat.pl/en website in order to access the newest manual. All rights reserved © AAT SYSTEMY BEZPIECZEŃSTWA Sp. z o.o.
-
Page 4: Table Of Contents
5.1. Software factory settings restoring via web browser ......... 28 5.2. Software factory settings restoring via NMS IPTool ......... 28 5.3. Hardware factory settings restoring ..............29 6. MICRO SD CARD INSTALLATION ................. 29 All rights reserved © AAT SYSTEMY BEZPIECZEŃSTWA Sp. z o.o. -
Page 5: Foreword Information
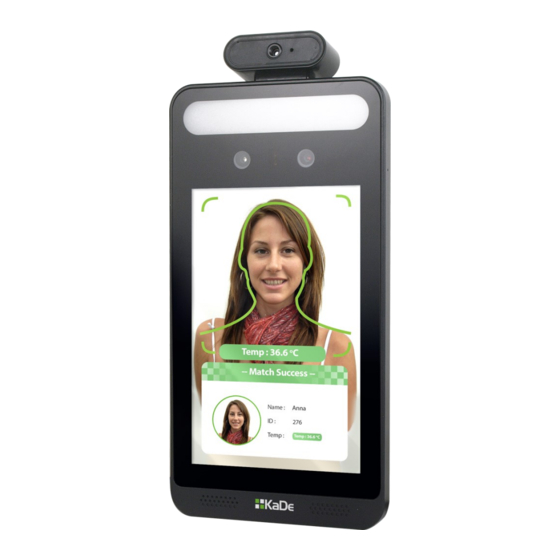
Measuring accuracy up to +/- 0,3°C • Alarm Outputs • Data storage on microSD card • 8-inch LCD touch screen • Two-way audio • Wall mounting bracket included • 12VDC Power Supply All rights reserved © AAT SYSTEMY BEZPIECZEŃSTWA Sp. z o.o. -
Page 6: Technical Specification
Power Management Screen Sleep, Screen Protection Power Consumption Weight 1.2kg Installation Wall mounting (bracket included) Protection Surge Protection Operating Temperature 0⁰C~40⁰C, <95% humidity (non-condensing) Dimensions (mm) 302 x 138.5 x 34 All rights reserved © AAT SYSTEMY BEZPIECZEŃSTWA Sp. z o.o. -
Page 7: Dimensions (Mm) And Physical Components
CAUTION! It is forbidden to connect devices called “passive PoE power supply”. Damages caused by the usage of improper power supply source are not covered by the warranty. All rights reserved © AAT SYSTEMY BEZPIECZEŃSTWA Sp. z o.o. -
Page 8: Start-Up And Initial Terminal Configuration
In order to provide protection against voltage surges/lightning strikes, usage of appropriate surge protectors is advised. Any damages resulting from surges are not eligible for service repairs. Schema of 12 VDC power supply connector 12VDC(+) GND(-) All rights reserved © AAT SYSTEMY BEZPIECZEŃSTWA Sp. z o.o. -
Page 9: Terminal Mounting Requirements
Make sure that the terminal can capture faces easily - that is, people are free to approach it, there • are adequate lighting and no light is reflected in the lens. CAUTION! Please note that the wall must have enough strength to carry the terminal with holder. All rights reserved © AAT SYSTEMY BEZPIECZEŃSTWA Sp. z o.o. -
Page 10: Selection Of The Terminal Mounting Location
Room temperature - too low temperature in the room causes the surface temperature of the • human body to drop. Too high a room temperature causes the human body to sweat, which affects the accuracy of temperature monitoring. All rights reserved © AAT SYSTEMY BEZPIECZEŃSTWA Sp. z o.o. -
Page 11: Terminal Mounting
Connect the terminal wires and cover them with a wires cover (if possible), passing the wires through the dedicated wires entry(3). • Place the terminal on the holder and screw it(4). Screws Wires cover Wires entry All rights reserved © AAT SYSTEMY BEZPIECZEŃSTWA Sp. z o.o. -
Page 12: Recommendations For Temperature Measurement
0.3m Recommended measure range 0.4m 0.4m Wysokość pomiaru Strefa pomiaru Odległość pomiaru Measurement distance Measurement height Measurement zone Zasłonięte czoło Zasłonięte czoło Covering the forehead Covering the forehead Wrong height All rights reserved © AAT SYSTEMY BEZPIECZEŃSTWA Sp. z o.o. -
Page 13: Starting The Terminal
Network transmis- Network transmission • Connection directly to computer Terminal Computer Network transmission Information: Power supply adapter is not included. Please use power adapter with parameters specified in user ‘s manual. All rights reserved © AAT SYSTEMY BEZPIECZEŃSTWA Sp. z o.o. -
Page 14: Initial Configuration Via Touch Screen
To enter the terminal menu, touch the Menu icon, and then in the login window, enter the login, password and touch the OK button. The default login is admin and the password is 123456. All rights reserved © AAT SYSTEMY BEZPIECZEŃSTWA Sp. z o.o. - Page 15 ( e.g. for IP 192.168.1.250, appropriate address for the terminal ranges from 192.168.1.2 to 192.168.1.249, for example 192.168.1.60). It is not allowed to set the same addresses for terminal and PC computer All rights reserved © AAT SYSTEMY BEZPIECZEŃSTWA Sp. z o.o.
-
Page 16: Initial Configuration Via Web Browser
You have to remember to use a new terminal IP address after changing network parameters. After network setting configuration has been done, the terminal can be connected to a target network. All rights reserved © AAT SYSTEMY BEZPIECZEŃSTWA Sp. z o.o. -
Page 17: Security Recommendations For Network Architecture And Configuration
Internet connection. The only device in the system, accessible from Internet will be recorder - there will be no physically access directly to any terminal. All rights reserved © AAT SYSTEMY BEZPIECZEŃSTWA Sp. z o.o. -
Page 18: Network Connection Using Web Browser
In order to log into the camera without changing the password, press the OK button. The message will be displayed each time you log in, until you change your password, or select the Do not show again option. All rights reserved © AAT SYSTEMY BEZPIECZEŃSTWA Sp. z o.o. - Page 19 If the installation fails, changing security settings for the IE browser is required. In order to do that, please select Enable for Initialize and script ActiveX controls not marked as safe and Download unsigned ActiveX controls option All rights reserved © AAT SYSTEMY BEZPIECZEŃSTWA Sp. z o.o.
-
Page 20: Www Interface - Working With Terminal
6. Function buttons - these buttons allow you to enable / disable some of functions Stop live view Snapshot Zoom In/Zoom Out (digital) Start recording Start two-way audio Start audio Start Face Detection preview function All rights reserved © AAT SYSTEMY BEZPIECZEŃSTWA Sp. z o.o. -
Page 21: Face Configuration
(e.g. . to NVR) and activation of alarm outputs. The area menu allows you to draw an area and a minimum and maximum size for face detection. All rights reserved © AAT SYSTEMY BEZPIECZEŃSTWA Sp. z o.o. -
Page 22: Face Database Management
After selecting the photo, select the List Type, Gender and fill the necessary information about the user. The ID number is the card number of the user. After filling in the fields, click the Entry button. All rights reserved © AAT SYSTEMY BEZPIECZEŃSTWA Sp. z o.o. - Page 23 Start button. The faces can be Modified and Deleted. Modifying information about a person works in the same way as the manual adding function (the person's data is filled in automatically). All rights reserved © AAT SYSTEMY BEZPIECZEŃSTWA Sp. z o.o.
-
Page 24: Access Control Configuration
The terminal is equipped with a tamper button and a function that allows you to trigger a tamper alarm reaction. In the following menu it is possible to Enable the tamper alarm function, set the Alarm holding Time and the reactions triggered by this alarm. All rights reserved © AAT SYSTEMY BEZPIECZEŃSTWA Sp. z o.o. -
Page 25: Door Lock
Input, and in order to send information (e.g. to a controller), the alarm triggering mode should be set as Output. Additionally, select the bit value for the Wiegand Mode from the list. All rights reserved © AAT SYSTEMY BEZPIECZEŃSTWA Sp. z o.o. -
Page 26: Image Configuration
The terminal has the function of Automatically Adjusting the Exposure and Automatics in order to get the most visible face. The parameters are changed after the face is detected. The level of the function is adjustable from 0 to 100. All rights reserved © AAT SYSTEMY BEZPIECZEŃSTWA Sp. z o.o. -
Page 27: Alarm Configuration
The terminal has a mask detection function. Select the alarm duration from the list and enable the desired alarm responses. The mask missing alarm can also trigger a voice prompt. All rights reserved © AAT SYSTEMY BEZPIECZEŃSTWA Sp. z o.o. -
Page 28: Factory Settings Restoring
NMS IPTool (version 3.4 or later) allows to restore terminal factory settings. To restore settings find terminal in NMS IPTool and press “Restore factory settings” button. In 30 seconds it is required to turn the terminal power off and on. All rights reserved © AAT SYSTEMY BEZPIECZEŃSTWA Sp. z o.o. -
Page 29: Hardware Factory Settings Restoring
The result of the data stored on the memory card can be checked in the Data Record menu. There are recognized faces with the measured temperature. Faces with temperatures can be exported to a * .CSV file. All rights reserved © AAT SYSTEMY BEZPIECZEŃSTWA Sp. z o.o. - Page 30 AAT SYSTEMY BEZPIECZEŃSTWA Sp. z o.o. 431 Pulawska St., 02-801 Warsaw, Poland tel.: +4822 546 07 00, fax: +4822 546 07 59 www.aat.pl/en 2020-10-14 MO, MK...
- Page 31 I n s t r u k c j a o b s ł u g i ( s k r ó c o n a ) KDH-KZ6000FR-IP...
- Page 32 8 czerwca 2011 r. w sprawie ograniczenia stosowania niektórych niebezpiecznych substancji w sprzęcie elektrycznym i elektronicznym (Dz.U. L 174 z 1.7.2011, str. 88—110, z późniejszymi zmianami) - zwana Dyrektywa RoHS Wszelkie prawa zastrzeżone © AAT SYSTEMY BEZPIECZEŃSTWA Sp. z o.o.
- Page 33 Ponieważ produkt jest stale ulepszany i optymalizowany niektóre parametry i funkcje opisane w załączonej instrukcji mogły ulec zmianie. Prosimy o zapoznanie się z najnowszą instrukcją obsługi znajdującą się na stronie www.aat.pl Instrukcja obsługi znajdującą się na stronie www.aat.pl jest zawsze najbardziej aktualną wersją.
-
Page 34: Spis Treści
5.1. Programowe przywracanie ustawień fabrycznych z poziomu przeglądarki ..28 5.2. Programowe przywracanie ustawień fabrycznych z poziomu programu NMS IPTool ......................28 5.3. Sprzętowe przywracanie ustawień fabrycznych ..........29 6. INSTALACJA KARTY MICRO SD ................29 Wszelkie prawa zastrzeżone © AAT SYSTEMY BEZPIECZEŃSTWA Sp. z o.o. -
Page 35: Informacje Wstępne
Dokładność pomiaru +/- 0,3°C • Wyjścia alarmowe • Zapis danych na karcie microSD • 8-calowy, dotykowy ekran LCD • Dwukierunkowa komunikacja audio • Uchwyt ścienny w zestawie • Zasilanie 12 VDC Wszelkie prawa zastrzeżone © AAT SYSTEMY BEZPIECZEŃSTWA Sp. z o.o. -
Page 36: Dane Techniczne
Instalacja uchwyt do montażu na bramce (opcja), uchwyt do montażu na blacie Stopień zabezpieczenia ochrona przepięciowa Warunki pracy 0⁰C~40⁰C, <95% wilgotności (bez kondensacji) Wymiary (mm) 302 x 138.5 x 34 Wszelkie prawa zastrzeżone © AAT SYSTEMY BEZPIECZEŃSTWA Sp. z o.o. -
Page 37: Wymiary (Mm) I Elementy Fizyczne
UWAGA: Zabronione jest podłączanie urządzeń potocznie nazywanych „pasywne zasilacze PoE”. Uszkodzenia wynikłe ze stosowania nieodpowiednich źródeł zasilana nie podlegają gwarancji. Wszelkie prawa zastrzeżone © AAT SYSTEMY BEZPIECZEŃSTWA Sp. z o.o. -
Page 38: Uruchamianie I Wstępna Konfiguracja Terminala
UWAGA: W celu ochrony terminala przed uszkodzeniem zalecane jest zastosowanie zabezpieczeń przepięciowych. Awarie powstałe w wyniku przepięć nie podlegają naprawie gwarancyjnej. Schemat podłączenia zasilania 12 VDC 12 VDC GND(-) Wszelkie prawa zastrzeżone © AAT SYSTEMY BEZPIECZEŃSTWA Sp. z o.o. -
Page 39: Wymagania Dotyczące Montażu Terminala
Upewnij się, że terminal może łatwo uchwycić twarze - tzn. osoby mogą swobodnie do niego • podejść, są odpowiednio oświetlone oraz światło nie odbija się w obiektywie. UWAGA! Należy zwrócić szczególną uwagę, aby powierzchnia do której mocowany jest uchwyt z terminalem miała odpowiednią nośność. Wszelkie prawa zastrzeżone © AAT SYSTEMY BEZPIECZEŃSTWA Sp. z o.o. -
Page 40: Dobór Miejsca Montażu Terminala
Temperatura pomieszczenia - zbyt niska temperatura w pomieszczeniu sprawi, że temperatura • powierzchni ciała ludzkiego spadnie. Zbyt wysoka temperatura w pomieszczeniu sprawi, że organizm ludzki zacznie się pocić, co wpływa na dokładność monitorowania temperatury. Wszelkie prawa zastrzeżone © AAT SYSTEMY BEZPIECZEŃSTWA Sp. z o.o. -
Page 41: Montaż Terminala
Podłączyć przewody do terminala i zasłonić je zaślepką (jeśli to możliwe) przepuszczając przewody dedykowanym wejściem (3). • Nałożyć terminal na uchwyt i wkręcić śruby mocujące (4). Śruby mocujące Zaślepka Wejście na przewody Wszelkie prawa zastrzeżone © AAT SYSTEMY BEZPIECZEŃSTWA Sp. z o.o. -
Page 42: Zalecenia Dotyczące Pomiaru Temperatury
KDH-KZ6000FR-IP - Skrócona instrukcja obsługi wer. 1.0 URUCHAMIANIE I WSTĘPNA KONFIGURACJA TERMINALA 2.6. Zalecenia dotyczące pomiaru temperatury: Linia obiektywów 0.3m 0.4m Wysokość pomiaru Strefa pomiaru Odległość pomiaru Zasłonięte czoło Zasłonięte czoło Zła wysokość pomiaru Wszelkie prawa zastrzeżone © AAT SYSTEMY BEZPIECZEŃSTWA Sp. z o.o. -
Page 43: Uruchomienie Terminala
Transmisja danych • Połączenie wykorzystujące kabel ethernetowy skrosowany Terminal Komputer Transmisja danych - kabel ethernetowy Informacja: Zasilacz zewnętrzny nie wchodzi w skład zestawu., należy się w niego zaopatrzyć we własnym zakresie. Wszelkie prawa zastrzeżone © AAT SYSTEMY BEZPIECZEŃSTWA Sp. z o.o. -
Page 44: Konfiguracja Terminala Przy Użyciu Ekranu Dotykowego
W celu wejścia do menu terminala należy dotknąć ikony Menu, a następnie w oknie logowania podać login, hasło i dotknąć przycisku OK. Domyślny login to admin, a hasło to 123456. Wszelkie prawa zastrzeżone © AAT SYSTEMY BEZPIECZEŃSTWA Sp. z o.o. - Page 45 (dla adresu IP terminala 192.168.1.250 jako adres IP komputera PC możemy ustawić adres z zakresu 192.168.1.2 - 192.168.1.249, np.: 192.168.1.60). Niedopuszczalne jest ustawianie adresu komputera takiego samego jak adres terminala . Wszelkie prawa zastrzeżone © AAT SYSTEMY BEZPIECZEŃSTWA Sp. z o.o.
-
Page 46: Konfiguracja Parametrów Sieciowych Przy Użyciu Przeglądarki Internetowej
IP terminal zostanie zresetowany i trzeba wpisać nowy adres w przeglądarce internetowej. Po konfiguracji ustawień sieciowych pozwalających na bezkonfliktową pracę urządzenia, terminal możemy podłączyć do sieci docelowej. Wszelkie prawa zastrzeżone © AAT SYSTEMY BEZPIECZEŃSTWA Sp. z o.o. -
Page 47: Zalecenia Dotyczące Bezpieczeństwa Sieci
10. Jeśli zastosowany rejestrator sieciowy wyposażony jest w dwa interfejsy sieciowe zaleca się odseparowanie sieci do której podłączone są terminale od sieci posiadającej połączenie internetowe. Dzięki temu urządzeniem dostępnym z poziomu sieci Internet będzie rejestrator natomiast połączenie z terminalem nie będzie możliwe. Wszelkie prawa zastrzeżone © AAT SYSTEMY BEZPIECZEŃSTWA Sp. z o.o. -
Page 48: Połączenia Sieciowe Za Pomocą Przeglądarki Www
W celu zalogowania się do terminala bez zmiany hasła należy kliknąć przycisk OK. Komunikat będzie wyświetlany przy każdym zalogowaniu, do momentu zmiany hasła, lub zaznaczenia opcji Nie pokazuj ponownie. Wszelkie prawa zastrzeżone © AAT SYSTEMY BEZPIECZEŃSTWA Sp. z o.o. - Page 49 UWAGA: Jeżeli podczas pobierania lub instalacji wystąpiły błędy, należy wybrać Ustawienia Zabezpieczeń w Opcjach Internetowych przeglądarki IE, oraz włączyć funkcję Pobieranie niepodpisanych formantów ActiveX. Wszelkie prawa zastrzeżone © AAT SYSTEMY BEZPIECZEŃSTWA Sp. z o.o.
-
Page 50: Interfejs Www - Praca Z Terminalem
6. Przyciski funkcyjne - przyciski te pozwalają włączać/wyłączać niektóre funkcje Zatrzymaj podgląd na żywo Zrób zdjęcie Przybliż/Oddal (cyfrowo) Włącz nagrywanie Włącz audio dwukierunkowe Włącz nasłuchiwanie audio Włącz funkcję wyświetlania rozpoznanych twarzy Wszelkie prawa zastrzeżone © AAT SYSTEMY BEZPIECZEŃSTWA Sp. z o.o. -
Page 51: Ustawienia Twarzy
(np. do NVRa) oraz wysterowanie wyjść alarmowych. Menu obszar pozwala narysować obszar oraz minimalną i maksymalną wielkość dla wykrywania twarzy. Wszelkie prawa zastrzeżone © AAT SYSTEMY BEZPIECZEŃSTWA Sp. z o.o. -
Page 52: Zarządzanie Bazą Twarzy
Po wyborze zdjęcia należy wybrać Typ listy, płeć oraz wypełnić niezbędne informacje o danym użytkowniku. Podawany numer ID jest numerem karty danego użytkownika. Po wypełnieniu pól należy kliknąć przycisk Dodaj. Wszelkie prawa zastrzeżone © AAT SYSTEMY BEZPIECZEŃSTWA Sp. z o.o. - Page 53 Baza twarzy może zostać przeszukana przez użytkownika, aby to zrobić należy wypełnić odpowiednio pola z danymi i kliknąć przycisk Wyszukaj. Wyszukane twarze mogą być modyfikowane oraz usuwane. Modyfikacja informacji o osobie działa analogicznie jak funkcja ręcznego dodawania (dane osoby wypełniane są automatycznie). Wszelkie prawa zastrzeżone © AAT SYSTEMY BEZPIECZEŃSTWA Sp. z o.o.
-
Page 54: Ustawienia Kontroli Dostępu
Terminal wyposażony jest w przycisk sabotażowy i funkcję umożliwiającą wywoływanie reakcji alarmu sabotażowego. W poniższym menu możliwe jest włączenie funkcji alarmu sabotażowego, ustawienie czasu trwania oraz reakcji wywoływanych przez ten alarm. Wszelkie prawa zastrzeżone © AAT SYSTEMY BEZPIECZEŃSTWA Sp. z o.o. -
Page 55: Zamek Do Drzwi
Wejście, a w celu wysyłania informacji (np. do kontrolera) tryb wyzwalania alarmów należy ustawić jako Wyjście. Dodatkowo z listy należy wybrać wartość bitów dla trybu Wiegand Wszelkie prawa zastrzeżone © AAT SYSTEMY BEZPIECZEŃSTWA Sp. z o.o. -
Page 56: Ustawienia Strumienia
Terminal posiada funkcję automatycznego dostosowywania ekspozycji i automatyki w celu uzyskania jak najlepiej widocznej twarzy. Zmiana parametrów następuje po wykryciu twarzy. Moc działania funkcji jest regulowana w zakresie od 0 do 100. Wszelkie prawa zastrzeżone © AAT SYSTEMY BEZPIECZEŃSTWA Sp. z o.o. -
Page 57: Ustawienia Alarmów
(domyślnie włączony) to komunikat głosowy słyszany z głośnika terminala. 4.5.2. Wykrywanie maski. Terminal posiada funkcję wykrywania maski. Czas trwania alarmu należy wybrać z listy i włączyć wybrane reakcje alarmowe. Alarm braku maski może również wywoływać komunikat głosowy. Wszelkie prawa zastrzeżone © AAT SYSTEMY BEZPIECZEŃSTWA Sp. z o.o. -
Page 58: Przywracanie Ustawień Fabrycznych
„Przywróć ustawienia domyślne”, Następnie wymagane jest odłączenie terminala z zasilania i ponowne podłączenie (w ciągu 30 sekund od momentu kliknięcia opcji w oprogramowaniu. Wszelkie prawa zastrzeżone © AAT SYSTEMY BEZPIECZEŃSTWA Sp. z o.o. -
Page 59: Sprzętowe Przywracanie Ustawień Fabrycznych
Wynik danych zapisanych na karcie pamięci można sprawdzić w menu Zapis Danych. Znajdują się tam rozpoznane twarze ze zmierzoną temperaturą. Wyszukane rozpoznania wraz z temperaturami można eksportować do pliku *.CSV Wszelkie prawa zastrzeżone © AAT SYSTEMY BEZPIECZEŃSTWA Sp. z o.o. - Page 60 AAT SYSTEMY BEZPIECZEŃSTWA Sp. z o.o. ul. Puławska 431, 02-801 Warszawa, Polska tel.: 22 546 07 00, faks: 22 546 07 59 www.novuscctv.com 2020-10-12 MO, MK...