
Related Manuals for We Care Solar Suitcase

Summary of Contents for We Care Solar Suitcase
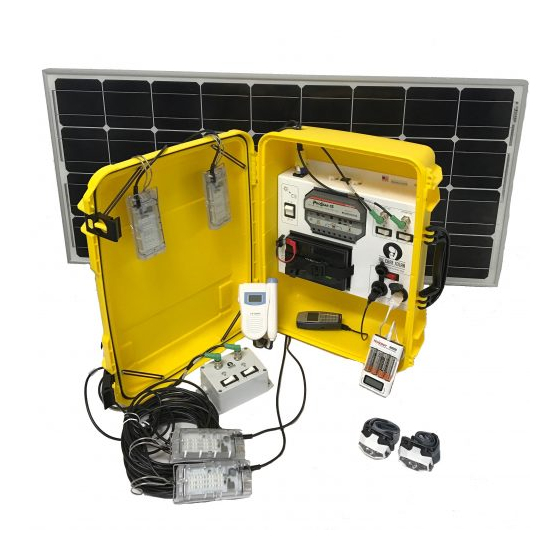
- Page 1 WCS-SC3 We Care Solar Suitcase Installation Guide ® We Care Solar | Jan 2019...
- Page 2 The We Care Solar Suitcase® provides highly efficient solar energy systems to health facilities in areas without reliable electricity. Our durable, easy-to-use...
- Page 3 Inside Installation Planning This Installation Overview Guide Solar Panel Installation Solar Suitcase Installation Lights Installation Last Steps for Completing Installation Installation Documentation Teaching Healthcare Workers We Care Solar | Jan 2019...
-
Page 4: Installation Planning
Preparation Checklist Solar Suitcase + 1 extra for teaching healthcare facility staff and as a backup Solar Panel(s) + 1 extra in case of breakage Toolkit including drills and ladder Make sure the drill batteries are charged and you bring the charger... -
Page 5: After Installation
– use them! Depart prior to dark Clean up the site Take photos Re-organize tools Take away debris Take photos of installation. and load vehicle and re-organize any Show us your good work! furniture moved We Care Solar | Jan 2019... -
Page 6: Installation Overview
Talk with the midwife to determine the best location for each light. Light The Homerun Cable is 40 feet cables are 33 feet (10m) in length. (12.2 meters) and must reach from the solar panel to the Solar Suitcase Primary locations: • Delivery bed •... -
Page 7: Solar Panel Installation
1/8” Standard Drill Bit Actual size Tape 1/4" & 5/16” Nut Drivers Marker From the Large Tool Bag Cordless Drill Driver Inclinometer Wire Stripper Safety Glasses Step Drill Bit Slip Joint Plier Hammer Wrench We Care Solar | Jan 2019... -
Page 8: Safety First
Climb with your eyes facing the ladder • Have someone hold the ladder • When getting off the ladder onto the roof, step around the ladder and not over the top of the ladder We Care Solar | Jan 2019... -
Page 9: Using The Drill
Hammer mode for masonry Adjustment and concrete Unlock Lock Trigger Screw drive mode for attaching screws Rechargeable Battery Drill mode for drilling holes Direction Mode Forward/Lock /Reverse Wear safety glasses when you are drilling We Care Solar | Jan 2019... - Page 10 Install the junction box close to the slope of 10 to 15 degrees from horizon ridge/high part of the roof to allow for rain to run off Junction Box 10-15˚ High Use inclinometer to measure the slope We Care Solar | Jan 2019...
- Page 11 Do not bend or crush the corrugated ridge All penetrations must be sealed with silicone The solar panel should not be stressed, warped, or twisted when mounted to the roof We Care Solar | Jan 2019...
- Page 12 Always use the cable guard where the homerun cable goes through the roof or around the edge of the roof. The cable guard should extend at least 6" inches (15cm) through the roof panel. 6" (15cm) Cable Guard We Care Solar | Jan 2019...
- Page 13 Solar Panel Installation Homerun Cable Options Under the ridge vent Option Silicone Zip Tie Cable Guard Through the roof Option Zip Tie Cable Guard Zip Tie Silicone We Care Solar | Jan 2019...
- Page 14 Over the edge Zip Tie Cable Guard Drip Loop Make a "Drip Loop" in the cable to allow water to drip off the cable, preventing the water from entering the health facility and Solar Suitcase We Care Solar | Jan 2019...
- Page 15 Twist the blue shroud firmly to onto wire. When finished, you should not be complete assembly able to pull the wires from the connector. Insert Insert red positive black negative wire into wire into We Care Solar | Jan 2019...
- Page 16 L brackets will using 1/4" bolts and locking nuts be attached Use one of the L brackets to protect 1/4" Bolt the solar panel and Locking Nut Actual size 1/4“ Standard Drill Bit Actual size We Care Solar | Jan 2019...
- Page 17 Using speed #1, drill the screws down so Use silicone to seal the area below the that the solar panel is firmly attached to L brackets the roof but not so tight that it flattens the metal corrugations of the roof We Care Solar | Jan 2019...
- Page 18 Installation Checklist. through the roof. Secure the cable guard with zip ties & silicone. Make a Drip Loop to prevent water from entering into the Solar Suitcase See P.12 for details on securing cable guard We Care Solar | Jan 2019...
- Page 19 Homerun cable has a drip loop immediately before entering building or room All roof holes are sealed with silicone Cables on the back of the solar panel have stress relief We Care Solar | Jan 2019...
- Page 20 Solar Suitcase Installation Where to Place the Solar Suitcase Before you install the Solar Suitcase, you need to make sure you have a good location that meets the needs of the healthcare staff. The Solar Suitcase powers the medical lights. The Solar Suitcase has important appliances that should be easily accessed and also stored properly.
-
Page 21: Parts & Tools Required
1/4“ Masonry Drill Bit for masonry or cement walls or 1/8” Standard Drill Bit for wood walls 5/16” Nut Driver (5) Plastic Anchors Actual size Marker Tape Measure From the Large Tool Bag Cordless Drill Driver Safety Glasses We Care Solar | Jan 2019... - Page 22 Drill 3 holes Insert 3 plastic anchors Plastic Anchors Actual size Actual size 1/4" Masonry Drill Bit for masonry or cement walls or 1/8” Standard Drill Bit for wood walls We Care Solar | Jan 2019...
- Page 23 Use template to drill 2 holes in the wall and insert plastic anchors Actual size 1/4" Masonry Drill Bit for masonry or cement walls or 1/8” Standard Drill Bit for wood walls Plastic Anchors Actual size We Care Solar | Jan 2019...
- Page 24 Solar Suitcase Installation Solar Suitcase Installation Steps Hang the Solar Suitcase on bracket Permanently attach the Solar Suitcase. The Solar Suitcase comes with 2 holes for installation. Make sure the Solar Suitcase is firmly 5/16” Nut Driver attached on the bracket and level...
- Page 25 Midwives can easily reach and see the display screen on the Solar Suitcase The Solar Suitcase is firmly attached to the wall. If you pull on it, it does not move. The Solar Suitcase is straight and not crooked on the wall...
- Page 26 Make sure the location for the light buttons on the light expansion box are convenient for healthcare workers • Place lights to avoid the shadows. Remember medical staff may create shadows where they work. We Care Solar | Jan 2019...
- Page 27 1/4“ Masonry Drill Bit for masonry or cement Screw Zip Ties Large & walls or 1/8” Standard Drill Bit for wood walls Driver Small Hooks From the Large Tool Bag Cordless Drill Driver Safety Glasses We Care Solar | Jan 2019...
- Page 28 • Use small hooks for the light to hang on • Attach Velcro to help keep the light cable neat Option Movable light hung on an IV pole or other fixture We Care Solar | Jan 2019...
- Page 29 Make sure the bubble in the level indicator is between the two black lines 50" (127cm) We Care Solar | Jan 2019...
- Page 30 Use drill speed #1 #12 X 1-3/4" Self-Tapping Screws Actual size Actual size 5/16” Nut Driver 1/4“ Masonry Drill Bit for masonry or cement walls or 1/8” Standard Drill Bit for wood walls We Care Solar | Jan 2019...
- Page 31 Lights Installation How to Install the Light Expansion Box The light expansion box cable can be removed to make it easier to run the cable from the Solar Suitcase. To remove the cable follow these steps: Make sure the light expansion box is disconnected...
- Page 32 Ensure wire ends are straight and not frayed are firmly attached to the terminals. Tuck the wires into the space next to the circuit board Tighten the cord locking nut Replace the light expansion box cover and tighten the 4 screws We Care Solar | Jan 2019...
- Page 33 Tighten the locking rings Secure the light cables and the light Reconnect light expansion box to the expansion box cables to the wall Solar Suitcase Zip ties Light expansion box connector requires precise alignment We Care Solar | Jan 2019...
- Page 34 The light expansion box is firmly attached to the wall Fixed lights are securely mounted to the wall or ceiling Mobile lights have a hook for hanging the light and for cable storage and organization We Care Solar | Jan 2019...
- Page 35 The cable is properly connected when the silver tab clicks into place Step Make sure two lights are securely attached to the Solar Suitcase Step Make sure the Light Expansion Box is securely attached to the Solar Suitcase We Care Solar | Jan 2019...
- Page 36 This allows the light. This allows future the wall above the light future relocation of the light relocation of the light if expansion box if necessary. necessary. We Care Solar | Jan 2019...
- Page 37 Last Steps for Completing Installation Step Turn on Solar Suitcase After you turn on the Solar Suitcase, the sun icon on the display screen is visible Step Ensure all lights and appliances are operational We Care Solar | Jan 2019...
- Page 38 Last Steps for Completing Installation Last Steps for Completing Installation Checklist After you turn on the Solar Suitcase, the sun icon on the display screen is visible Cables are fixed to the wall and have stress relief The homerun cable is firmly clicked into place with the silver tab facing forward...
-
Page 39: Installation Documentation
Installation Documentation Installation Tracking Sheet For each clinic where you install a Solar Suitcase, you need to record the following information: • Solar Suitcase serial number (found on a small silver sticker affixed to the Solar Suitcase) • Date of installation •... - Page 40 Staff Quick Guide The Solar Suitcase Quick Guide comes inside the Solar Suitcase. It is a Quick Guide for the health facility staff. It should be placed in the plastic folder on the inside of the Solar Suitcase door.
-
Page 41: Documentation Checklist
Installation Documentation Documentation Checklist Complete installation tracking sheet Make sure to write down Solar Suitcase serial number and take photo if possible Fill out information on the Solar Suitcase sticker on the inside door of Solar Suitcase Place User Manual and Quick Guide in the plastic folder... - Page 42 • Pick a time that is convenient for them and tell them it will take about an hour • Have everything prepared – set up the Solar Suitcase and appliances in advance Teaching Tips • Use the Solar Suitcase User Manual as a teaching tool when teaching the healthcare workers •...
-
Page 43: Understanding The Display Screen
How do you know if the battery is being charged? Look at the display screen. The arrow next to the battery symbol is pointing up. b. How do you know if you are using more power than the Solar Suitcase is receiving from the sun? Look at the display screen. - Page 44 10. Using the fetal Doppler (refer to P.17 “Fetal Doppler” in the User Manual) a. Show me how to use the fetal Doppler b. Should you turn it off when it is not in use? We Care Solar | Jan 2019...
-
Page 45: Charging Your Phone
Show me where you can get information on troubleshooting P.23-P.41 from the User Manual b. Who do you contact if you have a problem with the Solar Suitcase? Look at Solar Suitcase sticker under section “In Case of Problems Contact”... - Page 46 We Care Solar +1-510-766-0206 info@wecaresolar.org www.wecaresolar.org Online Sources For training videos on Solar Suitcase installation, use, maintenance, and repair, please visit https://wecaresolar.org/resources/product-info/ Designed by https://www.creative-integration.com/ We Care Solar | Jan 2019...
Need help?
Do you have a question about the Suitcase and is the answer not in the manual?
Questions and answers