Table of Contents
Advertisement
Available languages
Available languages
Quick Links
Advertisement
Table of Contents

Related Manuals for Nilox J5


Summary of Contents for Nilox J5
- Page 3 INDICE L’imballo pag. 4 Il manuale 1. Perché leggere e conservare questo manuale pag. 4 2. Consigli, Informazioni per la sicurezza pag. 4 Caratteristiche Tecniche pag. 5 Istruzioni d’uso 1. Informazioni importanti pag. 5 2. Regole per la circolazione pag. 6 3.
- Page 4 L’IMBALLO Aprire l’imballo con attenzione per non danneggiare la bicicletta. Sulla bicicletta sotto la protezione della batteria (Foto 1) troverete, imballati in una busta di plastica, i pedali, il caricabatteria con il cavo di collegamento, la chiave per il montaggio dei pedali e la chiave per la regolazione del manubrio (foto 2).
-
Page 5: Caratteristiche Tecniche
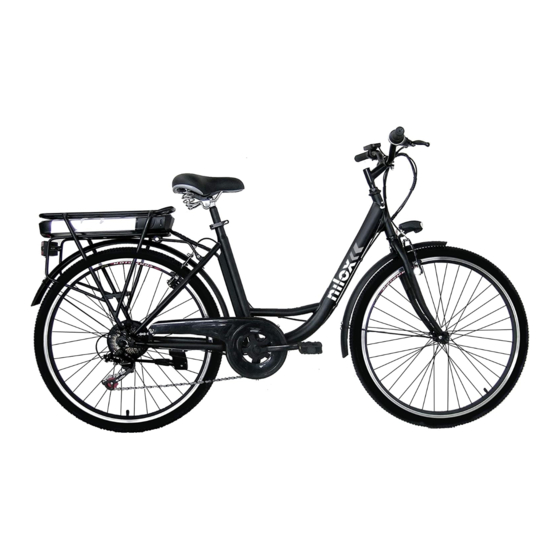
Pedalate con prudenza; prestate attenzione agli altri ciclisti ed agli automobilisti distratti. Pedalate senza superare i vostri limiti fisici. Indossare sempre il casco protettivo. Controllate periodicamente la meccanica della vostra bicicletta. CARATTERISTICHE TECNICHE Nilox J5 Telaio: Acciaio Forcella fissa in acciaio Pedalata Assistita da Motore Elettrico Motore: posteriore 36V*250W BAFANG Batteria: 36V *7.8Ah al Litio, celle Samsung... - Page 6 Questo prodotto deve circolare esclusivamente su percorsi urbani. ATTENZIONE: un utilizzo non corretto o su percorsi diversi da quelli indicati, potrebbe compromettere i requisiti di sicurezza della bicicletta. E’ vietato l’utilizzo di carrelli e/o rimorchi posteriori. Si avvisa che l’utilizzatore si assume un rischio personale per infortuni, danni e/o perdite se si violano le suddette condizioni e la garanzia decadrà...
- Page 7 FUNZIONAMENTO della BICICLETTA ELETTRICA Questa è una BICICLETTA a PEDALATA ASSISTITA. Ciò vuol dire che, anche se munita di motore elettrico, per funzionare è necessario che l’utente pedali come su una normale bicicletta. Il motore elettrico è di ausilio alla pedalata rendendola meno faticosa e aumentandone la velocità.
- Page 8 Montare i pedali Avvitare i pedali alle pedivelle: il pedale DESTRO è contrassegnato, sul perno, da una lettera “R” ; avvitare questo pedale in senso ORARIO sulla pedivella DESTRA (lato catena). Il pedale SINISTRO è contrassegnato, sul perno, da una lettera “L” ; avvitare questo pedale in senso ANTIORARIO sulla pedivella SINISTRA (Foto 7).
- Page 9 Regolare il cambio posteriore Se la catena ha difficoltà a salire sulla corona posteriore grande (comando cambio al manubrio girato al massimo) bisogna svitare leggermente la vite B evitando che la catena vada oltre l’ultima corona. Se la catena scende con difficoltà sulla corona posteriore piccola svitare leggermente la vite A per allineare il gruppo deragliatore sulla corona piccola (Foto 11).
- Page 10 COME UTILIZZARE LA BICICLETTA La Pedalata Assistita Questa bicicletta elettrica è fornita di un “sistema di pedalata assistita (PAS)”, composto da un motore, una batteria e un sensore della pedalata. E’ importante sapere che quando il sistema è acceso il motore si impegna a fornire energia solo mentre si sta pedalando.
- Page 11 Foto 19 Foto 18 Foto 20 Indicazione carica della batteria su display Quando si accende il motore della bicicletta e si inizia a pedalare sollecitando il motore, il numero di LED accesi sul display (i quattro LED in corrispondenza di “POWER”) indicano la carica istantanea misurata e non l’effettiva disponibilità...
- Page 12 La batteria Foto 21: Interruttore per l’accensione Foto 22: Indicatore di carica della batteria Foto 23: Presa per il carica batteria Foto 21 Foto 22 Foto 23 Quando la bicicletta viene accesa, tramite l’interruttore (foto 21) è possibile verificare lo stato di carica residua premendo il pulsante accanto agli indicatori (foto 24).
- Page 13 Come ricaricare la batteria Posizionare la batteria vicino ad una presa di corrente. Aprire il cappuccetto in gomma sulla parte posteriore della batteria (Foto 25) Foto 25 (Spinotto del carica-batteria) Foto 26 Collegare il carica-batteria (Foto 26) Appoggiare il carica batteria a terra o su una superficie piana e non scivolosa e collegarlo alla corrente elettrica. Collegare il carica-batteria alla corrente.
- Page 14 Quando la batteria è completamente scarica va immediatamente ricaricata. Non lasciare la batteria scarica inutilizzata ma provvedere subito ad un ciclo di ricarica. Si provveda, in questo caso, ad un ciclo di ricarica più lungo, di circa 6 ore per permettere la completa attivazione della batteria. Una o due volte l’anno è...
-
Page 15: Manutenzione E Pulizia
Dopo quanto tempo devo sostituire la batteria ? • La vita media della batteria dipende dall’uso personale e dalle condizioni di conservazione. Anche con la manutenzione adeguata, le batterie ricaricabili non sono eterne. Mediamente una batteria al litio resta attiva per circa 700 cicli di ricarica. Va considerato, però, che ad ogni ricarica la “capacità” della batteria cala proporzionalmente. - Page 16 Serraggio di bulloni e dadi Durante l’uso, a causa delle vibrazioni, alcune viti possono allentarsi. Vi consigliamo di controllare periodicamente il serraggio delle viti. Sostituite immediatamente qualsiasi parte danneggiata o persa. Quella che segue è una tabella delle coppie di serraggio da applicare per il montaggio di diverse tipologie di componenti. Per ogni componente è riportato l’intervallo “minimo-massimo”...
- Page 17 • Assicurarsi che dadi, bulloni, bloccaggi e tutti i componenti meccanici e da fissare siano chiusi e non consumati e/o danneggiati. AVVERTIMENTO La bicicletta e i suoi componenti meccanici sono soggetti ad usura. I materiali dei quali sono composti hanno cicli di vita diversi.
- Page 18 RISOLUZIONE DEI PROBLEMI Descrizione del problema Possibili cause Risoluzione • Cavi allentati e/o danneggiati • Regolare e/o sostituire i cavi Il cambio non funziona correttamente • Regolazione non corretta • Regolare il cambio • Maglia della catena allentata • Stringere le viti •...
-
Page 19: Garanzia
• Sfregamento dei freni sui cerchi • Regolare i freni • Percorso controvento, in salita… • E’ possibile che l’autonomia di percorrenza sia ridotta in questi casi di utilizzo • Connettori allentati • Controllare tutti i connettori La bicicletta funziona ma il display non •... - Page 20 smaltimento specifico dei rifiuti di apparecchiature elettriche ed elettroniche. Il simbolo barrato del contenitore mobile per la spazzatura (riportato qui sotto) viene apposto su tutti gli apparecchi elettrici ed elettronici immessi sul mercato. Il simbolo indica che, alla fine del loro ciclo di vita, questi prodotti devono essere smaltiti separatamente dagli altri rifiuti, al fine di assicurare il loro completo recupero e uno smaltimento inoffensivo per l’ambiente.
- Page 22 INDEX The packaging pag. 23 The manual 1. Why read and keep this manual pag. 23 2. Tips, safety information pag. 24 Technical features pag. 24 Instructions for use 1. Important information pag. 24 2. Traffic rules pag. 25 3. The E-bike pag.
- Page 23 PACKAGING Open the packaging carefully so as not to damage the bicycle. On the bicycle under the battery protection (Pic. 1) you will find, packed in a plastic bag, the pedals, the charger with the connection cable, the key for mounting the pedals and the key for adjusting the handlebar (Pic. 2) . Pic.
-
Page 24: Technical Features
Ride with caution; pay attention to other cyclists and careless motorists. Ride without exceeding your physical limits. Always wear a protective helmet. Periodically check the mechanics of your bicycle. TECHNICAL FEATURES Nilox J5 Frame: Steel Fixed steel fork Pedaling Assisted by Electric Motor Motor: rear 36V * 250W BAFANG Battery: 36V * 7.8Ah Lithium, Samsung cells... - Page 25 This product must only circulate on urban paths. WARNING: incorrect use or use on routes other than those indicated could compromise the safety requirements of the bicycle. The use of rear trailers is prohibited. The user assumes a personal risk for accidents, damages and /or losses if they violate the above conditions and the warranty will automatically expire.
- Page 26 THE E-BIKE This is an ASSISTED BIKE CYCLE. This means that, even if equipped with an electric motor, in order to operate, the user must pedal as on a normal bicycle. The electric motor is an aid to pedaling, making it less tiring and increasing its speed.
- Page 27 Fit the pedals Screw the pedals to the cranks: the RIGHT pedal is marked on the pin by a letter "R"; screw this pedal clockwise on the RIGHT crank (chain side). The LEFT pedal is marked, on the pin, by a letter "L"; screw this pedal anticlockwise on the LEFT crank arm (Pic.
- Page 28 Adjust the gearbox If the chain has difficulty climbing on the large rear chainring (shifter on the handlebar turned to maximum), unscrew screw B slightly, avoiding that the chain goes beyond the last chainring. If the chain descends with difficulty on the small rear chainring, slightly unscrew screw A to align the derailleur unit on the small chainring (Photo 11).
- Page 29 HOW TO USE THE BICYCLE The Assisted Pedaling This electric bicycle is equipped with an "assisted pedaling system (PAS)", consisting of a motor, a battery and a pedaling sensor. It is important to know that when the system is on, the engine undertakes to supply energy only while you are pedaling.
-
Page 30: Lithium Battery
Pic. 19 Pic. 18 Pic. 20 Battery charge indication on the display When you turn on the bicycle's engine and start pedaling by urging the engine, the number of LEDs lit on the display (the four LEDs corresponding to "POWER") indicate the instantaneous charge measured and not the actual charge availability. - Page 31 The Battery Pic. 21: Switch on button Pic. 22: Battery charge level Pic. 23: Plug to recharge Pic. 21 Pic. 22 Pic. 23 When the bicycle is turned on, using the switch (Pic. 21) it is possible to check the remaining charge status by pressing the button next to the indicators (Pic.
- Page 32 25. Do not use the battery charger for other purposes or for other devices. 26. Voltage dips during charging cycles may damage the battery. 27. Cali di tensione durante i cicli di ricarica potrebbero danneggiare la batteria. How to recharge the battery Place the battery near a power outlet.
- Page 33 The lithium battery has no "memory". Discharging and partially recharging the battery does not affect performance or duration. It is therefore possible to recharge the battery even if it is not completely discharged. If the bicycle is not used for a long period, keep the battery recharged at least once a month, leaving it to charge for about 4 hours.
-
Page 34: Maintenance And Cleaning
Battery FAQ 1. Is it normal for the battery to get warm during charging? Yes, it is normal for the battery to be warm during the charging process. This is because the increase in internal resistance transforms energy into heat that is transmitted externally. How long does it take to replace the battery? •... - Page 35 All other inspection, maintenance and repair services must be carried out in a specialized center by a qualified technician. Always contact the service center for any doubts or uncertainties. Bolts and nuts tightening During use, due to vibrations, some screws may become loose. We advise you to periodically check the tightness of the screws.
- Page 36 • Apply the front brake and move the bicycle back and forth and make sure everything is in order. If you hear a dull noise with every movement, there are likely to be problems with the steering: contact the service center. •...
-
Page 37: Troubleshooting
Do not leave the battery with condensation that could damage, cause a short circuit or corrode the battery. TROUBLESHOOTING Description Causes Solution • Loose and/or damaged cables • Calibrate or replace the cables Problem on the rear derailleur • Incorrect adjustment •... -
Page 38: Warranty
• Loose connectors • Check all connectors It is The bicycle works but the display • Damaged cable / casing • Check all cable and casing does not show the battery charge • Damaged display • Replace the display capacity •... - Page 39 The crossed-out symbol of the mobile garbage container (shown below) is affixed to all electrical and electronic appliances placed on the market. The symbol indicates that, at the end of their life cycle, these products must be disposed of separately from other waste, in order to ensure their complete recovery and harmless disposal for the environment.
Need help?
Do you have a question about the J5 and is the answer not in the manual?
Questions and answers