Table of Contents
Advertisement
Advertisement
Table of Contents

Related Manuals for Audiofront eDrumin Series


Summary of Contents for Audiofront eDrumin Series
- Page 1 USER MANUAL Version 1.3.1...
-
Page 2: Table Of Contents
Table of Contents Features at a Glance..................4 The Hardware and Connections..............5 Supported Pads....................6 Supported Hihat Controllers................6 Attaching the Drum Stand Clip..................7 Getting Started....................8 Installing the Control Application................... 8 Enabling eDRUMin in your MIDI Applications..............8 Connecting Drum Pads....................9 Loading a Presets......................9 Changing Note Assignments.................. - Page 3 Working With Multiple Devices on Separate USB Ports........39 Managing Crosstalk Between Devices..............39 Setting up Your Hihat on its Stand...............40 Controlling Banks with MIDI Program Change Messages.......41 Tips For Working with Audiofront Controls...........42 Drum Pad Wiring Diagrams.................43 Pedal Input Wiring Diagrams...............44 MIDI Implementation...................45...
-
Page 4: Features At A Glance
Features at a Glance eDRUMin devices are e-drum to MIDI interfaces with universal trigger inputs supporting pad, cymbals, and acoustic triggers. Flexible trigger circuity that allows them to support both piezo / piezo pads and piezo / switch pads. 10 bit sampling at up to 10K samples / per second / input ensures high resolution triggering with extremely low jitter. -
Page 5: The Hardware And Connections
The Hardware and Connections 9V DC Connector (if not using USB) Status Indicator MIDI Indicator Full Size MIDI OUT Controller Input Universal Trigger Inputs Full Size USB B External 9V Power Power Full Size (if not using USB) 10 Universal Trigger Inputs MIDI ports Switch / LED MIDI Port... -
Page 6: Supported Pads
Supported Pads eDRUMin supports all kinds of e-drum pads and triggers. It doesn’t matter if your pads are made by Roland, Yamaha, Alesis or anyone else. They are well supported. Here’s a list of the gear I used during development. Electric Drum Pads Electric Cymbals Acoustic Triggers... -
Page 7: Attaching The Drum Stand Clip
Attaching the Drum Stand Clip You can use the optional drum stand clip to attach your eDRUMin to the frame of a drum stand or a hihat stand. The texture of the clip mates with the texture of the device. Make sure your clip is very tight to ensure there’s enough friction to prevent slipping. -
Page 8: Getting Started
Control Application to edit the device settings. Installing the Control Application The Control application is available for Windows, macOS, and iOS and can be downloaded from the Audiofront downloads. Control Application is discussed in detail in the next section of the manual. -
Page 9: Connecting Drum Pads
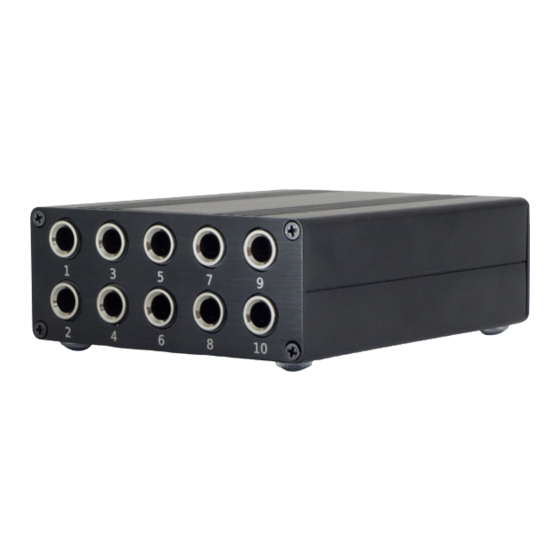
Connecting Drum Pads The 1/4” inputs on the front of the device are for connecting drum pads. Make sure you connect your pads with TRS connectors. The device is not designed to work with TS connectors. Even if you are using a single zone pad, you should still connect it with a TRS cable. -
Page 10: Manually Setting Trigger Settings
Manually Setting Trigger Settings If a preset is not available for your pad, you will need to manually adjust the trigger settings Setting the Pad Type Click to select Pad Type The default pad type for each input is set to a mesh head with a center mounted piezo. -
Page 11: The Control Application
The Control Application As your eDRUMin has no buttons or controls, you’ll need to use the software control application to edit settings on the device. The Control Application doesn’t need to be running for the device to work. All the processing and settings are saved on the device itself. -
Page 12: Sidebar
Sidebar The Sidebar gives quick access to pages of settings as well as a few useful settings. Trigger Editor displays the controls for adjusting trigger settings for the four inputs on the front of the device. Pedal Editor allows you to make adjustments to the pedal input on the back of the device. -
Page 13: Pad / Input Type Settings
Pad / Input Type Settings Whenever you connect a new pad to the device, these are the settings you should adjust first. Preset Manager Yamaha Wiring Toggle Activate Calibrate Mode Input Mode Pad Type Selector Reset Settings Input Mode Each input can function as a stereo input (for dual / triple zone pads), mono (single zone pads), and dual mono (two single zone pads connected to a single TRS cable. -
Page 14: Calibrate Mode
Calibrate Mode Calibrate Mode is designed to allow you to quickly setup a pad without needing to fiddle around with controls. You simply turn on Calibrate Mode, hit your pad to calibrate it, and turn it off again when you are done. Before turning on Calibrate mode, make sure that you have already selected the appropriate pad type. -
Page 15: Transient Scanning Controls
Transient Scanning Controls eDRUMin provides a very clear graphical representation of the transients from your pads making setting the values of the controls intuitive and easy. The amplitudes and time scales in the graphics are not linear. The amplitudes are exponentially scaled so that more detail and resolution is available for low amplitudes, making it easier to properly set the Thresh... -
Page 16: Crosstalk Cancellation
Vibrations from Crosstalk Cancellation hitting adjacent pad Sometimes vibrations from hitting one pad can travel though a drum stand and into an adjacent pad, registering a hit even though it hasn’t actually been hit. This is called crosstalk. The Crosstalk control is designed to prevent those vibrations from triggering notes. -
Page 17: Sense Controls
Sense Controls The type of sense controls available depends on whether an input is in Stereo mode not, as well as the Pad Type setting. These are advanced controls and you should make sure you have your pad triggering well before looking to adjust these controls. Rimshot Range The Rimshot Range control allows you to fine tune rimshot detection on dual piezo pads. -
Page 18: Bell Sense
Bell Sense Bell sense is a feature that’s designed to provide reliable and dynamic bell triggering using only only a single input. Support Cymbals Currently there are custom Bell Sense algorithms to support the Roland CY13-R, CY15-R and CY-8 cymbals. More cymbals can and will be added in the future. If you have a popular cymbal that’s not currently supported, contact technical support as it might be possible to add support for it. -
Page 19: Positional Sensing
Positional Sensing eDRUMin supports positional sensing for pads using the ‘Mesh Center Piezo’ Pad Type. The device can send out a Control Change message (CC) to indicate the position, or a separate Edge Note. Positional Sensing On/Off The CC or Note can be set in Notes Panel. Position Indicator To get positional sensing working, you’ll need to adjust the Range controls. -
Page 20: Note Panel
Select Bank Load from Drum Map Note Panel You use the note panel to assign MIDI notes to the different articulations for your pad. Working With Banks Each input has four banks where you can save different sets of note assignments. The currently selected bank can be changed by: Using the Control Application •... -
Page 21: Load Notes From A Drum Map
Load Notes from a Drum Map Select the the Click to open Drum Map It can be tedious to input note values, especially when you need to consult a manual to figure what values to use. Using a drum map, notes for all the different articulations of a single pad can be assigned using a few clicks of a mouse. -
Page 22: Preset Manager
Preset Manager The Preset Manager allows you to quickly load trigger settings. It comes with factory presets for many pads, but also allows you to create, import, and export your own presets. Show factory Show user Create a new user preset presets presets from the current input... -
Page 23: Creating User Presets
Creating User Presets A new user preset is created by selecting an input and clicking on the icon. The settings stored on the eDRUMin are then downloaded and stored to your computer. A dialog box is displayed and allows the user to set metadata for the preset. -
Page 24: Pedal Editor
Pedal Editor The pedal input on the back of the eDRUMin is actually a MIDI Expression input and as such supports a wide array of pedal types including hihat controllers, expression pedals, sustain pedals, and footswitches. You can edit the settings the pedal input by clicking on the Pedal Editor icon in the side bar. -
Page 25: Hihat Controllers And Expression Pedals
Hihat Controllers and Expression Pedals When using an expression pedal or a hihat controller, input is automatically setup in HIHAT MODE, which means it will send out CC messages for the position of the pedal, and velocity sensitive closed hihat notes and splash articulations. Before adjusting setting the Control Application, make sure you hihat is properly setup on its stand. -
Page 26: Hihat Mode
Hihat Mode When using this mode, the pedal sends out a CC message corresponding to the position of the pedal, and velocity sensitive notes when the pedal is pressed down quickly. Polarity Control Triggering Mode Link Trigger Input MIDI Assignments Panel Invert Expression Curve Note Dynamics Panel... -
Page 27: Adjust The Midi Settings For Your Pedal
Adjust the MIDI settings for your Pedal From the MIDI Assignments Panel, you can set all the MIDI related settings for your pedal. When changing the pedal note and splash note, the notes will auditioned so you can hear what a particular assignment corresponds to in your sampler. Channel Pedal Note This is the MIDI Channel the hihat will use... -
Page 28: Adjusting The Dynamics Of The Hihat Position Cc
Impact Method The velocity of closed hihat pedal notes in this setup is determined by the vibrations of the hihat cymbals as they come together. It’s very important that your hihat trigger settings are optimal. Poor choice of threshold and hit decay values will affect the ability to accurately trigger the closed hihat pedal articulation. -
Page 29: Advanced Hihat Options
Advanced Hihat Options For most users, these options should be left unchecked. They are advanced options that most users do not need to be concerned with and can produce unwanted results. Fast Stepping Fix In some drum triggering software applications, most notably Superior Drummer, rapid up and down movements of the hihat pedal can cause strange audible artifacts due to the way it transitions between hihat samples. -
Page 30: Setting Up Your Hihat For Use In Virtual Instruments
Setting up your Hihat for use in Virtual Instruments This section of the manual describes setting up note assignments inside virtual instruments. Look here for information about calibrating and adjusting setting for you hihat controller. Getting your hihat working in a software drum sampler involves: •... - Page 31 Setting up your Hihat in BFD3 For hihats in BD2/3, you only need to setup the ‘Variable Tip’, ‘Variable Shank’, ‘Pedal’, and ‘Splash’ articulations. You can use the ‘learn’ feature inside BFD to makes these assignments, or you can input them manually by selecting the note in the piano key bar on the left of the UI and clicking ‘Assign to Selected’.
- Page 32 Setting up your Hihat in Addictive Drums Additive Drums 2 has CC Hihat Bell, CC Hihat Shaft, and CC Hihat Tip articulations. The CC part of the naming indicates these articulations trigger different levels of openness depending on the hihat pedal CC position. You can either use the learn buttons in Addictive Drums to change the mapping to match the settings stored in the eDRUMin, or more easily, you can set your eDRUMin drum map...
-
Page 33: Sustain Pedals And Footswitches
Sustain Pedals and Footswitches When a sustain or dual footswitch is plugged into pedal input of the eDRUMin, the pedals are automatically configured to change the Note Bank for the currently selected input. Switch Type Mode Using a Latching Type Footswitch By default, the input is setup to be used with momentary type switches. -
Page 34: Bank Changes
Bank Changes Each eDRUMin input has 4 banks for MIDI Notes associated with it. By default, when you attach a footswitch or sustain pedal, it gets setup to control Bank Changes. Press the pedal quickly to select the next bank. Do a long press and the selected the previous bank. -
Page 35: Updating Firmware
Please note that the iOS version of the Control Application does not support updating device firmware. The latest version of the Control Application can be downloaded at www.audiofront.net/downloads.php Changing Colors If you have more than one eDRUMin of the same color connected to the same computer, you might want to change the ‘color’... -
Page 36: Ios Control Application
iOS Control Application The control application is available as an iOS app from the Apple App Store. Getting Connected The iOS version of the Control Application can communicate with the eDRUMin using the camera connection kit, or Network MIDI, When the Control Application is opened, any connected to devices will automatically be detected. -
Page 37: About Power In Ios
4. Click on the + sign to create a new session. 5. Give it a meaningful name and check the checkbox to enable it. 6. Setup the Live Routings. Be careful to pick the right MIDI Inputs. Do not chose the 'Network' MIDI connections. -
Page 38: Edrumin 10 Usb Host Port And Midi Ports
eDRUMin 10 USB Host Port and MIDI Ports The eDRUMin 10 comes with a USB Host port and full- size MIDI Din port for interfacing with other gear. The USB Host port allows users to connect additional eDRUMin devices or USB MIDI devices and have them function as an aggregate device, complete with crosstalk cancellation between devices. -
Page 39: Working With Multiple Devices On Separate Usb Ports
Working With Multiple Devices on Separate USB Ports You can connect as many eDRUMin devices to the same computer as you have USB connections. Each eDRUMin 4 needs about 70 ma and each eDRUMin 10 needs about 100ms, so you should be fine using a standard unpowered 4 port USB hub. Updating the firmware while connected though a hub is not recommenced. -
Page 40: Setting Up Your Hihat On Its Stand
Setting up your Hihat on its Stand To get the best performance possible from your hihat, it’s important that it’s setup properly on its stand. You know your setup is good when every slight movement of your hihat pedal registers in the Control Application. I’m going to go over setting up a Roland VH-10 as an example. -
Page 41: Controlling Banks With Midi Program Change Messages
Controlling Banks with MIDI Program Change Messages A connected sustain pedal or dual footswitch is perfect for controlling banks of notes. If your pedal input is being used by a hihat controller, you can still configure a 3rd party MIDI device to send program changes into the eDRUMin via its USB port. The MIDI Channel of the program change message determines which input should change its bank. -
Page 42: Tips For Working With Audiofront Controls
Tips For Working with Audiofront Controls The page contains some bits of information that can improve your workflow when using Audiofront software. General Tips • Using SHIFT modifiers for More Precision • Use Mouse Wheel For Fine Adjustment • Double-Click to Set Defaults Working with Note Controls The values of these controls can be changed in a variety of ways. -
Page 43: Drum Pad Wiring Diagrams
Drum Pad Wiring Diagrams Drum Head Drum Head Dual Piezo Pad Dual Piezo Pad (Roland Style) (Yamaha Style) Drum Rim Drum Rim Polarity of rim piezo Polarity of rim piezo doesn't matter doesn't matter Drum Head Drum Head Piezo / Switch Pad Piezo / Switch Pad (Roland Style) (Yamaha Style) -
Page 44: Pedal Input Wiring Diagrams
Pedal Input Wiring Diagrams Expression Pedal Expression Pedal (straight polarity) (reversed polarity) Potentiometer Potentiometer power power wiper wiper ground ground Sustain Pedal Dual Footswitch FSR Hihat Controller Hall Sensor Hihat Controller hall effect sensor force sentisive resistor Recommended Hall Effect sensor: SS49E Voltage on pedals inputs should be in the range of 0V to 3.3V. -
Page 45: Midi Implementation
MIDI Implementation M I DI Ex pre ssion M I DI I m ple m e nt a t ion Function Transmit Respond Passthru Remarks Channel 1 - 16 1 - 16 1 - 16 Learn Note Notes 0 - 127 0 - 127 0 - 127 Learn Note...
Need help?
Do you have a question about the eDrumin Series and is the answer not in the manual?
Questions and answers