
Summary of Contents for ALTAI VX200
- Page 1 Quick Setup Guide Altai VX200Dual-Band CPE/AP _____________________________________________ ck Setup Guide Version 1.1 Altai Technologies Ltd. All rights reserved...
-
Page 2: Package Contents
Quick Setup Guide Introduction Thank purchasingthe Altai VX200 product. This guide providesinstructions to install the product and set it up as CPE (Station mode) with minimal effort. Package Contents Altai Technologies Ltd. All rights reserved... - Page 3 Wall-mounting Plate Wall Mount Anchor & Long Screw (Phillips, 3 x 19mm) Short Screw (Phillips, 3 x 5mm) (For both DIN-rail Mount and Wall Mount) Foot Pad (For Desk Mount) Quick Setup Guide 1 pc Altai Technologies Ltd. All rights reserved...
-
Page 4: Hardware Overview
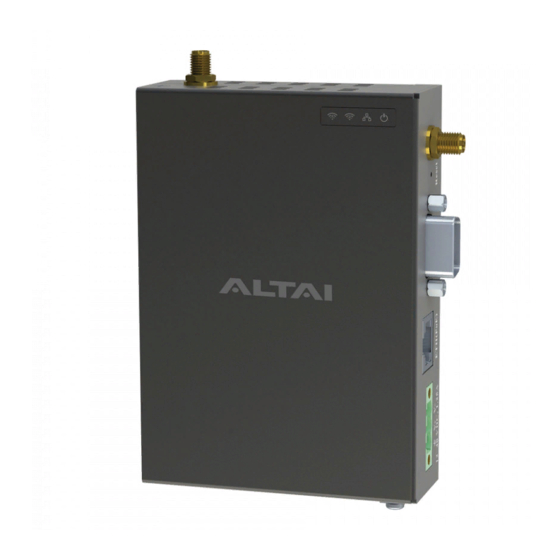
Quick Setup Guide Hardware Overview Front View Right Side View Top View Bottom View Back View Left Side View Altai Technologies Ltd. All rights reserved... - Page 5 2. AP Mode on with clients associated 3. Bridge Mode on and connected to remote peer B: RP-SMA RF Port 1 (Female) Used with Port 2 together to attach 2 x 2.4G/5G antennae (purchased separately) for 2x2 MIMO WiFi connection. Altai Technologies Ltd. All rights reserved...
- Page 6 D: RS232 DB9 SerialPort (Male) Used to connect with a peripheral RS-232 serial device so that you can access the serial device, via the VX200, from anywhere over TCP/IP network. E: Ethernet Port (PoE In) Used to connect to power source (seelater section forPower Options) and provides 10/100/1000 Mbps network interface for LAN connection.
- Page 7 Aground wire (AWG: 14) for chassis grounding Three wires (AWG: 12 – 24) for DC power; Or alternatively an 802.3af/at- compliant PoE switch to power up VX200 Two 2.4G/5G external antennae (not provided) Screw drivers (Phillips, and flat-blade) and a drill...
- Page 8 Quick Setup Guide Installation Option 1: DIN-Rail Mount (For 35mm Rail) To mount the VX200 unit on the rail, follow the steps below. Bracket Spring Rail 1. Drive the short screws to attach the DIN-rail mounting bracket to the back of the unit.
- Page 9 3. Insert the anchors into the holes. 4. Insert the long screws through the mounting plates into the anchors. 5. Tighten the screws to secure the unit in place. Wall Wall Four-Hole Installation Altai Technologies Ltd. All rights reserved...
- Page 10 1. Insert Ground/DC positive/DC negative wires (recommended AWG range: 12 - 24) into the terminal block. Use a small flat-blade screwdriver to tighten the wire- clamp screws so as to prevent the wires from loosening. Altai Technologies Ltd. All rights reserved...
- Page 11 Ethernet (Data) 802.3af/at – Compliant PoE Switch 1. Connect VX200 Eth(PoE) port to an 802.3af/at PoE Switch with an Ethernet cable. 2. Connect a computer to theswitch with another Ethernet cable. 3. When the Power LED light is up and becomes steady, the unit should be ready for configuration.
- Page 12 For Windows 7/Windows 10 users, 1. Go toControl Panel, click Network and Sharing Center and then choose the Ethernet adapter that is in connection with the VX200 unit. Click it and then click Properties. 2. Under the Networking tab, selectInternet Protocol Version 4 (TCP/IPv4) in the list box “This connection uses the following items”, and then click...
- Page 13 1. Open a web browser. Type 192.168.1.222in the address bar and then hit Enter. 2. Login page will come up andyou are required to enter username and password. By default, the credentials are: Username: admin Password: admin 3. Click Login. Altai Technologies Ltd. All rights reserved...
- Page 14 2.4G radio configuration. 1. Check the box toEnable Radio. Select Stationfor the Radio Mode field. Then click Submit button. 2. ClickStationtab. Enter theRemoteSSID that you want to connect to.Then click Submit button. Altai Technologies Ltd. All rights reserved...
- Page 15 3. Configure security for WLAN connection. Click the hyperlink of Auth Mode, which is “open” in the above screenshot and you will be directed to the WLAN Security page. In this example, the WLAN that the VX200 connects to is WPA2-Personal protected, so passphrase is required. If you are not sure about the authentication mode that the WLAN is using, contact your network administrator.
- Page 16 20cm between the radiator & your body. European Conformity (CE) –EU This is a Class B product. In a domestic environment, this productmay cause radio interference, in which case the user may berequired to take adequate measures. Altai Technologies Ltd. All rights reserved...
- Page 17 Warning VX200may require professional installation depending on the deployment scenario. Only use the optional power adaptor available for VX200. Using a different power adaptor might damage the device. The metal chassis of the equipment may be hot. Pay special attention or use special protection before handling this equipment.
Need help?
Do you have a question about the VX200 and is the answer not in the manual?
Questions and answers