
Subscribe to Our Youtube Channel
Summary of Contents for GBS Elettronica P3025B
- Page 1 Installation Manual Manuale di installazione Manual do Usuário Manuel d’installation Installationsanleitung Manual de instalación 41746JL20081110...
- Page 2 Content English Italiano Português ..............1~19 Français Deutsch Español ............20~38...
- Page 3 Caution Attenzione 1. To ensure safety, please read this manual carefully before installation and follow the 1. Per garantire la sicurezza, leggere attentamente questo manuale prima di effettuare instructions herein. Store this manual in a secure place for future reference. l’installazione e seguire le istruzioni qui contenute.
- Page 4 Tools Required for Installation Atenção Utensili necessari per l’installazione Utensílios necessários para a instalação 1. Para garantir a segurança ler atentamente este manual antes de efectuar a instalação e observar as instruções aqui contidas. Conservar este manual em lugar seguro para consultas futuras .
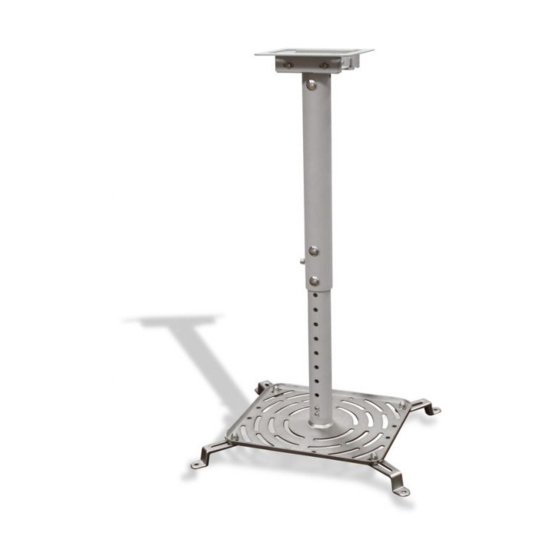
- Page 5 Applicable range of the adjustable angle of the Project Hanger Ceiling Mounted Projector Hanger Intervallo applicabile dell'angolo regolabile del supporto per proiettore Specifiche del supporto per proiettore Intervalo aplicável do ângulo regulável do suporte para projector Especificações do suporte para projector Applicable length of the Projector Hanger For turning 360º...
- Page 6 Enclosed Parts Installation Process Parti incluse Processo di installazione Partes incluídas Processo de instalação Install the Hanger onto the ceiling Installazione del supporto al soffitto Instalação do suporte no tecto Before the installation, you need to find out the type of ceiling at the installing position, whether it is a cement ceiling or a wooden ceiling.
- Page 7 For a cement ceiling, use the hammer to drive the Plastic Plug (B) into the Use an electric driller and a drilling bit to drill holes on the marked positions. Note: For a cement ceiling, drill holes with 10mm diameter and 55mm depth. holes on the ceiling, then, tighten the Iron Hanger (A) to the ceiling with For a wooden ceiling, drill holes with 4.5mm diameter and 55mm depth.
- Page 8 Install the support arms to hanger holes on the projector For a wooden ceiling, use screws (C) to tighten the Iron Hanger (A) to the Montaggio del braccio di supporto ai fori del proiettore ceiling directly. Montagem do braço de suporte nos furos do projector Per un soffitto in legno, utilizzare le viti (C) per stringere il supporto in ferro (A) direttamente al soffitto.
- Page 9 Install the Projector Bracket to the Support Arms Decide your desired length of the hanger bracket Montaggio della staffa del proiettore al braccio di supporto Decidere qual è la lunghezza desiderata della staffa di supporto Montagem do estribo do projector no braço de suporte Escolher o comprimento do estribo de suporte desejado Match the Projector Bracket (G) to the Support Arms (D) and adjust screw When the hanger length is 116mm...
- Page 10 When the hanger length is more than 398mm With screws (K), tighten the Projector Bracket (connected to the Projector) to the Place the Outer Sleeve (L) (outside adjusting tube) onto the Ceiling Mount Bracket Inner Tube (M). (J), insert the hexagonal Carriage Bolts (N) through the Outer Sleeve and tighten the bolts with screws (K), and finally tighten it to the Outer Sleeve with nut (I).
- Page 11 The user may adjust the Projector to Lock the Bottom Screw (O) to the outer sleeve, so that the outer sleeve is more an appropriate height, then use the securely tightened to the inner tube. hexagonal Carriage Bolt (N) and Nut Stringere la vite in basso (O) sulla manica esterna, in modo che quest’ultima (I) to secure the inner tube inside the sia stretta in modo più...
- Page 12 Secure the Projector onto the hanger bracket Attention Fissaggio del proiettore alla staffa di supporto Fixação do projector no estribo de suporte 1. Afin d'assurer votre sécurité, nous vous prions de bien lire le manuel avant l'installation et de suivre attentivement les instructions qui y sont incluses. Conservez ce manuel dans un endroit sûr comme référence.
- Page 13 Vorsicht Precaución 1. Lesen Sie bitte vor der Installation das Handbuch sorgfältig durch und befolgen alle Anweisungen, 1. Para garantizar su seguridad, lea este manual detenidamente antes de la instalación y siga sus um die Sicherheit zu gewähren. Heben Sie das Handbuch auf, damit Sie später darin nachlesen instrucciones.
- Page 14 Outils requis pour l’installation Spécifications du dispositif de fixation du projecteur Werkzeuge für die Installation Spezifikationen der Projektorhängevorrichtung Herramientas necesarias para la instalación Especificaciones del soporte para proyector Longueur du dispositif de fixation du projecteur Verfügbare Länge der Projektorhängevorrichtung 1. Perceuse à moteur ou perceuse de maçonnerie Bohrmaschine oder Schlagbohrmaschine Longitud aplicable del soporte para proyector Taladro eléctrico o de albañilería...
- Page 15 Gamme d’angles réglables pour le dispositif de fixation du projecteur Parties cloisonnées Verfügbarer Winkelbereich der Projektorhängevorrichtung Mitgelieferte Teile Rango del ángulo ajustable del soporte de proyector Componentes suministrados Pour tourner 360º vers la gauche et vers la droite. Rotation links oder rechts: 360º Gira 360º...
- Page 16 Méthode d’installation Utilisez une perceuse électrique pour faire un trou et insérez un trépan dans Installationsvorgang les trous. Remarque: Pour un plafond en ciment, faites des trous d’un diamètre de 10mm et Proceso de instalación d’une profondeur de 55mm. Pour un plafond en bois, faites des trous d’un diamètre de 4,5mm et d’une profondeur de 55mm.
- Page 17 Pour un plafond en ciment, enfoncez les bouchons en plastique (B) dans les Pour un plafond en bois, attachez directement le dispositif de fixation en fer trous à l’aide d’un marteau, attachez ensuite le dispositif de fixation en fer (A) (A) au plafond à...
- Page 18 Installer les bras de support sur les trous du projecteur Installer la plaque de support de projecteur sur les bras de support Die Stützarme an den vorgesehenen Löchern an dem Projektor befestigen Die Projektorkonsole an den Stützarmen befestigen Instalar los brazos de soporte en los orificios colgantes del proyector Instale la abrazadera del proyector en los brazos de soporte Attachez les bras de support (D) aux trous de fixation du projecteur avec les vis Faites correspondre la plaque de support de projecteur (G) aux bras de support (D)
- Page 19 Choisir la longueur du dispositif de fixation Lorsque la longueur du dispositif de fixation est 398mm ▓ Die Länge der Hängevorrichtung entscheiden Placez la barre externe (L) (le tube de réglage externe) sur le support de Decida la longitud de abrazadera que desee montage au plafond (J), insérez les boulons à...
- Page 20 Avec les vis (K), serrez la plaque de support de projecteur (attachée au L’utilisateur peut régler la hauteur du ▓ ▓ projecteur) au tube interne (M). projecteur comme désiré ; utilisez ensuite les boulons à tête Befestigen Sie mit Schrauben (K) die Projektorkonsole (mit dem Projektor ▓...
- Page 21 Attacher le projecteur sur le dispositif de fixation Verrouillez la vis de dessous (O) sur la barre externe, pour que la barre externe ▓ Den Projektor an dem Winkel der Hängevorrichtung befestigen soit mieux attachée au tube interne. Fije el proyector al brazo colgante Ziehen Sie die Knopfschraube (O) durch die Abstandhülse an dem Innenrohr ▓...
Need help?
Do you have a question about the P3025B and is the answer not in the manual?
Questions and answers