Advertisement
Multi-Function Tuner Instructions
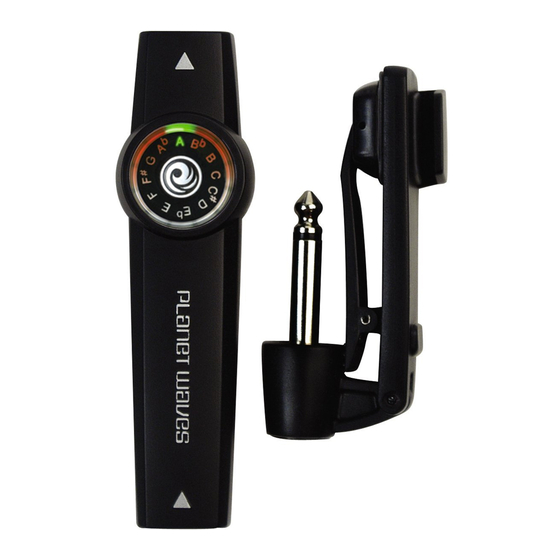
Mode Button
Modus-Knopf
Bouton de mode
Pulsante modalitá
Boton de modo
Input
Input-buchse
Prise D'Entree
Presa di entrata
entrada
Ouput
Output Buchse
Prise de sortie
Presa di Uscita
Salida
Freq. Button
Freq. Button
Freq. Button
Freq. Button
Multi-Function Tuner Instructions
Mode Button
This button selects sweep tuner, strobe tuner, and power-off modes.
Tuner Operation
The tuner has an input jack and output jack as shown. There is also a microphone in the tuner for use with acoustic instru-
ments. The internal microphone is automatically turned off once an instrument cable or the tuning cradle is plugged into the
tuner's input jack.
Sweep tuner introduction
The tuner operates in sweep or strobe tuning modes. Press the mode button once to turn the tuner on in
sweep mode. The lights sweep back and forth to show you that the tuner is in sweep mode. Play a note on
the instrument. The note played lights up in green. If the note is flat, a red LED before (counter-clockwise)
the green note indicator will light. If sharp, a red LED past (clockwise) the green note indicator will light.
The red LED that lights depends on how flat or sharp the note is. Tune the string so the red LEDs move toward
the green, leaving only the green LED lit when the note is in tune. Play the note as needed while tuning.
Strobe tuner introduction
Press the mode button a second time to enter strobe tuning mode. The lights move around in a circle to show
you that the tuner is in strobe mode. Play a note on the instrument. The green light comes on showing you
the note being played, but the red lights now chase around the rotary display. The speed at which the LEDs
chase depends on how sharp or flat the note is. Tune the note so that the movement of the red LEDs slows
and then stops, indicating that the note is in tune. When there are no movements of the LEDs, you are in tune.
Play the note as needed while tuning.
Power Off
Press the mode button again to power down the tuner. The LEDs sweep together and meet at the "A" to show you the
tuner is turning off. The tuner turns off automatically after 4 minutes of inactivity to save battery life.
Calibrating Tuner
The tuner can be adjusted to tune between A435 – A445. A440Hz is the default reference pitch after power up. To change the
Tuning Cradle
reference pitch, press the "Freq" button on the side of the tuner to cycle through the frequencies in 1Hz increments. A fre-
Das Tuning Cradle
quency indication chart is conveniently located on the reverse side of the tuner.
Socle D'Accordement
Tuning Cradle Instructions
Diapason
The Tuning Cradle is equipped with a piezo sensor that transfers the vibrations of your instrument directly to the tuner. This
works great in noisy environments where tuning can be difficult. This cradle can be used in multiple applications to aid in tun-
Brazo de Afinación
ing your instrument. When plugging the tuning cradle into the tuner's input jack, the internal microphone is disconnected and
the tuner defers to the sensor inside the cradle for its input.
After plugging the tuning cradle into the tuner's input jack, use the clip section to attach the cradle to the instrument's head-
stock, bridge (i.e.: upright bass or violin), amp handle, or use the tuner-up hook to attach the cradle to the sound hole of the
instrument.
By plugging the tuning cradle into the tuner's output jack, the cradle acts as a holder while the internal microphone of the
tuner stays active. You can now use the cradle to attach the tuner to your music stand or anywhere else and keep the internal
microphone active.
Battery Information
The tuner is programmed with a low battery indicator. When the battery life is low the rotary display will flash a couple of
times after power up. When this happens, install a fresh CR2032 3V Lithium battery into the tuner to resume normal opera-
tion.
Der Modus-Knopf
Mit diesem Knopf wählen Sie den Sweep Tuner-, den Strobe Tuner- und den Ausschalt-Modus aus.
Der Tuner-Betrieb
Wie in der Abbildung unten zu sehen ist, hat der Tuner sowohl eine Input- als auch eine Output-Buchse. Das Stimmgerät ver-
fügt außerdem über ein Mikrofon zur Anwendung mit akustischen Instrumenten. Das interne Mikrofon schaltet sich automa-
tisch aus, sobald ein Instrumentenkabel oder das Tuning Cradle an die Input-Buchse des Stimmgeräts angeschlossen wird.
Der Sweep Tuner
Das Stimmgerät arbeitet sowohl im Sweep- als auch im Strobe-Modus. Drücken Sie einmal auf den Modus-
Knopf, um das Stimmgerät in den Sweep-Modus zu schalten. Die Lämpchen laufen mehrmals hin und her, um
anzuzeigen, dass das Stimmgerät sich im Sweep-Modus befindet. Schlagen Sie auf dem Instrument eine Note
an. Die angeschlagene Note leuchtet grün auf. Ist die Note dem gewünschten Ton gegenüber abgesenkt,
leuchtet eine rote LED vor (also entgegen dem Uhrzeigersinn) der grünen Notenanzeige auf. Ist die Note dem
gewünschten Ton gegenüber erhöht, leuchtet eine rote LED nach (also im Uhrzeigersinn) der grünen Notenanzeige auf. Welche
rote LED aufleuchtet, hängt davon ab, um wieviel die Note gegenüber dem gewünschten Ton abgesenkt oder erhöht ist.
Stimmen Sie die Saite, sodass die roten LED-Lichter sich auf die grüne Anzeige hinzu bewegen. Wenn schließlich nur noch die
grüne LED beleuchtet ist, ist die Note richtig gestimmt. Schlagen Sie auf dem Instrument beim Stimmen die Note so oft wie
notwendig an.
Der Strobe-Tuner
Drücken Sie ein zweites Mal auf den Modus-Knopf, um das Stimmgerät in den Strobe-Modus zu schalten. Die
Lämpchen laufen mehrmals im Kreis umher, um anzuzeigen, dass das Stimmgerät sich im Strobe-Modus
befindet. Schlagen Sie auf dem Instrument eine Note an. Das grüne Lämpchen leuchtet auf und zeigt Ihnen
die angeschlagene Note an, aber die roten Lichter jagen sich jetzt in der Kreiselanzeige. Die Geschwindigkeit,
mit der sich die LEDs bewegen, hängt davon ab, um wieviel die Note gegenüber dem gewünschten Ton abge-
senkt oder erhöht ist. Stimmen Sie die Note, sodass die roten LED-Lichter sich langsamer bewegen und dann stoppen,
wodurch angezeigt wird, dass die Note nun richtig gestimmt ist. Wenn die LEDs sich nicht mehr bewegen, ist die Saite genau
richtig gestimmt. Schlagen Sie auf dem Instrument beim Stimmen die Note so oft wie notwendig an.
Der Ausschalt Abschalten
Bei nochmaligem Drücken auf den Modus-Knopf schaltet sich das Stimmgerät aus. Die LEDs laufen auf „A" zu, wo sie sich tre-
ffen, wodurch angezeigt wird, dass das Stimmgerät sich jetzt ausschaltet. Das Stimmgerät schaltet sich nach 4 Minuten
Nichtbenutzung automatisch aus, um die Lebenszeit der Batterie zu erhöhen.
Kalibrieren des Stimmgeräts
Der Tuner lässt sich zwischen A435 und A445 kalibrieren. A440Hz ist die werkseitig eingestellte Referenztonhöhe nach dem
Einschalten. Um die Referenztonhöhe zu verändern, drücken Sie den Freq-Knopf auf der Seite des Stimmgeräts, um das
Stimmgerät in Frequenzabständen von jeweils 1 Hz die Frequenzen durchlaufen zu lassen. Auf der Rückseite des Stimmgeräts
ist als Orientierungshilfe eine Frequenztabelle angebracht.
Das Tuning Cradle
Das Tuning Cradle ist mit einem Piezo-Sensor ausgerüstet, der die Schwingungen Ihres Instruments direkt ans Stimmgerät
überträgt. Von besonderem Vorteil ist dies in einer geräuschvollen Umgebung, in der das Stimmen des Instruments schwierig
sein kann. Dieses Cradle kann in verschiedenen Situationen als Stimmhilfe verwendet werden. Nach Anschluss des Tuning
Cradle an die Input-Buchse des Stimmgeräts wird das interne Mikrofon ausgeschaltet und das Stimmgerät ist danach für
seinen Input auf den Sensor im Cradle angewiesen.
Nach Anschluss des Tuning Cradle an die Input-Buchse des Stimmgeräts kann das Cradle mit Hilfe der Klemme an der
Kopfplatte, der Brücke (d.h.: Kontrabass oder Geige) oder dem Ampgriff befestigt werden, oder man benutzt den Tuner-up-
Haken, um das Cradle am Schallloch des Instruments zu befestigen.
Durch Anschluss des Tuning Cradle an die Output-Buchse des Stimmgeräts dient das Cradle als Haltevorrichtung, während das
interne Mikrofon des Stimmgeräts aktiv bleibt. Mit Hilfe des Cradle kann das Stimmgerät jetzt an Ihrem Notenständer oder
anderswo angebracht werden und das interne Mikrofon bleibt aktiv.
B B a a t t t t e e r r i i e e
Das Stimmgerät ist mit einer Batteriezustandsanzeige programmiert. Wenn der Ladezustand der Batterie unter ein bes-
timmtes Niveau fällt, leuchtet die Kreiselanzeige unmittelbar nach Netzanschluss mehrmals auf. Wenn dies eintritt, legen Sie
eine neue 3 V-Lithium-Batterie CR2032 ins Stimmgerät ein, um den normalen Betrieb wieder aufzunehmen.
Multi-Function Tuner Instructions
Multi-Function Tuner Instructions
Advertisement
Table of Contents

Subscribe to Our Youtube Channel
Related Manuals for Planet Waves Multi-Function Tuner


Summary of Contents for Planet Waves Multi-Function Tuner
- Page 1 Multi-Function Tuner Instructions Mode Button This button selects sweep tuner, strobe tuner, and power-off modes. Tuner Operation The tuner has an input jack and output jack as shown. There is also a microphone in the tuner for use with acoustic instru- ments.
- Page 2 Multi-Function Tuner Instructions Bouton de mode Ce bouton vous permet de sélectionner le mode d’accordeur par balayage, le mode d’accordeur stroboscopique ou la mise hors tension. Fonctionnement de l'accordeur L’accordeur a une prise d’entrée et une prise de sortie, illustrées ci-dessus. Il possède aussi un microphone à utiliser avec les Multi-Function Tuner Instructions instruments acoustiques.
Need help?
Do you have a question about the Multi-Function Tuner and is the answer not in the manual?
Questions and answers