Table of Contents
Advertisement
Available languages
Available languages
Quick Links
Advertisement
Table of Contents

Related Manuals for Eurosystems ECO SPRAYER


Summary of Contents for Eurosystems ECO SPRAYER
- Page 1 Bedienungsanleitung für Eco Sprayer handgezogener Sprüher Stand 01.06.2018 eurosystems Deutschland Motorgeräte Handelsgesellschaft mbH Im Fuchshau 14 D-73635 Rudersberg Tel: +49 7183 / 30 590-0 Fax: +49 7183 / 30 590-20 info@eurosystems.info www.eurosystems.info...
- Page 4 15 16...
- Page 7 • Leggere il manuale prima di usare la macchina • Read the instructions manual before operating on the machine • Lire le mode d’emploi avant l’usage • Pred uporabo naprave preberite navodila za uporabo Attenzione, pericolo! Non bere! Acqua non potabile Usare guanti di protezione Warning ! Do not drink the water ! it is not drinkable...
-
Page 8: Norme Di Sicurezza
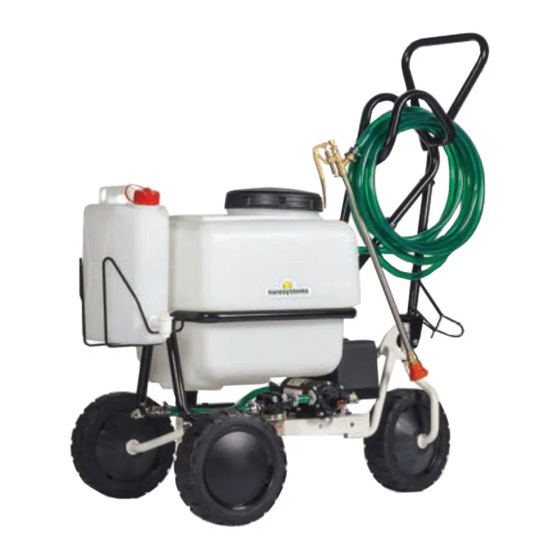
9. Non utilizzare la pompa per impieghi diversi da quelli previsti (es. con solventi, carburanti, infiammabili ecc.) 10. Prima di iniziare il lavoro con l’ECO SPRAYER procedere ad un controllo visivo del serraggio di tutti i componenti e dell’integrità della macchina, quindi verificare che tutti i sistemi antinfortunistici, di cui essa è... - Page 9 MONTAGGIO: L’ECO SPRAYER viene consegnato a destinazione, salvo accordi diversi, parzialmente smontato e sistemato nel suo imballo. Per rendere la macchina funzionante bisogna completare il montaggio delle parti smontate, osservando la seguente procedura: togliere i componenti dall’imballo. (Fig. G-H) Inserire il supporto ruota girevole (7) con distanziale ITT (8) nelle due bronzine (9) e nella boccola (10).
- Page 10 Premere l’interruttore (32) in pos. “0” per spegnere la pompa. Chiudere il rubinetto (31). (Fig. T-U) Se si sceglie “B” svolgere il tubo in gomma (33) per la lunghezza necessaria (max. 10mt), premere l’interruttore (32) in pos. “1” per accendere la pompa. A questo punto è possibile cominciare ad irrorare, impugnando la lancia (34) e premendone la leva (35);...
- Page 11 9. Do not use the pump for purposes other than those provided (expl : solvents, fuels, flammable, etc.). 10. Before you start working with the ECO SPRAYER carry out a visual check of the tightening of all the components and the integrity of the machine and check that all safety systems, of which it is fitted, are properly working.
-
Page 12: Spraying Operation
MOUNTING: The ECO SPRAYER is delivered to destination, unless otherwise agreed, partially disassembled and placed into its packaging. To make the machine operating, user should complete the assembly of the disassembled parts, with the following procedure: remove the components from the packaging. - Page 13 If you choose “B” unroll the rubber hose (33) to the required length (max. 10m), press the switch (32) in pos. “1” to turn on the pump. At this point you can start to spray, holding the spear (34) and by pressing the lever (35);...
-
Page 14: Regles De Securite
(Fig. A). CONDITIONS D’UTILISATION – LIMITES D’EMPLOI La machine Eco sprayer a été projetée et construite pour des opérations de pulvérisation, pour l’utilisation de la machine il est nécessaire la présence d’un seul operateur qui a la responsabilité de tenir à distance de sécurité (plus de 10 mts) chaque possible personne qui peut être exposé aux dangers provoqués par la machine. -
Page 15: Montage
(Fig. F) du bas en haut sur la languette de blocage. MONTAGE : Sauf accord contraire, l’Eco sprayer est livré a destination partiellement démonté et emballé. Afin que la machine puisse fonctionner, il est nécessaire de compléter le montage des parties désassemblées en respectant la procédure suivante: enlever les pièces de l’emballage. - Page 16 démarrer la pompe. Pousser ou tirer la machine sur la zone à traiter pour fondre la glace ou désherber. Presser l’interrupteur (32) en position « 0 » pour éteindre la pompe, fermer le robinet (31). Si on choisit « B » (Fig. T-U) dérouler le tuyau en caoutchouc (33) pour le longueur nécessaire (10 mt max), appuyer l’interrupteur (32) en position «...
-
Page 17: Varnostni Ukrepi
Predstavitev Prevod izvirnih navodil za uporabo Dragi uporabnik, zahvaljujemo se vam za vaše zaupanje, ki ste nam ga izkazali z nakupom našega izdelka. Upamo, da boste pri njegovi uporabi uživali. Ta navodila za uporabo so izdana za zagotavljanje pravilne in ustrezne uporabe izdelka: iz tega razloga vas prosimo, da pazljivo sledite delovnim in varnostnim navodilom, za nemoteno delovanje in dolgo življenjsko dobo vaše naprave. - Page 18 ukrepi upoštevani. Prepovedana je nestrokovna raba ali neustrezno vzdrževanje. 11 – Motorno črpalko je potrebno uporabljati pri najvišjem pritisku 4,1 bara. Varnostna naprava samodejno izključi napravo, če je ta vrednost presežena. Ob zmanjšanju pritiska ponovno samodejno prične z obratovanjem. 12 – Črpalko vedno izključite po končani uporabi / premoru, čeprav se nahaja v stanju pripravljenosti oz.
- Page 19 Če izberete „B“: (Slika T-U) Odvijte gumijasto cev (33) do ustrezne dolžine (najv. 10 m), potisnite stikalo (32) v pol. „1“, da vključite črpalko. Sedaj lahko pričnete z razprševanjem, tako da držite dolgi, ozki nastavek (34) in pritisnete na vzvod (35); rahel pritisk bo povzročil rahlo razpršitev tekočine, z močnejšim pritiskom navzdol pa boste dobili močnejši curek.
- Page 20 04/2015 cod. 321865000...
Need help?
Do you have a question about the ECO SPRAYER and is the answer not in the manual?
Questions and answers