
Related Manuals for Axiom Prime KidWalk

Summary of Contents for Axiom Prime KidWalk
- Page 1 INSTRUCTIONS FOR USE KidWalk KidWalk II Dynamic walking aid Manufactured by Supplier Prime Engineering A Division of Axiom Industries, Inc. 70111KWOM...
- Page 2 KidWalk/KidWalk II...
-
Page 3: Table Of Contents
TABLE OF CONTENTS These instructions for use are organised into the following sections: Description Page • General information Intended use/limitations of use Maintenance Cleaning and care Training Quality Safety • Product illustration and technical data • Parts list • Assembly instructions •... -
Page 4: General Information
Information: - Date of the last update: 2018-05-08 - Please read this document carefully. - Follow the safety instructions. This item should be fitted by an experienced clinician or technician. This document contains important information that must be passed on to the user at delivery. -
Page 5: Cleaning And Care
Annually: Unit should have all fasteners tightened properly by a suitably qualified and com- petent technician. The product was designed for an average service life of approximately five years. To obtain the full service life, the instructions and measures described in these instructions for use must be followed and carried out. - Page 6 WARNING • The anti-tipper must be properly adjusted to the large wheels. The KidWalk can tip over forwards in case of positioning too far forward. This • is therapeutically intended to give the user the required feedback in case of an unwanted gait pattern.
- Page 7 CAUTION • The upholstery is not highly flammable, but can catch fire. Therefore the ut- most caution must be exercised in the vicinity of an open flame. • Keep away from all ignition sources, especially lit cigarettes. • Avoid hypothermia or burns through contact with components. Do not expose the product to any extreme temperatures (e.
-
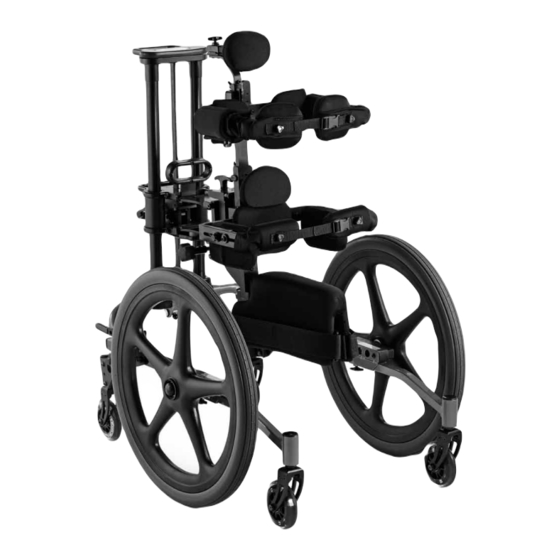
Page 8: Product Illustration And Technical Data
TECHNICAL DATA KidWalk/KidWalk II Illustration of the KidWalk/KidWalk II with optional encompassing thoracic pad Technical data Size 1 Size 2 1 – 7 years 5 – 12 years Max. user weight 30 kg 41 kg Seat height – inside leg length 230 –... -
Page 9: Parts List
PARTS LIST The KidWalk/KidWalk II comes preassembled in one carton. The carton contains: Quantity Description Base frame Adapter column Wheels Axles Axle spacers * The axles and axle spacers are in a sealed poly bag. Optional items: Other optional items may be packed in the box. Make sure to identify any optional compo- nents in the box and the instructions for use that belong with them. -
Page 10: Assembly Instructions
ASSEMBLY INSTRUCTIONS CAUTION • When connecting the upper section to the lower section, be sure to hold the upper section on the adapter column and below the seat. Set-up and assembly of the KidWalk/Kid- Walk II is easy when these directions are followed. - Page 11 ASSEMBLY INSTRUCTIONS • Pull the locking pin for the adapter column on the rear of the base frame and rotate it one-quarter turn so it locks (Fig. 4). Adapter • Set the adapter column onto the guide column pins on the base frame (Fig. 5). Rotate Locking the locking pin until it engages in the adapter column.
- Page 12 ASSEMBLY INSTRUCTIONS Headrest • Insert the headrest in the extension tube; the pad has to face forward. Then tighten the adjustment screw securely (Fig. 7). Height adjustment screw Fig. 7 Swivelling casters (Not available for KidWalk II) • Remove the anti-tipper arms from the base frame.
-
Page 13: Measurements & Initial Setup
MEASUREMENTS & INITIAL SETUP Measurements: The following measurements should be taken and recorded for the setup of the KidWalk/KidWalk II: • Inseam __________ inch (cm) • Hip width __________ inch (cm) • Chest width __________ inch (cm) • Thoracic height* __________inch (cm) •... - Page 14 MEASUREMENTS & INITIAL SETUP Other items: Make sure that all supports are set to a suitable height and width for the user. Adjust any optional items to match the measurements for height and width per the instructions included here. NOTICE: Set all depth-adjustable pads so far for- ward that the user fits into the system when the pads are flipped down.
-
Page 15: Initial Adjustments
INITIAL ADJUSTMENTS Pelvic guide • Flip the front pelvic guide pads upward and outward (Fig. 11). If the KidWalk/ KidWalk II is also equipped with upper encompassing thoracic pads, flip them up- ward and outward as well. • Adjust the distance between the pelvic pads using the rotary knob on the outside of the pelvic pads (to the left of the user, Fig. - Page 16 INITIAL ADJUSTMENTS Adjusting the hip width • Use the rotary knob on the outside of the pelvic pads to adjust the distance between the supporting elements in the area of the hips so the elements fit snugly on the user's hips. •...
-
Page 17: Positioning The User
INITIAL ADJUSTMENTS/POSITIONING THE USER Adapter column angle (adjustable) Once the user has been placed in the KidWalk/ KidWalk II and all supporting elements are ad- justed properly, it may be necessary to adjust the angle of the adapter column. The adapter column KidWalk/KidWalk II can be angled to the of the front or back as required. - Page 18 POSITIONING THE USER Centre Front Changing the wheel lock position hole hole • The wheel lock is pre-set at the factory to Rear the centre wheel position. If the position hole of the large wheels is changed, the wheel locks must be adjusted accordingly. •...
-
Page 19: Use
The KidWalk/KidWalk II supports the user with independent walking. Corrections to the walking direction and speed can be made by the attendant by adjusting the adapter column, the automatic pelvic centring devices or the encompassing tho- racic supports. To overcome obstacles, the KidWalk/KidWalk II without the user can be lifted on the base frame by two persons. -
Page 20: Exit Of The User/Transport And Storage
EXIT OF THE USER TRANSPORT & STORAGE CAUTION • When connecting the upper section to the lo- wer section, be sure to hold the upper section on the adapter column and below the seat. • Remove the wheels for transport. Exiting of the user Taking the user out of the KidWalk/KidWalk II •... -
Page 21: Accessories
Accessories Swivel lock KidWalk/KidWalk II retrofit kit Installation instructions Step 1 C D E Check if your retrofit kit includes the following: 1 Left swivel locking plate (A) 1 Right swivel locking plate (B) 4 Spacers (C) 8 Washers (D) 4 Button head screws (E) 4 Nut (F) Step 2... - Page 22 Accessories Step 4 Mount the lock assembly as illustrated. Repeat on the opposite side. Step 5 Raise, then slide forward and lower in the lo- cked position. Locked position Step 6 Raise, then slide and lower in the unlocked position. UNLOCKED POSITION KidWalk/KidWalk II...
- Page 23 Accessories Reverse stop KidWalk/KidWalk II retrofit kit Installation instructions Standard wheel lock assembly Exploded view Reverse stop for 20-inch Reverse stop for 20-inch wheel with plastic rim assembly spoked wheel assembly Reverse-roll Reverse-roll lock assembly lock assembly Spacer 0.125 Standard wheel lock assembly Spacer...
- Page 24 Accessories KidWalk size 2 24-inch installed Exploded view Reverse stop assembly Spacer 0.125 Assembly Standard wheel lock Nut adjustment KidWalk/KidWalk II...
- Page 25 Accessories Sliding foot guide KidWalk/KidWalk II size 1 Step 1 Remove the axle pins and take off the front wheels. Step 2 A view of the entire guide assembly is found below. Guide bracket Front bra- Guide block cket 5/16 nut Step 3 Assemble the two rear guide brackets.
- Page 26 Accessories Step 4 Cap screw, Assemble the front halves of the brackets short using the socket head cap screw. The threads of the bolts have to face out (A). Cap screw, long Front bracket with countersink Front bracket with thread Step 5 Ankle straps Then assemble the guide rods and ankle...
- Page 27 Accessories Sliding foot guide KidWalk/KidWalk II size 2 Step 1 Remove the axle pins and take off the two front wheels. Step 2 A view of the entire guide assembly is found below. Guide bracket Front bracket Guide block Button head Step 3 screw Assemble the two rear guide brackets.
- Page 28 Accessories Step 4 Assemble the front halves of the brackets using the socket head cap screws. The threads of the bolts have to face out (A). Cap screw, short Cap screw, long Front bracket with countersink Front bracket with thread Step 5 Then assemble the guide rods and ankle straps.
-
Page 29: Limited Warranty
LIMITED WARRANTY Warranty coverage is extended to the original purchaser of the Prime Engineering product. This warranty applies for the KidWalk/KidWalk II Dynamic Mobility System. Prime Engineering, Inc. (“the company”) shall repair or replace the product that fails due to defects in materials or workmanship per the following schedule: Frame: Three years to the original purchaser subject to the following terms, limitations and... - Page 30 KidWalk/KidWalk II...
- Page 31 KidWalk/KidWalk II...
- Page 32 BT28 2SA Northern Ireland United Kingdom T: 028 92600750 E: info@leckey.com W: www. leckey.com Prime Engineering A Division of Axiom Industries, Inc. 4202 W. Sierra Madre Ave. Fresno, CA 93722 USA Toll-free: +1 (800) 827-8263 Tel.: +1 (559) 276-0991 Fax:...
Need help?
Do you have a question about the Prime KidWalk and is the answer not in the manual?
Questions and answers