
Summary of Contents for Go Xpress 68
- Page 1 Xpress 68 68"Industrial Oil Based 3-in-1 Calendar System with Extension Table SUBLIMATION PRESSES User’s Manual Copyright © 2018 Graphics One...
- Page 2 Catalogue Chapter 1 Preface 1.1 Attention 1.2 Main technical data Chapter 2 Brief introduction to products 2.1 Model 2.2 Directions to appearance and all parts Chapter 3 Installation and connecting wire 3.1 Installation 3.2 Connecting wire 3.3 Electrical control schematic figure Chapter 4 Operation &...
-
Page 3: Chapter 1 Preface
Chapter 1 Preface X-Press 68 is a type of rotary digital presses. It is adopted electric heating diversion around oil layer, fast temperature rising, stable temperature on cylinder surface, four shafts interlock, blanket disengaging mechanical structure. It is applied for garment sheets, fabric rolls, flags, socks, blanket and curtain, ect. 1.1 Attention This manual offers installation, debugging, parameter set, trouble-shooting, operation and attention. - Page 4 corrosive liquid to clean it or put hard object inside to scratch the surfaces. 1.2 Main technical data Model: 377-170-ET Method of power supply: Three-phase and four-line Input voltage: 380V/220V Frequency: 50-60HZ Rating power: 15KW ( motor power is 0.75KW) Input current: 38A Timing turn-off: 1-12 hours Blanket: 1.73M(Width)×2.43M(Perimeter)
-
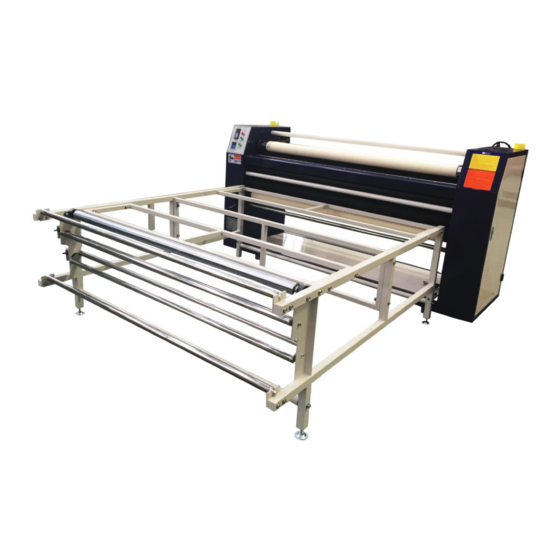
Page 5: Chapter 2 Brief Introduction To Product
Chapter 2 Brief introduction to product 2.1 Model 377-170-ET 2.2 Explanation to appearance and all parts ⑴Left box ⑵Temperature control device ⑶General power supply button ⑷Heating button ⑸Frequency conversion controller ⑹Converter startup button ⑺Paper feeding (put-in) groove ⑻Hand knob for cloth fabric shaft ⑼Cloth fabric shaft ⑽Directional wheel ⑾Directional wheel... - Page 6 ⑿Door knob ⒀Right box ⒁Heating tube body ⒂Blanket Configuration of inner right box ⑴Separate shaft ⑵Heating tube body shaft casing ⑶Pressing fabric shaft ⑷Balance shaft ⑸Pressing fabric synchronizing shaft ⑹Chain ⑺Motor ⑻ Adjustable shaft ⑼Balance shaft ⑽Separate handwheel The blanket may be separate tube body or reset while in rotation ⑾Separate reductor ⑿Overhaul manhole...
- Page 7 Inner configuration of left box ⑴Separate shaft ⑵Protection shaft ⑶ Pressing fabric Shaft ⑷Balance shaft ⑸Pressing fabric synchronizing shaft ⑹Electric appliance control board ⑺Adjustable shaft ⑻Yoke electric ring(in protection cover) ⑼Balance shaft ⑽Separate synchronizing shaft ⑾Overhaul manhole Copyright © 2018 Graphics One...
-
Page 8: Chapter 3 Installation And Connecting Wire
Chapter 3 Installation and connecting wire 3.1 Installation A Check that all screws in mainframe are loose or not, tighten if loose. B The whole machine should be set at level with enough capacity; wood frame to overhead the sliding wheel and level direction is preferred. C This machine is used at environment of ventilating, dry, noncorrosive gas and no inflammable and explosive material around the equipment. - Page 9 Converter Input ∠ ∠ ∠ Output Electrical heater Motor 3.3 Electrical control schematic figure Electrical heater Copyright © 2018 Graphics One...
-
Page 10: Chapter 4 Operation And Control
Chapter 4 Operation and control 4.1 Normal operation of mechanical part Check if mechanical drive part is normal or not before working and then lift feeding pressure beam to adjust the tension force of blanket. Start to work till qualified temperature. - Page 11 g Adjustment of blanket ①Power cabinet ②Adjustable core A ③Adjustable core B ④Electric control cable For the affection of level and attraction force, the blanket in printing machine will be drifting. The drifting adjustable core in this machine can be used as followings: If the blanket drifts to right( to power cabinet),insert T type hex key wrench-set into screw thread uropore in adjustable core A and then revolve at the direction of anti-clockwise ,otherwise, if drift to left(to electric control cabinet, adjustable core B at...
- Page 12 Attention: cloth and paper must be vertical to big rotary drum. Use hand to lift the pressing fabric handle on electric control cabinet and then press on fabric by green rod into machine. When rotary rod and blanket have seized cloth, use hand to low the handle to make pressure beam hold on at air.
-
Page 13: Chapter 5 Elimination Of Frequent Malfunction And Maintenance
Chapter 5 Elimination of Frequent Malfunction and maintenance 5.1 Elimination method of Frequent Malfunction Phenomenon Cause Elimination method Too small of inlet for power supply Replace the path of inlet in and too big of voltage pressure drop power supply Lack phase loose... - Page 14 5.2 Daily maintenance 1.Check dust in machine and clean all part to keep clean. 2.Check if reductor and chain are normal or not, immediately deal with it if abnormal. 3.Check the connection, deal with movement and burning. 4.Clear off converter, radiator and outer shell. 5.Check if there are any other things around the fan.
Need help?
Do you have a question about the Xpress 68 and is the answer not in the manual?
Questions and answers