Table of Contents
Advertisement
User's Manual for MK2XXX V1.0
Welcome to use Our Injection Molding Machine Control System
Danger
Cautions
Safety Cautions
(Please read it before installation)
1. When the exterior power supply is abnormal or the control system
breaks down, make sure the safety circuit is installed outside the
control system in order to make the entire system work safely.
2. When abnormal situations occur, such as the control system unable
to test the input/output, the output can not be controlled; in order to
make the machine opera te safety , for the output sign al related to majo r
accid ent, please design the exterior safety circu it or protection device.
3. The emergency door safety device is the core safety part of the
injection molding machine. Make sure related safety protection
devices for machine and oil line are added outside.
1. Others except the trained and qualified professional technicans
are not allowed to install and maintain this system.
2. When a valuable or large die is used, the travel control method
must be adopted to use the neutron; otherwise, the control system
can not guarantee the safety of the die.
P O R C H E S O N
R
Ⅰ
Preface
Advertisement
Table of Contents

Summary of Contents for Porcheson MK2 Series
- Page 1 User's Manual for MK2XXX V1.0 Preface Welcome to use Our Injection Molding Machine Control System Safety Cautions (Please read it before installation) 1. When the exterior power supply is abnormal or the control system breaks down, make sure the safety circuit is installed outside the control system in order to make the entire system work safely.
- Page 2 Statement Please read the manual carefully before you use this syst em. PORCHESON Company will only be resp onsible for the maintenance of the problems exist in the system itself, and will not be responsible for the fault caused by improper operat ion,...
- Page 3 User's Manual for MK2XXX V1.0 Preface System Configuration & Installation Button Operation specification Line of MK2XXX Operator's Manual Explanation of the Parameter/ Function Setting Production management Explanation of the System Debugging and Setting Input/output State Detection Reference & Appendices All copyrights are reserved, any duplication without the prior authorization shall be forbidden.
-
Page 4: Table Of Contents
Contents User's Manual for MK2XXX V1.0 Contents Chapter 1 System Configuration & Installation 1. System Configuration & Remarks Characteristics of MC2000A Control System 1Cautions upon Installing the Control System Chapter 2 Specifications of the Button-Pressed Operations Figure of Keyboard on the Operation Panel (See the figure below) Explanation of the Functional Keys 3. - Page 5 Contents User's Manual for MK2XXX V1.0 The servo -real time curve page the History curve page of servo page 12.the temperature tracking curve page the temperature monitor page the injcetion speed curve page USB setting page (for options) Chapter 5 Instructions for the System Commissioning Settings 1.
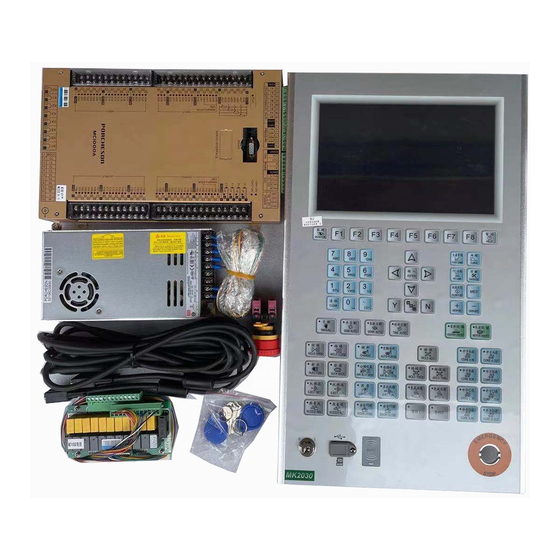
- Page 6 Chapter 1 System Configuration & Installation User's Manual for MK2XXX V1.0 Chapter 1 System Configuration & Installation 1. System Configuration & Remarks number code content remarks 1 set MC1000A optio nal 1.host Computer For specifications please 1 set MC2000A refer to appendix 11Model 1 set selection chart MK2020...
- Page 7 PORCHESON fine adjust teeth number mold open finished high pressure mold close back door 2 Low pressure mold close MC2000A...
- Page 8 Chapter 1 System Configuration & Installation User's Manual for MK2XXX V1.0 3.2.Inspection of the Control System (1)After installation completed, carry out an over all inspection if all connection lines are well fixed including the switching power supply, host computer shell, electrothermal output line and the thermal couple of keyboard.
- Page 9 Chapter 1 System Configuration & Installation User's Manual for MK2XXX V1.0 XCOM XCOM XCOM XCOM Safety Door Wiring Diagram (for reference only) ★ Safety Doors * Special Explanation: When X00=ON/X15=OFF or X00=OFF/X15=ON closing/opening the doors, or in case of other abnormal conditions, the system will issue an alarm 2 seconds later for Safety Door Failure and simultaneously terminate all operating output.
-
Page 10: Figure Of Keyboard On The Operation Panel (See The Figure Below) P5
Chapter 2 Explanation of the Key Operations User's Manual for MK2XXX V1.0 Chapter 2 Explanation of the Key Operations 1. Figure of Keyboard on the Operation Panel (See the figure below) P O R C H E S O N... -
Page 11: Explanation Of The Functional Keys P6
Chapter 2 Explanation of the Key Operations User's Manual for MK2XXX V1.0 2. Explanation of the Functional Keys keys usage F1 for setting page of mold opening/closing F2 for setting pages of injection/pressure holding and injection F3 for setting pages of feeding/screw back /auto purging F4 for setting pages of seat stand &... - Page 12 Chapter 2 Explanation of the Key Operations User's Manual for MK2XXX V1.0 usage keys Enter into page of USB setting Enter into page to set alarm Enter into page to injection, servo temp curve Enter into pages to set production data & SPC Tracking For entering into MES production management page When cursor moves to such as the time setup location,1 will be automatically increased with each pressing on this key.
-
Page 13: Explanation Of The Parameter Setting Button P8
Chapter 2 Explanation of the Key Operations User's Manual for MK2XXX V1.0 3. Explanation of the Parameter Setting 0-9 numeric keys are used for data input in the data settingpage. When electric lock is in “OFF”State, These ten numbers are locked to ensure the data will not be chan ged arbi trari ly. -
Page 14: Operation Mode Selection Key P9
Chapter 2 Explanation of the Key Operations User's Manual for MK2XXX V1.0 6. Operation Mode Selection Key Keys Usage Remarks Pressing this key will enter the system Ther e is an indi cat or on the left upper into manual state. of all keys. - Page 15 Chapter 2 Explanation of the Key Operations User's Manual for MK2XXX V1.0 Keys Usage Operation Conditions 1.if use time-inject,inject time not reached 2.if use position,not reached inject final position Injection Operation 3.all sections of temp in charging barrel must within set range (no temp alarms)and cool boot for screw timing is up 1.if E-ru ler not bein g used,suck back time not rea ched 2.if E-ru ler bein g used,not rea ched suck back term ina tion posit ion...
- Page 16 Chapter 2 Explanation of the Key Operations User's Manual for MK2XXX V1.0 Keys Usage Operation Conditions 1. female blowing optional female blowing opeation 2. female blowing time not completed 1 .nozzle advance lim it not being used,no conditio n 2. nozzle advacne lim it being used,a not reached nozzle advance stop nozzle advance operation positio n b.tim ing for nozzle advance slow not reached nozzle retrea t operation...
- Page 17 Chapter 2 Explanation of the Key Operations User's Manual for MK2XXX V1.0 Keys Usage Operation Conditions core B being used core B retreat not reached termination position or time core B retreat operation not completed ejector retreat reached position or ejector retreat time is up Core C being used core C advance not reached termination position or time core C advance operation...
-
Page 18: Setting Scope Of Numeric Items
Chapter 2 Explanation of the Key Operations User's Manual for MK2XXX V1.0 Keys Usage Operation Conditions line of Mk2030 Keyboard core B being used core B retreat not reached termination position or time Standby operatio n keys not completed ejector retreat reached position or ejector retreat time is up line of Mk2030 Keyboard Core C being used core C advance not reached termination position or time... -
Page 19: Chapter 3 Descriptions On Setting Parameters/Functions
Connect with power, turn the red urgent stop switches, the operation light of the computer- RUN-flickers, the following menu shown on the display, now the control system is running and it is ready to operate the machine. PORCHESON Monitor 2016-07-26 16:33:30... -
Page 20: The Descriptions On Display P15
Chapter 3: Descriptions on setting parameters/functions User's Manual for MK2XXX V1.0 2.The descriptions on display: Display Meanings and descriptions The running mode of the machine; Manual Injector This section is heating; The current mold number; Mold number System records the open mold times for the current mold no during the Current mold number process of auto running. - Page 21 快速设定 CELERITY SET Press key, enter the menu for fast setup information, now as following: Fast setup PORCHESON 2016-07-26 16:33:30 slow speed fast speed middle speed low pressure high pressure 7Segment 6Segment 5Segment 4Segment 3Segment 2Segment 1Segment pressure (bar) 25.0...
-
Page 22: Set Moid Close/Open Information
User's Manual for MK2XXX V1.0 4. Set moId close/open information Press key, enter the menu for setting mold close information , now the menu is as followi ng: PORCHESON Mold close/open 2016-07-26 16:33:30 mold open total no Mould slow speed... - Page 23 Chapter 3: Descriptions on setting parameters/functions User's Manual for MK2XXX V1.0 Mold-closed terminated & high pressure holding means high-pressure mold closed is (5). terminated and X03 got signal and then hold high pressure until it is finished. Action Middle Fast Slow Pressure Flux...
-
Page 24: The Injection/ Hold Pressure Setup Information P19
Press key , ent er the inject ion/ hold pres sur e set up infor mation , now the menu is as following: PORCHESON Injection/ hold pressure setup 2016-07-26 16:33:30 mold open total no Mould 7Segment 6Segment 5Segment 4Segment 3Segment 2Segment 1Segment... - Page 25 Chapter 3: Descriptions on setting parameters/functions User's Manual for MK2XXX V1.0 (2). Switch to pressure holding:There are【time】【position】and 【pressure】.It will start to count when intering into process of injection when 【time】is selected and it will switching to pressure holding;when 【position】is selected,the screw position of injection movement less or equal to position of pressure holding namely swithching to pressure holding;and when 【pressure】is selected the detection pressure of injection is large or euqal to pressure of the one of pressure switch then it switch to pressure holding.And it will switch to pressure holding regardless of...
-
Page 26: The Injection Function Setup Information P21
6. the injection function setup information Pres s key two times, enter the inje ction function setup info rmation , now the menu is as following : PORCHESON injection function setup 2016-07-26 16:33:30 mold open total no Mould system pressure injectio n delay 45.0... -
Page 27: The Feed/Suck Back/Auto Clear Data Setup Information P22
7. The Feed/suck back/Auto clear data setup information 储 料 FEEDING Press key , enter the Feed/suck back/Auto clear data setup information ,now the menu is as following: PORCHESON Feed/suck back/Auto clear 2016-07-26 16:33:30 mold open total no Mould Forwarde Suck Back Feed 1 Feed 2... - Page 28 Times of material clearing up Feed Suck Back [Yes] Press key two times, to enter into Feed/suck back/Auto clear function setup page which will be as folowing: PORCHESON Feed/suck back/Auto clear 2016-07-26 16:33:30 mold open total no Mould Forwarde Feed Cooling Feed delay 45.0...
- Page 29 Chapter 3: Descriptions on setting parameters/functions User's Manual for MK2XXX V1.0 Feed back pressure :There are 【Disab le】【Enable】available.When sel ect 【Enable】,Y42 of (6). feed ing back pressure ,feed rat io are syn c output during feed motions;otherw ise,no worki ng. Auto purging:There are 【Disab le】【Enable】avail able.When sel ect 【Enable】and system will (7).
- Page 30 User's Manual for MK2XXX V1.0 8. Nozzle/Mold adjustment data setup Press key to enter into nozzle/mold adjustment data setup page which will be as folowing: nozzle/mold adjustment PORCHESON 2016-07-26 16:33:30 mold open total no Mould system pressure Nozzle advance 1...
- Page 31 Chapter 3: Descriptions on setting parameters/functions User's Manual for MK2XXX V1.0 for mold ajust advance , mold adjust retreat is to be set in fine adjustmet column.It will hint [Auto mold adjust finished] (7).Initial mold adjust -advance teeth no:under auto mode,the teeth no that readjust after the first time to touch X03 switch.
-
Page 32: Set The Ejector Forward Information P26
Chapter 3: Descriptions on setting parameters/functions User's Manual for MK2XXX V1.0 9. Set the ejector forward information Press key to enter into ejector setup page which will be as folowing: Ejector setup PORCHESON 2016-07-26 16:33:30 mold open total no mould system pressure ejector return 2... - Page 33 Chapter 3: Descriptions on setting parameters/functions User's Manual for MK2XXX V1.0 Retaining function is for retaining pressure,speed and starting retaining time for the output after ejecting forward completed. The retaining movement is completed as soon as the time is over. (8).Stop holding:There are[Enable],[Disable] available, under semi-auto ,the mode for ejector choose Stop and the flow is :ejector advance-stop----hold(time is up or open/close safe door)------cycle over;otherwise,ejector advance-stop-----cycle over.
-
Page 34: Set Core Information P28
User's Manual for MK2XXX V1.0 10. Set core information Press key, enter the menu for set ting core inform ation, now the menu is as following: Core setup PORCHESON 2016-07-26 16:33:30 mold open total no Mould Core A in Core B in... -
Page 35: Lubricating/Blowing Data Setup P29
User's Manual for MK2XXX V1.0 11. Lubricating/blowing data setup Press key twice to enter into lubricating/blowing setup page whi ch will be as following: Blowing/Lubircating PORCHESON 2016-07-26 16:33:30 mold open total no Mould male mold blow 1 femail mold blow 1... - Page 36 Chapter 3: Descriptions on setting parameters/functions User's Manual for MK2XXX V1.0 (11).Oil lack delay alarm:[Disable] and [Enable] are optional.When select [Enable],it will alarms [lubr icating pressure low] on the con dition of lubr icating out put cou nting is up and X11 of lubr ication pressure is off and remain set value,and auto status,s cycle over swiitching to manual;otherwise not switching to manual.
-
Page 37: The Temperature Setup Information P31
TEMP. Press key, enter the menu for setting temper ature information , now the menu is as followi ng: The temperature setup PORCHESON 2016-07-26 16:33:30 Ejector 1segment 2segment 3segment 4segment 5segment 6segment 7segment 8segment 9segment 10segment enable enable enable enable... -
Page 38: Set Blowing Data Setup P32
13. Set blowing data setup Press key tw ce to enter into page of blowing which will be as following: The blowing setup PORCHESON 2016-07-26 16:33:30 section 1 blow section 2 blow section 3 blow section 4 blow section 5 blow enable enable... -
Page 39: Pre-Warming Data Setup P33
Chapter 3: Descriptions on setting parameters/functions User's Manual for MK2XXX V1.0 14. Pre-warming data setup Press key three times to enter into pre-warming setup page which will be as following: Warm-up setup PORCHESON 2016-07-26 16:33:30 enable warming on time monda y tuesday... -
Page 40: Special Parameter/Time Setup P34
Chapter 3: Descriptions on setting parameters/functions User's Manual for MK2XXX V1.0 15. Special parameter/time setup Press key on main page to enter itnto special paramter/time setup which will be as following: special parameters setup PORCHESON 2016-07-26 16:33:30 time setup special parameter 1.00 full-auto re-cycle... - Page 41 Chapter 3: Descriptions on setting parameters/functions User's Manual for MK2XXX V1.0 (6) Move the cursor to select the [special parameters>>] button, press the input button, a new page will pop up. At this time, the screen displays as follows: System menu Next special parameters setup sales log in scheme 1...
- Page 42 Chapter 3: Descriptions on setting parameters/functions User's Manual for MK2XXX V1.0 (7) Move the cursor to select[language conversion>>]button, press the input button, a new page will pop up. The screen displays as follows: System language Return English Chinese Japanese Korean Vietnamese Russian Turkish...
-
Page 43: Set Ethernet Information P37
Chapter 3: Descriptions on setting parameters/functions User's Manual for MK2XXX V1.0 16. Set ethernet information Move the cursor to select [Ethernet] button, press the enter button to eject a new page, which will display the following information: Ethernet/ CAN-Bus Configurat ion Return Ethernet Setup CAN Setup... -
Page 44: User Management P38
Chapter 3: Descriptions on setting parameters/functions User's Manual for MK2XXX V1.0 17.user management User management data setup:move cursor to press【user management】button and then the page will be as below: User manage Return Modify No user login in Current user Delete Login Record NO Page NO... - Page 45 Chapter 3: Descriptions on setting parameters/functions User's Manual for MK2XXX V1.0 d、 new account no: means the account no for log in e、 input password:means the password no for log in f、 Password confirmation:input the password again to confirm its accuracy g、...
- Page 46 Chapter 3: Descriptions on setting parameters/functions User's Manual for MK2XXX V1.0 a、User deletion:single operation﹑continuous users will be deleted in bulk operation mode(prudent operation) 7.user list User manage Return Page NO Login Muit-use Boot login OFF Output count User name Level Enter date/time Log-on date/time Running time...
-
Page 47: Mes
Chapter 3: Descriptions on setting parameters/functions User's Manual for MK2XXX V1.0 18.MES---setup of injection molding workshop management system(optional) Press key three times,and then MES--function page will be showed as below: PORCHESON MES functions selection 2016-07-26 16:33:30 Selection of production type Selection of Production order Number... - Page 48 Chapter 3: Descriptions on setting parameters/functions User's Manual for MK2XXX V1.0 Production Order No PORCHESON selection 2016-07-26 16:33:30 execute or not Current production Order No Production Order No production No Shift Order No Mould No Number Finish time Pre-Production Q. Produced q. Defected q.
- Page 49 Chapter 3: Descriptions on setting parameters/functions User's Manual for MK2XXX V1.0 PORCHESON machine halt types selection 2016-07-26 16:33:30 machine halt types Current machine halt types execute or not Number Status of machine halt Number Status of machine halt Arlam change mould...
-
Page 50: Chapter 4 Production Management
1. Set setup Imformation 生产管理 Press key to enter into production management page and press key for setup production FLOW CHART which will be as following: production setup PORCHESON 2016-07-26 16:33:30 Setup mold number Output number Good product inferior product Warning Qty reset... -
Page 51: Mold Data Setup
2. mold data setup 生产管理 Press FLOW CHART key to enter into production management page and press key for mold data setup which will be as following: PORCHESON mold data setup 2016-07-26 16:33:30 mold number Read Save Delete A Cup... - Page 52 Press key enter the statistics , output FLOW CHART now the menu is as follows: amend ment history PORCHESON 2016-07-26 16:33:30 up page down page record times display initi al sequnce no record clear...
- Page 53 Press key to enter into produ ction manag ement pag e and press key for SPC tracking FLOW CHART record 1 pag e which will be as foll owing: PORCHESON SPC tracing record 1 2016-07-26 16:33:30 up page sampling interval...
-
Page 54: Spc Tracking Record 1 P47
Press key to enter into produ ction manag ement pag e and press key for SPC tracking FLOW CHART record 2 pag e which will be as foll owing: PORCHESON SPC tracing record 2 2016-07-26 16:33:30 up page sampling interval... -
Page 55: Spc Tracking Record
6. SPC Tracking record 3 生产管理 Press key to enter into production management page and then press key for SPC FLOW CHART tracking page 3 which will be as following: PORCHESON SPC tracking record 3 2016-07-26 16:33:30 samping again auto monitor disable disable... -
Page 56: The Incident Track
Press key to enter into production management page and then press key for FLOW CHART incident track back page 3 which will be as following: PORCHESON The Incident track back page 2016-07-26 16:33:30 display initial sequence NO Page up Page down... -
Page 57: The Output Statistics Iformation P51
Press key to enter into flow chartand then Press key enter the statistics , output FLOW CHART now the menu is as follows: statistics PORCHESON Output 2016-07-26 16:33:30 Search/Delete Last day Clear intra date Seach date 2016-06-29 Next day Clear all... -
Page 58: The Injection Curve Page
曲 线 Press key to enter into curve , and press key,enter injection curve management CURVE page which will be as below: Injection curve PORCHESON 2016-07-26 16:33:30 repeat times Max .pressure Max.speed mm/s 140.0 inject pressure setup Display injection setup... -
Page 59: The Servo -Real Time Curve Page
10. The servo -real time curve page Press key to enter into curve management then Press key enter the actual curve page now the menu is as follows: PORCHESON Servo-real time curve 2016-07-26 16:33:30 Injection Repeated times movement selection sampling cycle amplification factor... -
Page 60: The History Curve Page Of Servo Page
11.the History curve page of servo page Press key to enter into curve management and then press key to enter the curve page of servo history which the page will be as below: The servo historyCurve PORCHESON 2016-07-26 16:33:30 Data collection Start Clear record sampling cycle... -
Page 61: The Temperature Tracking Curve Page
Press key enter the tracking curve page now the menu is as follows: Temp. tracking curve PORCHESON 2016-07-26 16:33:30 Selection of display Nozzle injection curve Servo -real time History curve Temperature curve temperature monitor injcetion speed Temperature collection... -
Page 62: The Temperature Monitor Page
Pres s key to ent er into curve managem ent and then pres s key to ent er the tempera ture monit or which the page will be as bel ow: temperature monitor PORCHESON 2016-07-26 16:33:30 Ejectio n Seg1 Seg2 Seg3... -
Page 63: The Injcetion Speed Curve Page
14.the injcetion speed curve page Pres s key to ent er into curve managem ent and then pres s key to ent er inject ion speed curve the page will be as bel ow: PORCHESON Injection Curve 2016-07-26 16:33:30 Injection sampling cycle... -
Page 64: Usb Setting Page (For Options) P58
User's Manual for MK2XXX V1.0 Chapter 4 production management 15. USB setting page (for options) PC连接 Press key; enter USB setting page. and it is as follows: PC LINK USB set system USB up/download option data operation: download data area:system program update area : Upload update OPW IN.PS6 :... - Page 65 User's Manual for MK2XXX V1.0 Chapter 4 production management Selects 【addition】 ;new photo will be added after deleted all exist photos when selects (b) photo uploading:【addition】、【replacement】optional.Only new photo will be added when 【replacement】 (c) Entering into normal page: 【counting reached】 、 【input】optional.One photo will be automatically displayed after every interval time in [counting reach] mode;photos will be automatically played in turn after every interval time in [input] mode and then press [input] key to enter into normal page.
-
Page 66: Chapter 5 Instructions For The System Commissioning Settings
Chapter 5 Instructions for the System Commissioning Settings 1. Engineer Setting Page Press [ ]/-. Key the Main Page to enter the Engineer Setting , and the following will be displayed: PORCHESON Engineer setup 2016-07-26 16:33:30 delay setup cancellatin of log in... -
Page 67: Action Delay Setting Page
Chapter 5 Instructions for the System Commissioning Settings User's Manual for MK2XXX V1.0 2. Action Delay Setting Page Entering Engineer Page, press Key , enter the action Delay setup Page. The following is displayed: Actio n delay Setup PORCHESON 2016-07-26 16:33:30 Begin Begin Begin Action Action... -
Page 68: Time Delay Setting Page
3. Time Delay Setting Page Entering Engineer Page, press Key two times , enter the time Delay setup Page. The following is displayed: Time delay Setup PORCHESON 2016-07-26 16:33:30 Mold close delay Core A in delay Nozzle advance delay Core A out delay... -
Page 69: Slope Setup
User's Manual for MK2XXX V1.0 4. Slope Setup Page 1 Enter into engineer page and then press key one time for pressure slope page 1 which will be as following: PORCHESON Slope Setup 1 2016-07-26 16:33:30 slow mold close Pressure slope:bar/s、flow solpe: %/s... -
Page 70: Slope Setup
Chapter 5 Instructions for the System Commissioning Settings User's Manual for MK2XXX V1.0 5. Slope Setup Page 2 Entering Engineer Page, press Key two times,enter into Slope Page 2,The following is displayed: PORCHESON Slope Setup 2 2016-07-26 16:33:30 P 降 P 降 P 降... -
Page 71: Pressure Pre-Adjustment P1 Page
Chapter 5 Instructions for the System Commissioning Settings User's Manual for MK2XXX V1.0 6. Pressure Pre-Adjustment P1 Page Entering Engineer Page, press Key , enter the Pressure Pre-Adjustment P1 Page.The following is displayed: Pressure Pre-adjustment P1 PORCHESON 2016-07-26 16:33:30 Pre-adjust minimum current Disabl e 1000 Flow pre-adjust... -
Page 72: Flow Pre-Adjustment F1 Page
User's Manual for MK2XXX V1.0 7. Flow Pre-Adjustment F1 Page Entering Engineer Page, press Key two times, to enter the Flow Pre-Adjustment F1 Page.The following is displayed: Flow Pre-adjustment F1 PORCHESON 2016-07-26 16:33:30 Pre-adjust minimum current Disabl e 1000 1000... -
Page 73: Back Pressure Pre-Adjustment P2 Page
8. Back pressure pre-adjustment P2 page Ent ering Engi neer Pag e, press Key three times , enter the b pressure pre-Adjustment P2 Pag e.The following is displayed: Pressure Pre-adjustment P2 PORCHESON 2016-07-26 16:33:30 Pre-adjust minimum current Disabl e 1000... -
Page 74: Flow Pre-Adjust F2 Page
User's Manual for MK2XXX V1.0 9. Flow pre-adjust F2 page Enter into engineer page and then press key four times for flow pre-adjust page which will be as following: Flow Pre-adjustment F2 PORCHESON 2016-07-26 16:33:30 Pre-adjust minimum current Disabl e 1000... -
Page 75: Pressure Pre-Adjustment Dac1 Page
User's Manual for MK2XXX V1.0 10. Pressure pre-adjustment DAC1 page Enter into engineer page and press key five times for pressure pre-adjustment DAC1 page which will be as following: Pressure Pre-adjustment DAC1 PORCHESON 2016-07-26 16:33:30 Pre-adjust minimum current Disabl e 1000... -
Page 76: Flow Pre-Adjust Dac2 Page
User's Manual for MK2XXX V1.0 11. Flow pre-adjust DAC2 page Entering Engineer Page, press Key two times, to enter the Flow Pre-Adjust DAC2 Page.The following is displayed: Flow Pre-adjustment DAC2 PORCHESON 2016-07-26 16:33:30 Pre-adjust minimum current Disabl e 1000 Pressure pre-adjust 3881 90.0... -
Page 77: Back Pressure Pre-Adjust Dac3 Page
User's Manual for MK2XXX V1.0 12. Back pressure pre-adjust DAC3 page Entering Engineer Page, press Key , enter the Pressure Pre-Adjustment DAC3 Page. The following is displayed: Pressure Pre-adjustment DAC3 PORCHESON 2016-07-26 16:33:30 Pre-adjust minimum current Disabl e 1000 Flow pre-adjust... -
Page 78: Flow Pre-Adjustment Dac4 Page
User's Manual for MK2XXX V1.0 13. Flow Pre-Adjustment DAC4 Page Entering Engineer Page, press Key two times, to enter the Flow Pre-Adjustment DAC4 Page.The following is displayed: Flow Pre-adjustment DAC4 PORCHESON 2016-07-26 16:33:30 Pre-adjust minimum current Disabl e 1000 Pressure pre-adjust 3881 90.0... -
Page 79: Pressure Pre-Adjustment P3 Page
User's Manual for MK2XXX V1.0 14. Pressure Pre-Adjustment P3 Page Entering Engineer Page, press Key , enter the Pressure Pre-Adjustment P3 Page. The following is displayed: Pressure Pre-adjustment P3 PORCHESON 2016-07-26 16:33:30 Pre-adjust minimum current Disabl e 1000 Flow pre-adjust... -
Page 80: E-Ruler/Pressure Sensor/Magnetic Suspension Displacement Sensor P74
Chapter 5 Instructions for the System Commissioning Settings User's Manual for MK2XXX V1.0 15. E-ruler/Pressure sensor/Magnetic suspension displacement sensor Enter into enginner page and press key for E-ruler/Pressure sensor/Magnetic suspension displacement sensor page: PORCHESON PORCHESON Electronic ruler 1 Electronic ruler 1 2016-07-26 16:33:30 2016-07-26 16:33:30... -
Page 81: Special Function Options Page
Chapter 5 Instructions for the System Commissioning Settings User's Manual for MK2XXX V1.0 16. Special Function Options Page Entering Engineer Setting Page, press Key to enter the Special Function 1 Options Page. The following is displayed: Chose special function 1 motor idle auto stop mold open stop ran ge Disable... - Page 82 Enter into engineer page and press key twice for speical function setup page which will be as following: Special function selection PORCHESON 2016-07-26 16:33:30 rear door open and motor stop Disabl e door open fast pressure 60.
- Page 83 User's Manual for MK2XXX V1.0 Enter into enginner page and press key three times for special function setup page which will be as following: Special function selection 3 PORCHESON 2016-07-26 16:33:30 mold close install mold pressure mold close high pressure -pressure core pressure 60.
- Page 84 User's Manual for MK2XXX V1.0 Enter into engineer page and press key four times for special function set page which will be as following: Function 3 - PORCHESON oil pump distribution 2016-07-26 16:33:30 to next setup pump output oil pump distribution way flow from 0.1%...
-
Page 85: Servo Driver Setup Page
17. Servo Driver Setup Page 监 视 MONITOR Press key to enter the servo driver setup page with the display as follows: Servo Driver Monitoring Parameters PORCHESON 2016-07-26 16:33:30 ==== Servo Driver NO serv o connection status display Normal Operation Status Pressure Setup 140.0... - Page 86 Chapter 5 Instructions for the System Commissioning Settings User's Manual for MK2XXX V1.0 PORCHESON Selection V-Type Selection Parameters 2016-07-26 16:33:30 parameter modification password operatio n hint operatio n confirm not ready System Response Proportion Base Pressure System Response Integral Base Flow...
- Page 87 Chapter 5 Instructions for the System Commissioning Settings User's Manual for MK2XXX V1.0 PORCHESON multi- group PID selection 2016-07-26 16:33:30 storing 1 Mold closing slowly/fastly low pressure mold closing storing 2 high pressure mold closing injection retreat Mold opening slowly...
-
Page 88: Shift Function Setup Page
Chapter 5 Instructions for the System Commissioning Settings User's Manual for MK2XXX V1.0 18. Shift function setup page After entering the correct password, press Key to enter the Standby Function Setting Page. The following is displayed: PORCHESON Shift function 2016-07-26 16:33:30 Hint:0.OFF 1.ON delay slope pre-adj. -
Page 89: Programmable Standby Function Page
Chapter 5 Instructions for the System Commissioning Settings User's Manual for MK2XXX V1.0 19. Programmable Standby Function Page After entering the correct password, press to enter the Programmable Page. following is displayed: PORCHESON Programmable Standby Function 2016-07-26 16:33:30 Segment out Manual +aut o Enable... -
Page 90: Temperature Parametersetting Page
Chapter 5 Instructions for the System Commissioning Settings User's Manual for MK2XXX V1.0 20. Temperature ParameterSetting Page After entering the correct password, press Key to enter the Temperature Parameter Setting Page. The following is displayed: PORCHESON tem p control param eter 2016-07-26 16:33:30 Function Ejector Enable... - Page 91 21. Machine No./Ex-Factory Value/ Time Setting Page After entering the correct password, press Key to enter the Machine No./Ex-Factory Value/ Time Setting Page. The following is displayed: PORCHESON Machine No./Ex-Factory Value 2016-07-26 16:33:30 Machine No Input conversion ABC enter timer to zero...
-
Page 92: Chapter 6 Input/Output Mode Inspection
Chapter 6 Input/Output Mode Inspection User's Manual for MK2XXX V1.0 Chapter 6 Input/Output Mode Inspection 1. Alarm history page 诊 断 Press DIAGNOSE key , to enter the alarm history page, and it is as follows: Alarm history page up page down record clear record item number Display start number 20... - Page 93 Chapter 6 Input/Output Mode Inspection User's Manual for MK2XXX V1.0 Source Alarm Solution Please check whether switches of rear safe Rear safe door unclosed Switches of X15 and X16 of rear safe door correctl y connect with ports X15 and door are in OFF status .
-
Page 94: Descriptions On Operation/Prompt Mode P89
Chapter 6 Input/Output Mode Inspection User's Manual for MK2XXX V1.0 Alarm Source Solution Machine stops when output of mach Solution: If you need the machine continues ine halt is started and the numbers of Running after the output reached, just set mould opening reached set value of Set output is reached The [stop after alarm] in produc tion menu... -
Page 95: Input Inspection Page
诊 断 Press key to enter into diagnose mode and then press key for input detection DIAGNOSE page Which will be as following: PORCHESON Input check 1 2016-07-26 16:33:30 lubricating oil level low X20 fine adj ust teet ch num ber... -
Page 96: Key Inspection Page
诊 断 Press key to enter into diagnose mode and then press key for Key Inspection DIAGNOSE page Which will be as following: Key check PORCHESON 2016-07-26 16:33:30 M00 manual M08 charge M16 female mold blow M01 semi-auto M09 auto purge... -
Page 97: Appendix 1: Mk2020 Keyboard Installation Dimension Layout P92
Chapter 6 Input/Output Mode Inspection User's Manual for MK2XXX V1.0 Appendix 1:MK2020 keyboard installation dimension Layout 35.5 6-M4X12 screw P O R C H E S O N... -
Page 98: Appendix 2: Mk2030 Keyboard Installation Dimension Layout P93
Reference & Appendices User's Manual for MK2XXX V1.0 Appendix 2:MK2030 keyboard installation dimension Layout 1 6. 8 6-M4X12 screw P O R C H E S O N... - Page 99 Reference & Appendices User's Manual for MK2XXX V1.0 Appendix 3:external dimensions for powee supply case and transformer PW450 POWER PACK 300,0 47,5 231,0 MC1000A manin coneroller Exterior dimensions and installation hole positon drawings for manin coneroller P O R C H E S O N...
- Page 100 Reference & Appendices User's Manual for MK2XXX V1.0 M C 2 0 0 0 A main controller 412,0 396,0 49,6 MC3000A main controller Exterior dimensions and installation hole position drawings for main controller P O R C H E S O N...
-
Page 101: Appendix 4: Mc2000A System Drawing P95
Reference & Appendices User's Manual for MK2XXX V1.0 Appendix 4:MC2000A system drawing PW450 Power pack P O R C H E S O N... -
Page 102: Appendix 5:Mc1000A Input And Outputwiring Diagram P96
Reference & Appendices User's Manual for MK2XXX V1.0 Appendix 5:MC1000A input and outputWiring Diagram Yellow Gray Analog out Power E-ruler /Magnetic railling ruler pressure check P1 Pressure P2 Pressure F1 Speed F2 Speed Dfeects servo interface manipulator emergency stop Defects mold closed allowable auto mode ejector forward finished... -
Page 103: Appendix 6:Mc2000A Input And Outputwiring Diagram P97
Defects back mold adject stop fully auto front mold adject stop ejec tor finishe d PORCHESON fine adjust teeth number mold open finished safe relay high pressure mold close back door 2 Low pressure mold close... -
Page 104: Appendix 7:Mc3000A Input And Outputwiring Diagram P98
Reference & Appendices User's Manual for MK2XXX V1.0 Appendix 7:MC3000A input and outputWiring Diagram MC3000A P O R C H E S O N 1 0 0... - Page 105 Reference & Appendices User's Manual for MK2XXX V1.0 Appendix 8:Motor Electric-Heating Wiring Diagram (for reference only) P O R C H E S O N 1 0 1...
- Page 106 Reference & Appendices User's Manual for MK2XXX V1.0 Appendix 9:Introduction of new type of patent double channel compensation linear sensor Linear sensor wiring diagram seechart1 SENSOR 图一 O U T P U T O U T P U T V1/V2 1 0 % - 9 0 % V 9 0 % (100%,9/1)
- Page 107 Reference & Appendices User's Manual for MK2XXX V1.0 Appendix 10:Magnetic suspension displacement sensor Digital impulse output is the most economic can reach effect of anti-interference digital signal output.First controller will send start pulse to sensor.Sensor will issue stop pulse correspondingly based on magnetic pitch position,And controller can calculate the time difference between two groups pulses and then calculate the precision displacement...
- Page 108 Reference & Appendices User's Manual for MK2XXX V1.0 开始/停止 传感器 控制模块 output digital pulse output (IP65 4pins connector) mounting 1=42.5mm mounting 2=42.5mm isolation mounting 3=50mm mounting Magnetic type 1=captive 3=die-casting 2=suspension 4=large suspension effective stroke(mm) Accept custom P O R C H E S O N 1 0 4...
- Page 109 Reference & Appendices User's Manual for MK2XXX V1.0 Appendix 11:Product selection table Mainframe selection chart M C 1 0 0 0 A M C 2 0 0 0 A M C 3 0 0 0 A Mainframe model specification 2 1 0 X 3 0 0 2 9 5 X 3 2 0 1 5 7 X 4 1 2 Outline size...
- Page 110 Reference & Appendices User's Manual for MK2XXX V1.0 Appendix 12:Product Guarantee Terms Product Guarantee Terms I. Our guarantee services are provided by our after-sale service center of all offices all over China and cover all products sold by us. II.Our products carry out one-month 3-R service and two-year (one year for LCD screen) free repair service.
Need help?
Do you have a question about the MK2 Series and is the answer not in the manual?
Questions and answers
I want a programme for carte pourchison ps660 **** machine injection 120ton